Kenwood DDX5706S Quick Start Guide - Page 7
Turning on the Unit, Press the, button., button for 1 second.
 |
View all Kenwood DDX5706S manuals
Add to My Manuals
Save this manual to your list of manuals |
Page 7 highlights
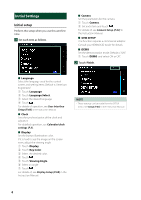
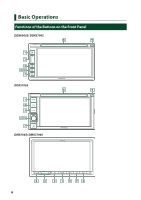
NOTE • The panels shown in this guide are examples used to provide a clear explanation of operations. For this reason, they may be different from the actual panels. Number Name 1 [ ]/HOME 2 S, R (Volume) 3 [ ]/CAM 4 [ ]/MENU 5 ATT 6 7 8 Disc insert slot 9 Remote Sensor Motion • Displays the HOME screen (P.10) in the Instruction Manual. • Pressing for 1 second turns the power off. • When the power is off, turns the power on. • Adjusts the volume. The volume will go up to 15 when you keep pressing. (DDX6906S/ DDX6706S/ DMX706S/ DMX7706S only) • Switches view camera display on/off (P.62) in the Instruction Manual. --The camera whose view is displayed first changes according to the "Camera Setup" setting and the shift lever position in the shift gate. • Displays the popup menu screen. • Pressing for 1 second turns the display off. (DDX5706S/ DMX706S/ DMX7706S only) • Switches attenuation of the volume on/off. (DDX5706S/ DMX706S/ DMX7706S only) • Pressing for 1 second switches attenuation of the volume on/off. (DDX6906S/ DDX6706S only) • Displays the APP (CarPlay/ Android Auto) screen. • Pressing for 1 second displays the Voice Recognition screen (P.58) in the Instruction Manual. • A slot to insert a disc media. (DDX6906S/ DDX6706S/ DDX5706S only) • Receives the remote control signal. Turning on the Unit The method of turning on is different depending on the model. 1 Press the [ ]/[HOME] button. DDX6906S/ DDX6706S DDX5706S ●●To turn off the unit: 1 Press the [ ]/[HOME] button for 1 second. NOTE • If it is your first time to turn the unit on after installation, it will be necessary to perform Initial setup (P.4). DMX706S/ DMX7706S hhThe unit is turned on. English 7
-
 1
1 -
 2
2 -
 3
3 -
 4
4 -
 5
5 -
 6
6 -
 7
7 -
 8
8 -
 9
9 -
 10
10 -
 11
11 -
 12
12 -
13
-
14
-
15
-
16
-
17
-
18
-
19
-
20
-
21
-
22
-
23
-
24
-
25
-
26
-
27
-
28
-
29
-
30
-
31
-
32
-
33
-
34
-
35
-
36
-
37
-
38
-
39
-
40
-
41
-
42
-
43
-
44
-
45
-
46
-
47
-
48
-
49
-
50
-
51
-
52
-
53
-
54
-
55
-
56
-
57
-
58
-
59
-
60
-
61
-
62
-
63
-
64
-
65
-
66
-
67
-
68
-
69
-
70
-
71
-
72
-
73
-
74
-
75
-
76
-
77
-
78
-
79
-
80
-
81
-
82
-
83
-
84
-
85
-
86
-
87
-
88
 |
 |
