Kenwood DNX7120 Instruction Manual - Page 64
Language Setup
 |
UPC - 019048177230
View all Kenwood DNX7120 manuals
Add to My Manuals
Save this manual to your list of manuals |
Page 64 highlights
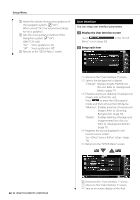
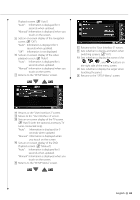
Setup Menu 7 8 9 10 11 12 13 7 Returns to the "DVD SETUP 1" screen. 8 Moves to the "DVD SETUP 3" screen. 9 Sets an angle mark display. ( "On") p Selects the screen display mode.*1 ( "16:9") "16:9": Displays wide pictures. "4:3 LB": Displays wide pictures in the Letter Box format (having black stripes at the top and bottom of screen). "4:3 PS": Displays wide pictures in the Pan & Scan format (showing pictures cut at the right and left ends). q Displays the Parental Lock screen.*1 ( "Off") (See , page 65) w Keep "Auto" to use.*1 e Returns to the "SETUP Menu" screen. 14 15 16 r Returns to the "DVD SETUP 2" screen. t Selects a picture display time. *1 ( "Middle") The Display of a JPEG picture is changed. ("Short", "Middle", "Long") y Returns to the "SETUP Menu" screen. ⁄ • *1 Disabled when a DVD is being played. Language Setup Selects a language you use for the speech and menus. 1 Select the language item to set See to (page 63) and select [Menu Language], [Subtitle Language] or [Audio Language]. 2 Display the Language SETUP screen 2 1 4 3 5 1 Enters a language code. 2 Cancels the language setup and returns to the "DVD SETUP 1" screen. 3 Sets the original audio language. (It appears during Audio Language setup.) 4 Sets the language and returns to the "DVD SETUP 1" screen. (It appears after you have entered a language code.) 5 Clears the language code. 3 Enter a language code See (page 96) and select the desired language. 4 Set the language you use 64 DNX7120/DDX712/DDX7032
-
 1
1 -
2
-
3
-
4
-
5
-
6
-
7
-
8
-
9
-
10
-
11
-
12
-
13
-
14
-
15
-
16
-
17
-
18
-
19
-
20
-
21
-
22
-
23
-
24
-
25
-
26
-
27
-
28
-
29
-
30
-
31
-
32
-
33
-
34
-
35
-
36
-
37
-
38
-
39
-
40
-
41
-
42
-
43
-
44
-
45
-
46
-
47
-
48
-
49
-
50
-
51
-
52
-
53
-
54
-
55
-
56
-
57
-
58
-
 59
59 -
 60
60 -
 61
61 -
 62
62 -
 63
63 -
 64
64 -
 65
65 -
 66
66 -
 67
67 -
 68
68 -
 69
69 -
70
-
71
-
72
-
73
-
74
-
75
-
76
-
77
-
78
-
79
-
80
-
81
-
82
-
83
-
84
-
85
-
86
-
87
-
88
-
89
-
90
-
91
-
92
-
93
-
94
-
95
-
96
-
97
-
98
-
99
-
100
-
101
-
102
-
103
-
104
 |
 |
