Kenwood GTM10 Installation Guide - Page 1
Kenwood GTM10 - FM Traffic Receiver Manual
 |
UPC - 019048168085
View all Kenwood GTM10 manuals
Add to My Manuals
Save this manual to your list of manuals |
Page 1 highlights
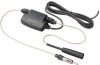
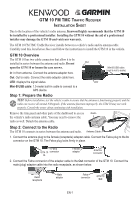
GTM 10 FM TMC TRAFFIC RECEIVER INSTALLATION SHEET Due to the location of the vehicle's radio antenna, Kenwood highly recommends that the GTM 10 be installed by a professional installer. Installing the GTM 10 without the aid of a professional installer may damage the GTM 10 and void your warranty. The GTM 10 FM TMC Traffic Receiver installs between a vehicle's radio and its antenna cable. Carefully read this Installation Sheet and follow the instructions to install the GTM 10 in the vehicle. GTM 10 Overview The GTM 10 has two cable connectors that allow it to be installed in series between the antenna and radio. Do not Out In open the GTM 10 or loosen the case screws. In: In from antenna. Connect the antenna adapter here. Mini-B USB cable (cord is not to scale) Out: Out to radio. Connect the radio adapter cable here. LED: displays the signal status. LED Mini-B USB cable: 1.5-meter built-in cable to connect to a GPS device. Step 1: Prepare the Radio TEST: Before installation, test the vehicle's radio to ensure that the antenna is functioning properly and the radio can receive all normal FM signals. If the antenna functions improperly, the GTM 10 may not work properly. Consult the owner about continuing with installation. Remove the trim panel and other parts of the dashboard to access Radio the vehicle's radio antenna cable. You may need to remove the radio as well. Detach the antenna cable. Step 2: Connect to the Radio The GTM 10 connects in series between the antenna and radio. Antenna Cable 1. Connect the antenna plug to the female (receptacle) adapter cable. Connect the Fakra plug to the In connector on the GTM 10. The Fakra plug locks firmly in place. Fakra GTM 10 connector In Female adapter Antenna connector 2. Connect the Fakra connector of the adapter cable to the Out connector of the GTM 10. Connect the male (plug) adapter cable into the radio receptacle, as shown below. Radio receptacle Male adapter Fakra connector GTM 10 Out EN-1
-
 1
1 -
 2
2 -
 3
3
 |
 |
