Kenwood KDC-X991 Instruction Manual - Page 22
G-Analyzer Calibration setup, G-Analyzer Reset, G-Counter Level setting - hard drive
 |
UPC - 019048172228
View all Kenwood KDC-X991 manuals
Add to My Manuals
Save this manual to your list of manuals |
Page 22 highlights
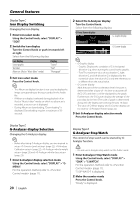
General features Display Type E G-Analyzer Reset Resets the value of G-Meter, G-Counter and GAnalyzer Horsepower Analysis. 1 Enter G-Analyzer Reset mode Using the Control knob, select "DISPLAY" > "GMA" > "RESET". For the operation method, refer to (page 11). "G-RESET" is displayed. 2 Select the Reset item Turn the Control knob. Display "Meter Reset" "Power Reset" "Counter Reset" Setting Reset the value of G-Meter. Reset the value of G-Analyzer Horsepower Analysis. Reset the value of G-Counter. 3 Determine the item you want to reset Press the Control knob. 4 Reset the value Select "YES" using the Control knob. "Reset OK" is displayed. 5 Exit G-Analyzer Reset mode Press the [FNC] button. Display Type E G-Counter Level setting Calibrating G-Point. Setting the level according to the kinds of vehicles. 1 Enter G-Counter Level setting mode Using the Control knob, select "DISPLAY" > "GMA" > "LEVEL". For the operation method, refer to (page 11). "G-COUNTER LEVEL" is displayed. 2 Select the G-Counter Level Turn the Control knob. Display "Level 1" "Level 2" "Level 3" ... Setting Counter is easy to go up. Counter is hard to go up. 22 | English 3 Exit G-Counter Level setting mode Press the Control knob. ⁄ • In the case of driving situations calling for few accelerations, set the G-Point up to "Level 1". In the case of frequent accelerations, set it up to "Level 3". In Standby mode Display Type E G-Analyzer Calibration setup G-Analyzer requires calibration for horizontal acceleration and braking. ⁄ • To ensure accurate calibration, go through the following steps at a level place where you can move the vehicle straight ahead. 1 Park the vehicle in a horizontal location 2 Enter G-Analyzer Calibration setup mode Using the Control knob, select "DISPLAY" > "GMA" > "CALIB". For the operation method, refer to (page 11). "G-CALIBRATION" is displayed. 3 Start Calibration of horizontal direction Press the Control knob. Once "Move Forward" appears on the display, the vehicle must be advanced. 4 Start Calibration of straight direction Start moving the vehicle ahead. Calibration of straight direction automatically starts. When the Calibration is finished, "Calibration OK" is displayed. ⁄ • If you fail to complete the calibration, "No Calibration" is displayed. In such a case, repeat steps 1 through 4. 5 Exit G-Analyzer Calibration setup mode Press the [FNC] button.
-
 1
1 -
2
-
3
-
4
-
5
-
6
-
7
-
8
-
9
-
10
-
11
-
12
-
13
-
14
-
15
-
16
-
 17
17 -
 18
18 -
 19
19 -
 20
20 -
 21
21 -
 22
22 -
 23
23 -
 24
24 -
 25
25 -
 26
26 -
 27
27 -
28
-
29
-
30
-
31
-
32
-
33
-
34
-
35
-
36
-
37
-
38
-
39
-
40
-
41
-
42
-
43
-
44
-
45
-
46
-
47
-
48
-
49
-
50
-
51
-
52
-
53
-
54
-
55
-
56
-
57
-
58
-
59
-
60
-
61
-
62
-
63
-
64
 |
 |
