KitchenAid KFP740QBW Use & Care Guide - Page 11
Installing the Adjustable, Slicing Disc, Installing the Reversible, Shredding Disc
 |
View all KitchenAid KFP740QBW manuals
Add to My Manuals
Save this manual to your list of manuals |
Page 11 highlights
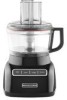
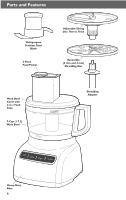
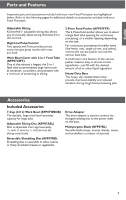
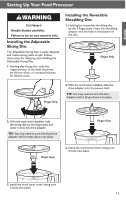
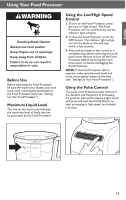
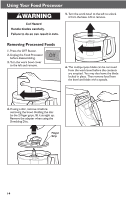
English Setting Up Your Food Processor Installing the Adjustable Slicing Disc The Adjustable Slicing Disc is easily adjusted and makes slicing tasks simple. Follow these steps for adjusting and installing the Adjustable Slicing Disc. 1. Holding the slicing disc, twist the ridged portion of the shaft clockwise for thinner slices, or counterclockwise for thicker slices. Installing the Reversible Shredding Disc 1. Holding the reversible shredding disc by the 2 finger grips, insert the shredding adapter into the hole in the bottom of the disc. Finger Grip Finger Grip 2. With the work bowl installed, slide the drive adapter onto the power shaft. TIP: You may need to turn the disc/ adapter until it drops down into place. 2. With the work bowl installed, hold the slicing disk by the finger grips and lower it onto the drive adapter. TIP: You may need to turn the disc/drive adapter until it drops down into place. Finger Grip Finger Grip 3. Install the work bowl cover, being sure it locks into place. 3. Install the work bowl cover, being sure it locks into place. 11
-
 1
1 -
2
-
3
-
4
-
5
-
 6
6 -
 7
7 -
 8
8 -
 9
9 -
 10
10 -
 11
11 -
 12
12 -
 13
13 -
 14
14 -
 15
15 -
 16
16 -
17
-
18
-
19
-
20
-
21
-
22
-
23
-
24
-
25
-
26
-
27
-
28
-
29
-
30
-
31
-
32
-
33
-
34
-
35
-
36
-
37
-
38
-
39
-
40
-
41
-
42
-
43
-
44
-
45
-
46
-
47
-
48
-
49
-
50
-
51
-
52
-
53
-
54
-
55
-
56
-
57
-
58
-
59
-
60
-
61
-
62
-
63
-
64
-
65
-
66
-
67
-
68
 |
 |