KitchenAid KRBX109EWH User Instructions - Page 10
Electronic Controls, Digital Controls
 |
View all KitchenAid KRBX109EWH manuals
Add to My Manuals
Save this manual to your list of manuals |
Page 10 highlights
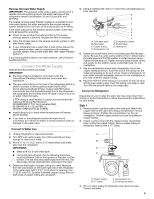
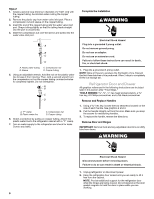
Electronic Controls For your convenience, your refrigerator and freezer controls are preset at the factory. When you first install your refrigerator, make sure the controls are still set to the recommended setting as shown. Recommended Setting "4" To Turn Your Refrigerator Off/On: ■ To turn the refrigerator off, press the freezer Minus (-) touch pad until a dash (-) appears in both the refrigerator and freezer displays. Neither compartment will cool. Adjusting Electronic Controls The temperature control range for each compartment is 1 through 7 (coldest). Press the Plus (+) or Minus (-) touch pads to adjust the temperature. Except when starting the refrigerator, do not adjust either control more than one setting at a time. Wait 24 hours between adjustments for the temperature to stabilize. If you need to adjust the temperature in either the refrigerator or freezer compartment, use the settings listed in the chart below as a guide. CONDITION/REASON: ADJUSTMENT: REFRIGERATOR too warm Adjust REFRIGERATOR Control one setting higher FREEZER too warm/to little ice Adjust FREEZER Control one setting higher REFRIGERATOR too cold Adjust REFRIGERATOR Control one setting lower FREEZER too cold Adjust FREEZER Control one setting lower Digital Controls For your convenience, your temperature controls are preset at the factory. When you first install your refrigerator, make sure the controls are still set to the recommended set points as shown. IMPORTANT: When the power is on, the temperature display shows the set point temperature of the compartment. Recommended Settings Adjusting Controls The REFRIGERATOR control adjusts the refrigerator compartment temperature. The FREEZER control adjusts the freezer compartment temperature. If you need to adjust the temperature in either the refrigerator or freezer compartment, use the settings listed in the chart as a guide. To Adjust Set Point Temperatures: The first touch of the (+) or (-) touch pad displays the current temperature set point. ■ Press the (+) or (-) touch pads until the desired temperature set point is displayed. NOTE: Except when first turning on the refrigerator, do not adjust either temperature control more than one setting at a time. Wait 24 hours between adjustments for the temperature to stabilize. CONDITION/REASON: REFRIGERATOR too warm FREEZER too warm/too little ice REFRIGERATOR too cold FREEZER too cold ADJUSTMENT: REFRIGERATOR Control 1° lower Adjust FREEZER Control 1° lower Adjust REFRIGERATOR Control 1° higher Adjust FREEZER Control 1° higher Additional Control Center Features Max Ice The Max Ice feature assists with temporary periods of heavy ice use by increasing ice production. ■ Press the Max Ice feature touch pad to set the freezer to the lowest temperature setting. Press the Max Ice feature touch pad again to return to the normal freezer set point. NOTE: The Max Ice feature will automatically shut off in approximately 24 hours. To Turn Your Refrigerator Off/On: ■ Press the freezer (+) touch pad repeatedly until "OFF" appears in the freezer display. Allow a few seconds for the refrigerator to shut off. Neither compartment will cool. ■ Press either the refrigerator or freezer (-) touch pad to turn on the refrigerator. Humidity Control The Humidity Control feature turns on a heater to help reduce moisture on the door hinge seal. Use in humid environments or when you notice moisture on the door hinge seal. The refrigerator uses more energy when Humidity Control is on. ■ Press Humidity Control when the environment is warm and more humid, or if you notice moisture on the door hinge seal. The indicator light will be lit when humidity control is ON. ■ Press Humidity Control to save energy when the environment is less humid. 10
-
 1
1 -
2
-
3
-
4
-
 5
5 -
 6
6 -
 7
7 -
 8
8 -
 9
9 -
 10
10 -
 11
11 -
 12
12 -
 13
13 -
 14
14 -
 15
15 -
16
-
17
-
18
-
19
-
20
-
21
-
22
-
23
-
24
-
25
-
26
-
27
-
28
-
29
-
30
-
31
-
32
-
33
-
34
-
35
-
36
-
37
-
38
-
39
-
40
 |
 |
