KitchenAid KSCS25FTBT Installation Guide - Page 8
Door Height Adjustment, Complete Installation
 |
View all KitchenAid KSCS25FTBT manuals
Add to My Manuals
Save this manual to your list of manuals |
Page 8 highlights
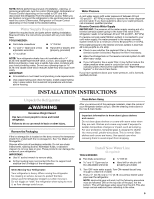
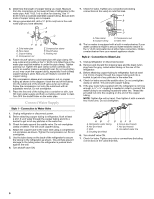
Level the Refrigerator There is a set of two leveling bolts on each side of the refrigerator behind the base grille. The top bolts adjust the rear of the refrigerator, and the bottom bolts adjust the front of the refrigerator. Door Height Adjustment TOOLS NEEDED or adjustable wrench. IMPORTANT: Models are preset with a quarter's-thickness difference in door height and may not need adjusting. If necessary after the refrigerator is loaded with food, follow the steps below to adjust the door height up or down. A B A. Rear leveling bolt (top) B. Front leveling bolt (bottom) 1. Use a ¹⁄₂" (12.70 mm) socket wrench to adjust the leveling bolts. Turn the leveling bolts to the right to raise or to the left to lower the refrigerator. It may take several turns to adjust the tilt of the refrigerator. NOTE: Do not unscrew the leveling bolts too much when lowering the refrigerator. The bolt head will start to come away from the refrigerator when in the lowest position. 2. Adjust the front leveling bolts to bring the refrigerator top parallel with the cabinet above the refrigerator. s For standard cabinets, leave approximately ¹⁄₈" (3.18 mm) gap between the refrigerator's top hinges and the cabinets. s For full-overlay cabinets, leave ¹⁄₄" (6.35 mm) gap between the refrigerator's top hinges and the cabinets. s If you do not have a cabinet above the refrigerator, simply adjust the refrigerator to make it level. A B A. Top hinges B. Front of the refrigerator 3. Adjust the rear leveling bolt to bring the refrigerator level with the side cabinets or cabinet end panels. 4. If you want, you may now use the four leveling bolts to raise the refrigerator to reduce the gap between the refrigerator top hinge and the cabinet opening. Check that all four leveling legs still touch the floor and that the cabinet doors above the refrigerator open all the way. Replace Base Grille 1. Open the refrigerator doors to 90°. 2. Replace the base grille. Place the lower clips into the bottom of the refrigerator and roll the grille up until it snaps into place. 1. Locate the height adjustment bolt on the bottom hinge of the refrigerator door. NOTE: For easier access to the height adjustment bolt, the refrigerator door should be closed. 2. Turn the height adjustment bolt using the or adjustable wrench. s To raise the height, turn the bolt to the right. s To lower the height, turn the bolt to the left. 3. Check to make sure the doors are even at the top and bottom. If necessary, continue to turn the height adjustment bolt. Complete Installation 1. Turn water supply line valve to "Open" position. 2. Turn refrigerator switch to ON position. Wait a few minutes. Check water line connections for leaks. 3. Set refrigerator and freezer compartment controls to the midpoint setting. Check that the compressor is operating properly and that all lights are working. 4. Flush water system before using. See "Prepare the Water System." NOTE: If construction will continue after refrigerator has been installed, set controls to OFF. If refrigerator does not operate s Check that the circuit breaker is not tripped or household fuse blown. s Check that the power supply cord is plugged into a grounded 3 prong outlet. s See "Troubleshooting" in the Use & Care Guide. 8
-
 1
1 -
2
-
 3
3 -
 4
4 -
 5
5 -
 6
6 -
 7
7 -
 8
8 -
 9
9 -
 10
10 -
 11
11 -
 12
12 -
 13
13 -
14
-
15
-
16
-
17
-
18
-
19
-
20
-
21
-
22
-
23
-
24
 |
 |
