KitchenAid KUCS02FRPA Use and Care Guide
KitchenAid KUCS02FRPA Manual
 |
View all KitchenAid KUCS02FRPA manuals
Add to My Manuals
Save this manual to your list of manuals |
KitchenAid KUCS02FRPA manual content summary:
- KitchenAid KUCS02FRPA | Use and Care Guide - Page 1
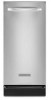
INTEGRATED COMPACTOR Use & Care Guide For questions about features, operation/performance, parts, accessories or service, call: 1-800-422-1230 or visit our website at www.kitchenaid.com In Canada, for assistance, installation or service, call: 1-800-807-6777 or visit our website at www.KitchenAid.ca - KitchenAid KUCS02FRPA | Use and Care Guide - Page 2
8 Using Solid (Locked) Cycle 8 Using the Air Filter or Freshener 8 Removing a Filled Bag 8 Installing a New Bag 8 COMPACTOR CARE 9 Changing the Air Filter or Freshener 9 Cleaning 9 TROUBLESHOOTING 10 ASSISTANCE OR SERVICE 11 In the U.S.A 11 In Canada 11 Accessories 11 WARRANTY 12 - KitchenAid KUCS02FRPA | Use and Care Guide - Page 3
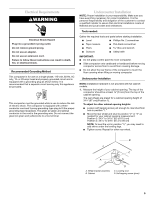
not overload trash bag with heavy material such as glass. ■ This compactor is intended for household use only. ■ Use only for intended use as described in this manual. Do not use other than manufacturer's recommended attachments. SAVE THESE INSTRUCTIONS INSTALLATION INSTRUCTIONS Installer: Leave - KitchenAid KUCS02FRPA | Use and Care Guide - Page 4
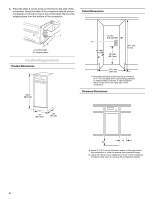
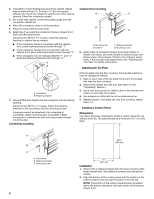
either to the left or the right side of the compactor. Clearance Dimensions B A A. Leave 6" (15.2 cm) of clearance space to the right side of the compactor in order to remove the compactor bags. B. Leave 23" (58.4 cm) of clearance in front of the compactor in order to fully open or remove the - KitchenAid KUCS02FRPA | Use and Care Guide - Page 5
required tools and parts before starting installation. ■ Level ■ Phillips No. 2 screwdriver ■ Tape measure ■ Flat-blade screwdriver ■ Pliers Box-end wrench ■ Scissors ■ Utility knife IMPORTANT: ■ Do not grasp control panel to move compactor. ■ Slide compactor onto cardboard or hardboard - KitchenAid KUCS02FRPA | Use and Care Guide - Page 6
cannot be attached to the underside of countertop, attach mounting clips to brackets. Fasten compactor to cabinet front covering, repeat steps 1-4. Installing a Custom Panel Dimensions Use these dimension drawings to create a custom panel for use without a trim kit. The panel should be a minimum - KitchenAid KUCS02FRPA | Use and Care Guide - Page 7
depending on the load. A. Custom panel B. 15" x ¹⁄₂" quarter round C. Drawer front D. Four #8 x 1" wood screws placement E. Rubber bumper (one on each side) COMPACTOR USE How Your Compactor Works The compacting ram is the part of the compactor which compresses the trash. The compacting ram does not - KitchenAid KUCS02FRPA | Use and Care Guide - Page 8
other than those designed especially for use in your compactor. Order replacement compactor bags through your local dealer or by calling the toll-free number on the cover or in the "Assistance or Service" section. IMPORTANT: Before installing a new bag, be sure: ■ The drawer side is securely locked - KitchenAid KUCS02FRPA | Use and Care Guide - Page 9
3. Press inside of bag against the drawer bottom, sides and corners for a smooth fit. COMPACTOR CARE Your new compactor is designed to give you many years of dependable service. However, there are a few things you are expected to do in order to properly maintain your compactor. This section will - KitchenAid KUCS02FRPA | Use and Care Guide - Page 10
for more than a couple of days, remove the compactor bag. Remove the Key-Knob (or Key-Switch) and store it out of children's reach. TROUBLESHOOTING Try the solutions suggested here first in order to avoid the cost of an unnecessary service call. Trash is not compacting ■ Is the drawer less than - KitchenAid KUCS02FRPA | Use and Care Guide - Page 11
and specifications on our full line of appliances. ■ Installation information. ■ Use and maintenance procedures. ■ Accessory and repair parts sales. For further assistance If you need further assistance, you can write to KitchenAid with any questions or concerns at: KitchenAid Brand Home Appliances - KitchenAid KUCS02FRPA | Use and Care Guide - Page 12
or workmanship. Service must be provided by a KitchenAid designated service company. 30 DAY LIMITED WARRANTY ON THE CHARCOAL FILTER AND AIR FRESHENER For thirty days from the date of purchase, when the compactor is installed, operated and maintained according to instructions attached to or
-
 1
1 -
 2
2 -
 3
3 -
 4
4 -
 5
5 -
 6
6 -
 7
7 -
8
-
9
-
10
-
11
-
12
 |
 |

INTEGRATED COMPACTOR
Use & Care Guide
For questions about features, operation/performance, parts, accessories or service, call:
1-800-422-1230
or visit our website at
www.kitchenaid.com
In Canada, for assistance, installation or service, call:
1-800-807-6777
or visit our website at
www.KitchenAid.ca
Table of Contents
............................................................................................................
2
9872215B