KitchenAid KUIC15P Use and Care Manual
KitchenAid KUIC15P - 15 in. ARCHITECT Series II Ice Maker Manual
 |
View all KitchenAid KUIC15P manuals
Add to My Manuals
Save this manual to your list of manuals |
KitchenAid KUIC15P manual content summary:
- KitchenAid KUIC15P | Use and Care Manual - Page 1
Guide For questions about features, operation/performance, parts, accessories or service, call: 1-800-422-1230 In Canada, call for assistance 1-800-461-5681, for installation and service, call: 1-800-807-6777 or visit our website at... www.kitchenaid.com or www.KitchenAid.ca MACHINE À GLAÇONS Guide - KitchenAid KUIC15P | Use and Care Manual - Page 2
and Moving Care 11 TROUBLESHOOTING 12 Ice Maker Operation 12 Ice Production 12 Ice Quality 13 Plumbing Problems 13 ASSISTANCE OR SERVICE 13 In the U.S.A 13 In Canada 13 WARRANTY 14 TABLE DES MATIÈRES SÉCURITÉ DE LA MACHINE À GLAÇONS 15 INSTRUCTIONS D'INSTALLATION 15 Déballage de - KitchenAid KUIC15P | Use and Care Manual - Page 3
We have provided many important safety messages in this manual and on your appliance. Always read and obey all safety messages. This servicing. s Replace all parts and panels before operating. s Use two or more people to move and install ice maker. SAVE THESE INSTRUCTIONS INSTALLATION INSTRUCTIONS - KitchenAid KUIC15P | Use and Care Manual - Page 4
allow the ice maker to be pulled forward for servicing if necessary. s Installation of the ice maker requires use an extension cord. Failure to follow these instructions can result in death, fire, or electrical shock personal safety, this appliance must be grounded. This appliance is equipped with a - KitchenAid KUIC15P | Use and Care Manual - Page 5
temperatures will remain above freezing. Tools needed: Gather the required tools and parts before starting installation. Read and follow the instructions provided with any tools listed here. s Flat-blade screwdriver s and maker to be pulled out of the cabinet or away from the wall for service. 5 - KitchenAid KUIC15P | Use and Care Manual - Page 6
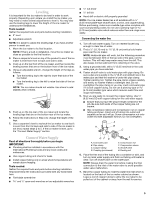
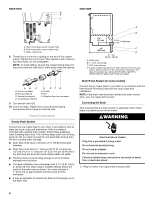
NOTE: To avoid rattling, be sure the copper tubing does not touch the cabinet's side wall or other parts inside the cabinet. 3⁵⁄₈" (9.2 cm) A B 1" (2.54 cm) 23" C (58.4 cm) D an extension cord. Failure to follow these instructions can result in death, fire, or electrical shock. 1. Plug ice maker - KitchenAid KUIC15P | Use and Care Manual - Page 7
screw C Handle screw End Cap screw Remove Door 1. Unplug ice maker or disconnect power. 2. Remove the handle screws and handle (on some models). Keep the parts together and set them aside. 3. Remove the hinge pin from the top hinge. 4. Remove the door from the hinges and screw the top hinge pin - KitchenAid KUIC15P | Use and Care Manual - Page 8
use an adapter. Do not use an extension cord. Failure to follow these instructions can result in death, fire, or electrical shock. ICE MAKER USE How Your s As each cycle ends, you may hear a gurgling sound due to the refrigerant flowing in your ice maker. s You may hear air being forced over the - KitchenAid KUIC15P | Use and Care Manual - Page 9
Service The service light indicates when service is needed. If the service light turns on, turn the ice maker off and back on. If the service light turns on again, call for service of a good household appliance cleaner and wax call 1-800-442-9991 and ask for Part Number 8171307. In Canada, call 1-800 - KitchenAid KUIC15P | Use and Care Manual - Page 10
Disconnect power before cleaning. Replace all parts and panels before operating. Failure to from the base grille area of the front panel support. Pull forward to remove the lower access panel. condenser fins and the unit compartment with a brush attachment on a vacuum cleaner. A. Cutter grid harness - KitchenAid KUIC15P | Use and Care Manual - Page 11
interior components using the following instructions. s Replace the ice hoses. Do not wash plastic parts in dishwasher. They cannot withstand temperatures above Disconnect power before servicing. Replace all parts and panels before area of the front panel support. Pull forward to remove the - KitchenAid KUIC15P | Use and Care Manual - Page 12
than normal? Room temperatures of more than 90°F (32°C) will normally reduce ice production. WARNING Electrical Shock Hazard Disconnect power before servicing. Replace all parts and panels before operating. Failure to do so can result in death or electrical shock. s Is the condenser dirty? Dirt or - KitchenAid KUIC15P | Use and Care Manual - Page 13
calling for assistance or service, please check "Troubleshooting." It may save you the cost of a service call. If you still need help, follow the instructions below. When calling, please know the purchase date and the complete model and serial number of your appliance. This information will help - KitchenAid KUIC15P | Use and Care Manual - Page 14
refrigeration system. These parts are compressor, evaporator, condenser, dryer/ strainer, and connecting tubing. Service must be performed by a KitchenAid designated service company. ITEMS KITCHENAID WILL NOT PAY FOR 1. Service calls to correct the installation of your major appliance, to instruct - KitchenAid KUIC15P | Use and Care Manual - Page 15
surfaces en acier inoxydable de la machine à glaçons. Ces produits peuvent endommager la surface de votre machine à glaçons. Le non-respect de cette instruction peut causer une blessure au dos ou d'autre blessure. Enlèvement des matériaux d'emballage Enlever le ruban adhésif et la colle de la - KitchenAid KUIC15P | Use and Care Manual - Page 16
60 Hz, de 15 ampères, mis à la terre conformément aux instructions du Code national de l'électricité et des codes et règlements locaux. Il çons. Utiliser une boîte où l'alimentation ne peut pas être coupée à l'aide d'un commutateur ou d'un interrupteur à tirage. Méthode de mise à la terre recommand - KitchenAid KUIC15P | Use and Care Manual - Page 17
sur le fond arrière de la machine à glaçons. 6. Suivre les instructions de l'étape 4 pour modifier la hauteur des pieds. 7. Utiliser un niveau à choisi. 4. Fixer le robinet d'arrêt sur le tuyau d'alimentation en eau à l'aide d'une bride pour tuyau. Il faut s'assurer que l'extrémité de sortie est - KitchenAid KUIC15P | Use and Care Manual - Page 18
l'écrou à compression sur l'extrémité de la sortie à l'aide d'une clé réglable. Ne pas serrer à l'excès. A de l'armoire ou du mur en cas d'intervention de service. VUE ARRIÈRE A B C A. Tuyau de de vidange par gravité, il faut suivre les instructions ci-dessous lors de l'installation des tuyaux de - KitchenAid KUIC15P | Use and Care Manual - Page 19
placer et installer la machine à glaçons. Le non-respect de cette instruction peut causer une blessure au dos ou d'autre blessure. 2. Style 1 - le code sanitaire local l'exige, sceller la machine sur le plancher à l'aide d'un produit de calfeutrage approuvé une fois que les raccordements d'eau et - KitchenAid KUIC15P | Use and Care Manual - Page 20
enlever la broche de liaison à la terre. Ne pas utiliser un adaptateur. Ne pas utiliser un câble de rallonge. Le non-respect de ces instructions peut causer un décès, un incendie ou un choc électrique. 4. Brancher la machine à glaçons ou reconnecter la source de courant électrique. Sons normaux Il - KitchenAid KUIC15P | Use and Care Manual - Page 21
bouton Holiday Mode pour activer cette caractéristique. Appuyer à nouveau sur le bouton pour désactiver la caractéristique. Service Le témoin Service indique si une visite de service est nécessaire. Si le témoin Service est allumé, éteindre puis remettre en marche la machine à glaçons. Si le témoin - KitchenAid KUIC15P | Use and Care Manual - Page 22
tartre dans le système. Nettoyer périodiquement le système de formation aide à enlever les dépôts accumulés de minéraux. La fréquence des ou il n'y aura pas de glace. 5. Lire et suivre toutes les instructions apparaissant sur la bouteille avant de suivre les étapes suivantes. Utiliser une bouteille - KitchenAid KUIC15P | Use and Care Manual - Page 23
. 5. Remettre le panneau d'accès inférieur en place et le fixer à l'aide des quatre vis. 6. Brancher la machine à glaçons ou reconnecter la source de avec les autres composants intérieurs conformément aux instructions suivantes. s Réinstaller le support de la pelle à glace en réinstallant les vis - KitchenAid KUIC15P | Use and Care Manual - Page 24
de l'eau propre. Nettoyer ensuite ces mêmes composants à l'aide d'une solution comprenant 1 cuillerée à soupe (15 mL deux vis de la grille de la base (support du panneau avant). Tirer vers l'avant pour la remise en marche. Le non-respect de ces instructions peut causer un décès ou un choc électrique. - KitchenAid KUIC15P | Use and Care Manual - Page 25
servoir déborde-t-elle? Ceci est normal. Ce débordement aide à purger les minéraux éliminés de l'eau durant clignote-t-il en permanence? Faire un appel de service. La machine à glaçons fonctionne mais produit tr en marche. Le non-respect de ces instructions peut causer un décès ou un choc électrique - KitchenAid KUIC15P | Use and Care Manual - Page 26
service, veuillez vérifier la section "Dépannage". Cette vérification peut vous faire économiser le coût d'une visite de réparation. Si vous avez encore besoin d'aide, suivre les instructions précises utilisées pour construire chaque nouvel appareil KITCHENAID®. Pour localiser des pièces spécifiées - KitchenAid KUIC15P | Use and Care Manual - Page 27
aux instructions fournies avec le produit, KitchenAid service, voir d'abord la section "Dépannage" du Guide d'utilisation et d'entretien. Après avoir vérifié la section "Dépannage", de l'aide supplémentaire peut être trouvée en vérifiant la section "Assistance ou service" ou en appelant KitchenAid - KitchenAid KUIC15P | Use and Care Manual - Page 28
© 2006. All rights reserved. Tous droits réservés. ® Registered Trademark/TM Trademark of KitchenAid, U.S.A., KitchenAid Canada licensee in Canada ® Marque déposée/TM Marque de commerce de KitchenAid, U.S.A., Emploi licencié par KitchenAid Canada au Canada 8/06 Printed in U.S.A. Imprimé aux É.-U.
-
 1
1 -
 2
2 -
 3
3 -
 4
4 -
 5
5 -
 6
6 -
 7
7 -
8
-
9
-
10
-
11
-
12
-
13
-
14
-
15
-
16
-
17
-
18
-
19
-
20
-
21
-
22
-
23
-
24
-
25
-
26
-
27
-
28
 |
 |

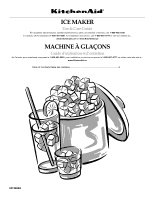
ICE MAKER
Use & Care Guide
For questions about features, operation/performance, parts, accessories or service, call:
1-800-422-1230
In Canada, call for assistance
1-800-461-5681
, for installation and service, call:
1-800-807-6777
or visit our website at...
www.kitchenaid.com
or
www.KitchenAid.ca
MACHINE À GLAÇONS
Guide d’utilisation et d’entretien
Au Canada, pour assistance composez le
1-800-461-5681
, pour installation ou service composez le
1-800-807-6777
ou visitez notre site web à...
www.KitchenAid.ca
Table of Contents/Table des matières
.............................................................................
2
2313684A