Kodak D1030 User Manual
Kodak D1030 - Easyshare Digital Frame Manual
 |
View all Kodak D1030 manuals
Add to My Manuals
Save this manual to your list of manuals |
Kodak D1030 manual content summary:
- Kodak D1030 | User Manual - Page 1
KODAK EASYSHARE Digital Frame Extended user guide D830/D1030 www.kodak.com For help with your digital frame, www.kodak.com/go/digitalframesupport - Kodak D1030 | User Manual - Page 2
Eastman Kodak Company Rochester, New York 14650 © Eastman Kodak Company, 2009 All screen images are simulated. Kodak, EasyShare, and Perfect Touch are trademarks of Eastman Kodak Company. P/N 4H5193_en - Kodak D1030 | User Manual - Page 3
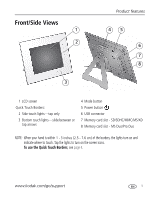
touch lights-slide between or tap arrows 4 Mode button 5 Power button 6 USB connector 7 Memory card slot - SD/SDHC/MMC/MS/XD 8 Memory card slot - MS Duo/Pro Duo NOTE: When your hand is within 1 - 3 inches (2.5 - 7.6 cm) of the borders, the lights turn on and indicate where to touch. Tap the lights - Kodak D1030 | User Manual - Page 4
Back View 1 4 2 1 Faceplate attach clips (4) 2 DC-In 3 3 Rotating stand 4 Wall mounting holes (3) ii www.kodak.com/go/support - Kodak D1030 | User Manual - Page 5
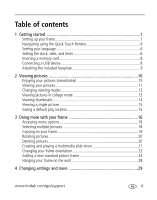
18 Copying on your frame 19 Rotating pictures 20 Deleting pictures 20 Creating and playing a multimedia slide show 21 Changing your frame orientation 23 Adding a new standard picture frame 24 Hanging your frame on the wall 28 4 Changing settings and more 29 www.kodak.com/go/support iii - Kodak D1030 | User Manual - Page 6
menus 29 Upgrading your firmware (recommended 32 Maintaining your frame 33 Learning more about your frame 33 5 Troubleshooting and support 34 Picture frame problems 34 Screen messages 37 6 Appendix 39 Digital frame specifications 39 Important safety instructions 40 Upgrading your software - Kodak D1030 | User Manual - Page 7
1 Getting started Welcome to your KODAK EASYSHARE Digital Frame. Viewing and sharing your pictures couldn't be simpler! Setting up your frame Attaching the stand Snap the stand into a slot in the back of the frame. To adjust the display angle, move the stand to a different slot. When displayed with - Kodak D1030 | User Manual - Page 8
Getting started Attaching the power cable CAUTION: Do not use this power cable with other devices, including digital cameras. Your power cable may look different from the one pictured. Use the plug that accommodates your type of power outlet. 2 www.kodak.com/go/support - Kodak D1030 | User Manual - Page 9
Turning your frame on and off Getting started Power button - press and hold (for about 2 seconds), then release When you turn off the frame (but leave it plugged in), it retains information, like the time and date. www.kodak.com/go/support 3 - Kodak D1030 | User Manual - Page 10
the right or bottom border to turn on the icons. Bottom border tap arrow lights or slide to move thru items on screen CAUTION: Only use your finger on the borders. Borders do not react to sharp or metal objects-and they may damage the border or screen. 4 www.kodak.com/go/support - Kodak D1030 | User Manual - Page 11
: like turning the pages of a book, slide left ←to go forward, slide right →to go back. ■ For faster scrolling through large numbers of thumbnail pictures, touch and hold an arrow light (3 seconds). What 'tap' and 'slide' mean in this guide Only the lights on the right and bottom Quick Touch Borders - Kodak D1030 | User Manual - Page 12
Touch Borders, see page 4. Setting the clock, date, and timer If this is the first time you turned on your frame, the Clock and Date screen appears automatically after you select your language. Follow steps 3, 4, and 6 down arrow to highlight Clock and Date, then tap OK. 6 www.kodak.com/go/support - Kodak D1030 | User Manual - Page 13
arrow to highlight Turn Frame On At, frame loses power, the clock time returns to the factory setting, and the automatic on/off times, if set, are disabled. To reset the clock and re-enable your on/off times, see Resetting the clock and calendar after losing power, page 36. www.kodak.com/go/support - Kodak D1030 | User Manual - Page 14
Do not insert an MS Pro or MS Pro Duo card in the top slot. It may be difficult to remove. Connecting a USB device Supported USB devices include a flash drive, card reader, hard drive*, etc. USB devices and cables are sold separately. * External hard drives must be self-powered. 8 www.kodak.com/go - Kodak D1030 | User Manual - Page 15
Attaching the included faceplate Getting started To attach To remove You can also personalize your KODAK EASYSHARE Digital Frame by putting a standard picture frame over the digital frame's panel. See Adding a new standard picture frame, page 24. www.kodak.com/go/support 9 - Kodak D1030 | User Manual - Page 16
show, insert a memory card or other USB device (see page 8). Your pictures play automatically. NOTE: Your frame may have pre-loaded pictures, which start playing if you do not insert a memory card or USB device with your own pictures. You cannot delete the pre-loaded pictures. 10 www.kodak.com/go - Kodak D1030 | User Manual - Page 17
15). Internal memory-the frame's 512 MB internal memory. Copy your pictures into internal memory from a memory card or other device (see page 19). Memory card-appears when you insert a card (see page 8). The label and icon indicate the type of card. USB drive-appears when you insert a USB flash or - Kodak D1030 | User Manual - Page 18
■ You can change the duration (how long each picture stays on the screen) and transition style between pictures. See Changing frame settings, page 29. ■ Pictures play continuously until you turn off the frame or change modes. Changing viewing modes Press the Mode button for quick access to the - Kodak D1030 | User Manual - Page 19
play is paused, tap OK to display the highlighted picture in full screen, single view. ■ While play is paused, tap page 16). (Menu) to access the main menu options (see ■ Tap (Play) to resume collage play. NOTE: Multimedia slide shows do not play in collage mode. www.kodak.com/go/support 13 - Kodak D1030 | User Manual - Page 20
view: 1 Tap a touch border to display the icons, then tap (Menu). 2 Tap (Thumbnails). Pictures are displayed as thumbnails. Tips when viewing thumbnails: ■ To move to the next or previous row, tap (Play). ■ To play a slide show, highlight the thumbnail and tap (Play). 14 www.kodak.com/go/support - Kodak D1030 | User Manual - Page 21
picture source. The next time you turn on your frame, it will automatically start playing from the same source you were in when you entered the Settings Menu. The Default Play Location icon source (see page 11). appears in the Pictures & Videos list as a picture www.kodak.com/go/support - Kodak D1030 | User Manual - Page 22
Accessing menu options Use the Menu button to view and work with your pictures, and to change your frame settings (see page 29). NOTE: As your hand approaches the frame, lights turn on indicating where to touch on the Quick Touch Borders. Tap the right border to see the screen icons. 1 Tap (Menu - Kodak D1030 | User Manual - Page 23
in your current picture source (see page 18). See Copying on your frame, page 19. See Rotating pictures, page 20. See Deleting pictures, page 20. Customize how you use your frame and how you view your pictures and videos. See Chapter 4, Changing settings and more. www.kodak.com/go/support 17 - Kodak D1030 | User Manual - Page 24
Doing more with your frame Selecting multiple pictures Use the multi-select feature to copy, delete, or rotate multiple pictures at once. Or select just the pictures you want to play in a slide show. 1 Tap (Menu), then tap the down arrow to highlight Thumbnails. Tap OK. Arrow lights 2 Tap the - Kodak D1030 | User Manual - Page 25
8). For example, copy pictures from a memory card* into your frame's internal memory. * HINT: Share the digital pictures from your camera or computer-take the card out of your camera or copy pictures from your computer to a memory card. Then copy them into your frame's internal memory and share with - Kodak D1030 | User Manual - Page 26
more with your frame Rotating pictures 1 Highlight a picture in thumbnails view (see page 14) or display it in single view (see page 15). To select multiple pictures, see page 18. 2 Tap (Menu), then tap (Rotate). 3 Tap an up/down arrow to highlight the direction and degree of rotation, then tap OK - Kodak D1030 | User Manual - Page 27
Creating and playing a multimedia slide show Use KODAK EASYSHARE Digital Display Software on your computer to create a multimedia slide show (WINDOWS OS only). Then copy the slide show to your frame. NOTE: D830/D1030 Digital Frames do not support audio or video playback. Therefore, audio and video - Kodak D1030 | User Manual - Page 28
pictures in the Editor to change the play order. 5 5 Click Save. 6 For more details on creating multimedia slide shows, click Help. Copying a multimedia slide show to your frame On your computer, use Digital Display Software to copy your multimedia slide shows to a memory card or USB flash drive - Kodak D1030 | User Manual - Page 29
is set up to display pictures and videos in landscape orientation. You can turn the frame on its side to change the orientation to portrait. But, you must also change the orientation setting to portrait. Landscape Change the stand position Portrait Rotate the stand 90 º. To adjust the display - Kodak D1030 | User Manual - Page 30
choosing from the thousands of standard picture frames on the market, even a favorite you might already have. Choosing a standard picture frame size KODAK EASYSHARE Digital Frame model D830 D1030 Use a standard picture frame that accommodates this photo size (without a matte) 8" x 10" (20.3 x 25 - Kodak D1030 | User Manual - Page 31
Doing more with your frame The following types of standard picture frames will not fit on your EASYSHARE Digital Frame. ■ Frames that secure a photo by pressing it between two pieces of glass. ■ A deep frame that's designed to hold 3-dimensional objects instead of photos. ■ Frames with inserts in - Kodak D1030 | User Manual - Page 32
frame. If necessary: ■ If a deep picture frame places the slot above the clips, carefully bend the clips up-slightly above the slot. Then, rotate and depress the clips to slide them into the slot. ■ Tighten the screws to secure the clips. Be careful not to over-tighten. 26 www.kodak.com/go/support - Kodak D1030 | User Manual - Page 33
the digital frame's back panel and the clips on the standard frame. Stack the spacers if necessary. Avoid adding more spacers than necessary to prevent excessive force against the clips. If necessary: ■ Tighten the screws to secure the clips. Be careful not to over-tighten. www.kodak.com/go/support - Kodak D1030 | User Manual - Page 34
the digital frame's back panel and the metal tabs. Hanging your frame on the wall To hang your frame on the wall, remove the stand, then use wall anchoring hardware (not included) to securely mount the frame to the wall. See Back View, page ii for the location of the mounting holes. 28 www.kodak - Kodak D1030 | User Manual - Page 35
version of firmware on your This setting is only available if frame (page 32). the upgrade file (.img) is Exit-return to the main menu. present on the frame (on an inserted memory card or flash drive, or copied into internal memory). Duration Specify how long each picture is displayed - Kodak D1030 | User Manual - Page 36
pictures into the frame's Off-copy pictures to internal memory at full resolution. internal memory. Copies are See page 19. Full resolution is unnecessary for viewing and automatically resized to a quickly fills up the frame's memory. lower resolution (smaller size). 30 www.kodak.com/go/support - Kodak D1030 | User Manual - Page 37
play alphabetically from Z to A. NOTE: If Shuffle is On, pictures play in random order, regardless of this setting. Clock & Date See frame Check your frame model, serial number, and firmware version. Exit Return to the top menu with no actions performed or saved. www.kodak.com/go/support - Kodak D1030 | User Manual - Page 38
(Settings). 5 Highlight Firmware Upgrade, then tap OK to begin the upgrade. IMPORTANT: Do not turn off the frame or remove the memory card or USB flash drive during the upgrade! When the upgrade is complete, your frame automatically restarts. If it doesn't, press the power button on the frame to Off - Kodak D1030 | User Manual - Page 39
light pressure. Learning more about your frame www.kodak.com/go/digitalframes Learn more about your frame www.kodak.com/go/digitalframesupport Interactive troubleshooting and repairs Interactive tutorials Frequently asked questions Downloads Product registration www.kodak.com/go/support 33 - Kodak D1030 | User Manual - Page 40
5 Troubleshooting and support For step-by-step product support, visit www.kodak.com/go/digitalframesupport and select Step-by-Step Solutions & Repair. Picture frame problems If... Try one or more of the following Frame does not turn on. ■ Make sure the power cable that was included with your - Kodak D1030 | User Manual - Page 41
to the factory setting on/off but the frame doesn't turn on and off and auto on/off times are disabled. See Resetting the clock and calendar after losing power, page 36. at the specified times. Cannot copy pictures from one device (memory card or USB flash drive) to another even though the copy - Kodak D1030 | User Manual - Page 42
Troubleshooting and support Resetting the clock and calendar after losing power If you turn off the power on the frame or otherwise lose power for half a day or more, the clock and calendar return to the factory setting and the automatic on/off times, if set, are disabled. When you turn the frame - Kodak D1030 | User Manual - Page 43
by the file name. For example: xxx_xxxx.JPG file is bad) The frame is unable to display the picture because the file is corrupted or it's an unsupported file format (see page 39). Create file failed. The device (memory card, USB drive, etc.) you are trying to copy to is protected. ■ See your - Kodak D1030 | User Manual - Page 44
Troubleshooting and support Screen message Try one or more of the following Error attempting to open file or ■ Turn off the frame, then turn it back on. Press and directory. hold the power button (for about 2 seconds), then release. If the problem persists, contact customer Error duplicate - Kodak D1030 | User Manual - Page 45
For more specifications, visit www.kodak.com/go/digitalframesupport. KODAK EASYSHARE D830/D1030 Digital Frames Color display D830 20.3 cm (8 in.) diagonal digital LCD, 800 x 600 pixels, 4:3 aspect ratio, 16.3 x 11.4 cm (6.4 x 4.8 in.) viewable area D1030 26.4 cm (10.4 in.) diagonal - Kodak D1030 | User Manual - Page 46
D1030: 1227 gm (2.6 lb.) includes frame, stand, and AC adapter Important safety instructions CAUTION: Do not disassemble this product; there are no user-serviceable parts inside. Refer servicing to qualified service personnel. KODAK AC Adapters and Battery Chargers are intended for indoor use only - Kodak D1030 | User Manual - Page 47
conditions and/or limitations stated herein. Warranty service will include all labor as well as any necessary adjustments and/or replacement parts. If Kodak is unable to repair or replace a Product, Kodak will, at its option, refund the purchase price paid for the Product provided the Product has - Kodak D1030 | User Manual - Page 48
, modification, unauthorized service, misuse, abuse, use with incompatible accessories or attachments (such as third party ink or ink tanks), failure to follow Kodak's operation, maintenance or repacking instructions, failure to use items supplied by Kodak (such as adapters and cables), or claims - Kodak D1030 | User Manual - Page 49
. However, there is no guarantee that interference will not occur in a particular installation. If this equipment does cause harmful interference to radio or television reception, which can be determined by turning the equipment off and on, the user is encouraged to try to correct the interference - Kodak D1030 | User Manual - Page 50
applications and the like) or on physical media (compact discs, digital versatile discs, semiconductor chips, hard drives, memory cards and the like). An independent license for such use is required. For details, please visit http://mp3licensing.com. Australian C-Tick N137 44 www.kodak.com/go - Kodak D1030 | User Manual - Page 51
and Electronic Equipment labeling/battery disposal In Europe: For kodak.com/go/recycle. Product weight with adapter and stand: D830, 843 gm. D1030, 1227 gm Russian GOST-R D1030: D830: Eastman Kodak Company Rochester, New York 14650 VCCI Class B ITE Korean Class B ITE www.kodak.com/go/support - Kodak D1030 | User Manual - Page 52
Appendix China RoHS 46 www.kodak.com/go/support - Kodak D1030 | User Manual - Page 53
picture display, 29 E EASYSHARE Digital Display Software create slide show, 21 download, install, 21 error messages, 37 F faceplate, attaching, 9 file formats, pictures, 39 firmware, upgrading, 29, 32, 40 fit or fill display, 31 flash drive, connecting, 8 format cards, FAT16 or 32, 35 frame, picture - Kodak D1030 | User Manual - Page 54
or lock screen, reset, 35 G go-to play location, 15 H help frame, 34 support URLs, 33 troubleshooting and support, 34 I installing EASYSHARE Digital Display Software, 21 included faceplate, 9 memory cards, 8 standard picture frame, 24 internal memory capacity, 39 copying to, 19 K KODAK PERFECT TOUCH - Kodak D1030 | User Manual - Page 55
, 1 stand, changing position, 23 standard picture frame, adding, 24 storage capacity, internal memory, 39 T tap to select, 5 thumb drive. See flash drive. thumbnails, 14 timer, auto on/off, 7 transition, setting, 29 troubleshooting error messages, 37 frame, 34 turn on frame, 3 U upgrading 49 - Kodak D1030 | User Manual - Page 56
Index firmware, 29 software and firmware, 40 USB device, connecting, 8 V viewing modes, changing, 12 picture sources, 11 single picture, 15 thumbnails, 14 viewing mode button, i W wall mount, frame, 28 warranty, 41 Web sites, help, 33 50 www.kodak.com/go/support
-
 1
1 -
 2
2 -
 3
3 -
 4
4 -
 5
5 -
 6
6 -
 7
7 -
8
-
9
-
10
-
11
-
12
-
13
-
14
-
15
-
16
-
17
-
18
-
19
-
20
-
21
-
22
-
23
-
24
-
25
-
26
-
27
-
28
-
29
-
30
-
31
-
32
-
33
-
34
-
35
-
36
-
37
-
38
-
39
-
40
-
41
-
42
-
43
-
44
-
45
-
46
-
47
-
48
-
49
-
50
-
51
-
52
-
53
-
54
-
55
-
56
 |
 |

KODAK EASYSHARE Digital Frame
Extended user guide
D830/D1030
www.kodak.com
For help with your digital frame,
www.kodak.com/go/digitalframesupport