Kodak DX4900 User's Guide - Page 39
Placing the Date on Pictures
 |
View all Kodak DX4900 manuals
Add to My Manuals
Save this manual to your list of manuals |
Page 39 highlights
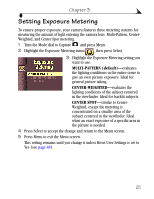
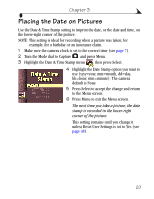
Chapter 3 Placing the Date on Pictures Use the Date & Time Stamp setting to imprint the date, or the date and time, on the lower-right corner of the picture. NOTE: This setting is ideal for recording when a picture was taken; for example, for a birthday or an insurance claim. 1 Make sure the camera clock is set to the correct time (see page 7). 2 Turn the Mode dial to Capture and press Menu. 3 Highlight the Date & Time Stamp menu , then press Select. 4 Highlight the Date Stamp option you want to use (yyyy=year, mm=month, dd=day, hh=hour, mm=minute). The camera default is None. 5 Press Select to accept the change and return to the Menu screen. 6 Press Menu to exit the Menu screen. The next time you take a picture, the date stamp is recorded in the lower-right corner of the picture. This setting remains until you change it unless Reset User Settings is set to Yes (see page 48). 29
-
 1
1 -
2
-
3
-
4
-
5
-
6
-
7
-
8
-
9
-
10
-
11
-
12
-
13
-
14
-
15
-
16
-
17
-
18
-
19
-
20
-
21
-
22
-
23
-
24
-
25
-
26
-
27
-
28
-
29
-
30
-
31
-
32
-
33
-
 34
34 -
 35
35 -
 36
36 -
 37
37 -
 38
38 -
 39
39 -
 40
40 -
 41
41 -
 42
42 -
 43
43 -
 44
44 -
45
-
46
-
47
-
48
-
49
-
50
-
51
-
52
-
53
-
54
-
55
-
56
-
57
-
58
-
59
-
60
-
61
-
62
-
63
-
64
-
65
-
66
-
67
-
68
-
69
-
70
-
71
-
72
-
73
-
74
-
75
-
76
-
77
-
78
-
79
-
80
-
81
-
82
-
83
-
84
-
85
-
86
-
87
-
88
-
89
-
90
-
91
-
92
-
93
-
94
-
95
-
96
-
97
-
98
-
99
-
100
-
101
-
102
-
103
-
104
-
105
-
106
 |
 |