Kodak ESP Office 6150 Networking Setup Guide - Page 3
Setting Up the Wireless Wi-Fi, Connection - printer
 |
View all Kodak ESP Office 6150 manuals
Add to My Manuals
Save this manual to your list of manuals |
Page 3 highlights
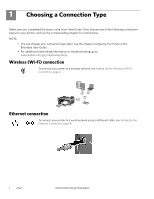
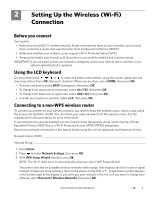
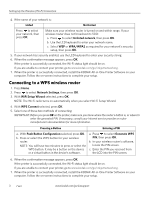
2 Setting Up the Wireless (Wi-Fi) Connection Before you connect You need to: • Have a functional 802.11 wireless network. Kodak recommends that you use a wireless access point, most commonly a router, that uses Dynamic Host Configuration Protocol (DHCP). • Determine whether your wireless router supports Wi-Fi Protected Setup (WPS). • Temporarily disable your firewall until the printer is successfully installed and communicating. IMPORTANT: If you are unsure of how your network is configured, contact your Internet service provider or your network administrator for assistance. Using the LCD keyboard On the printer, press , , or to select the letters and numbers, using the correct uppercase and lowercase letters. Press OK after each character. When you are done, select DONE, then press OK. • To erase a character, select BKSP (backspace), then press OK. • To change from uppercase to lowercase, select abc/123, then press OK. • To change from lowercase to uppercase, select ABC/123, then press OK. • To enter punctuation or symbols, select !@#, then press OK. Connecting to a non-WPS wireless router To connect your printer to your wireless network, you need to know the network name, which is also called the Service Set Identifier (SSID). You can obtain your network name from the wireless router. See the manufacturer's documentation for more information. If your network has security enabled, you also need to know the security string, which may be a Wired Equivalent Privacy (WEP) key or a Wi-Fi Protected Access (WPA/WPA2) passphrase. Record your network information in the spaces below, using the correct uppercase and lowercase letters. Network Name (SSID Security String 1. Press Home. 2. Press to select Network Settings, then press OK. 3. With WiFi Setup Wizard selected, press OK. NOTE: The Wi-Fi radio turns on automatically when you select WiFi Setup Wizard. The printer searches for available wireless networks within range, then displays the list in order of signal strength. If there are more networks than can be shown on the LCD, a (page down) symbol appears in the bottom right of the display. If you don't see your network in the list, or if you want to change your network, select Rescan for Wireless Networks, then press OK. www.kodak.com/go/aiosupport 2
-
 1
1 -
 2
2 -
 3
3 -
 4
4 -
 5
5 -
 6
6
 |
 |