Kodak Z712 Installation Guide
Kodak Z712 - EASYSHARE IS Digital Camera Manual
 |
UPC - 041771699512
View all Kodak Z712 manuals
Add to My Manuals
Save this manual to your list of manuals |
Kodak Z712 manual content summary:
- Kodak Z712 | Installation Guide - Page 1
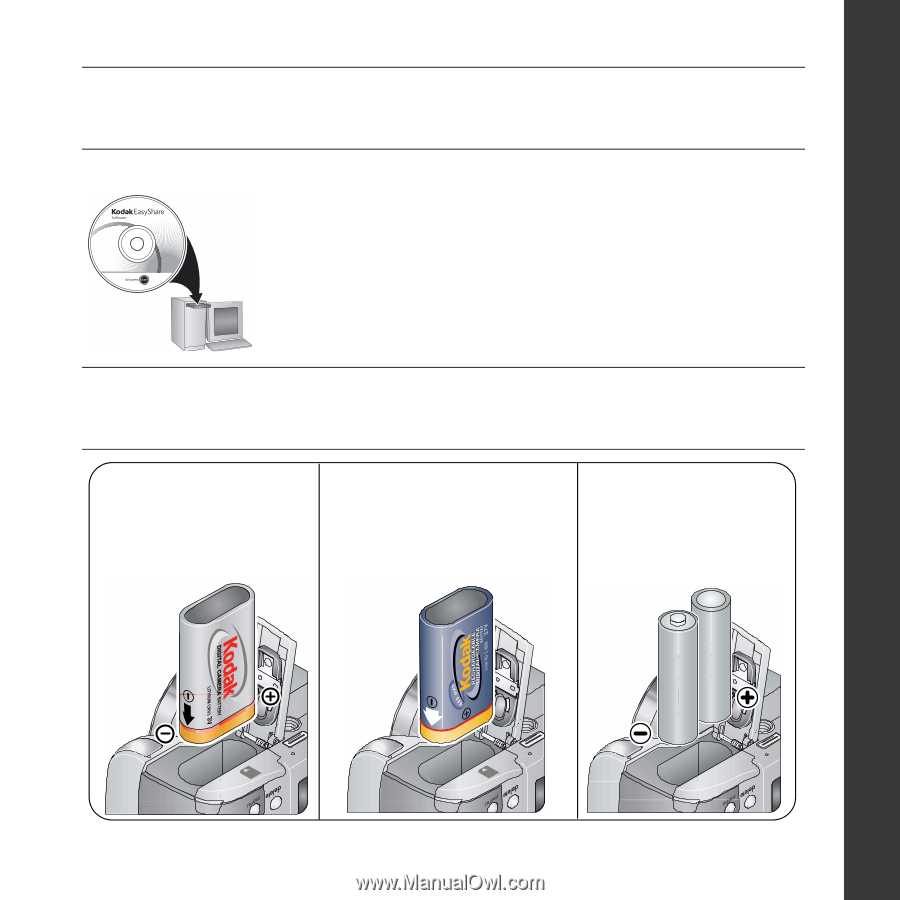
the on-screen instructions. After installing the software, return to this Getting Started Guide. ᕢ Loading the batteries Kodak lithium digital camera battery CRV3 (non-rechargeable) Kodak Li-Ion rechargeable digital camera battery KLIC-8000 AA lithium batteries www.kodak.com/go/z712support - Kodak Z712 | Installation Guide - Page 2
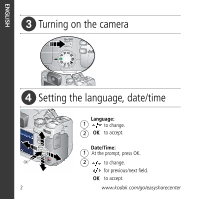
ENGLISH ᕣ Turning on the camera ᕤ Setting the language, date/time Language: 1 to change. 2 OK to accept. Date/Time: 1 At the prompt, press OK. OK 2 to change. for previous/next field. OK to accept. 2 www.kodak.com/go/easysharecenter - Kodak Z712 | Installation Guide - Page 3
indicator 3 Press the Shutter button halfway to focus and set exposure. When the AF/AE indicator turns green, press the Shutter button completely down. www.kodak.com/go/z712support 3 Press the Shutter button completely down and release. To stop recording, press the Shutter button again. 3 - Kodak Z712 | Installation Guide - Page 4
USB cable Kodak EasyShare printer dock or camera dock (May be sold separately.) 1 2 For dock compatibility, visit www.kodak.com/go/dockcompatibility. To purchase accessories, visit www.kodak.com/go/z712accessories. To use an EasyShare dock, see its Getting Started Guide. 4 www.kodak.com/go - Kodak Z712 | Installation Guide - Page 5
so you can take and share your best pictures! Visit www.kodak.com/go/z712support and www.kodak.com/go/easysharecenter for: • the extended user's guide • interactive troubleshooting and repairs • interactive tutorials • FAQs • downloads • accessories • printing information • product registration www - Kodak Z712 | Installation Guide - Page 6
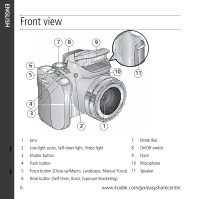
2 1 1 Lens 7 Mode dial 2 Low-light assist, Self-timer light, Video light 8 On/Off switch 3 Shutter button 9 Flash 4 Flash button 10 Microphone 5 Focus button (Close-up/Macro, Landscape, Manual Focus) 11 Speaker 6 Drive button (Self-timer, Burst, Exposure Bracketing) 6 www.kodak.com/go - Kodak Z712 | Installation Guide - Page 7
14 15 16 17 18 1 Battery compartment 2 Slot for optional SD or MMC card 3 Tripod socket 10 Info button 11 Review button 12 USB, A/V Out 4 Dock connector 13 DC-In (3V) 5 LCD 14 OK button 6 EVF/LCD button 15 7 EVF (Electronic viewfinder) 16 Share button 8 Zoom (Wide Angle/Telephoto) button - Kodak Z712 | Installation Guide - Page 8
can purchase SD or MMC cards to store more pictures and videos. We recommend Kodak SD or MMC cards. (Visit www.kodak.com/go/z712accessories.) 1 Turn off the camera. 2 Insert or remove the optional card. 3 Turn on the camera. CAUTION: A card can only be inserted one way; forcing it may cause damage - Kodak Z712 | Installation Guide - Page 9
close as 24 in. (60 cm) to your subject. ■As you zoom in (up to 12X), you need to move further from your subject. Use digital zoom in any Still mode to get up to 4.2X magnification beyond optical zoom. Press the Telephoto (T) button past the optical zoom limit (12X). www.kodak.com/go/z712support 9 - Kodak Z712 | Installation Guide - Page 10
night, indoors, or outdoors in heavy shadows. 1 Turn on the camera to open the flash. 2 Press the flash button repeatedly to scroll through take a picture, regardless of the lighting conditions. In low light, hold the camera steady or use a tripod. The flash fires once so the eyes become accustomed - Kodak Z712 | Installation Guide - Page 11
to view 2X magnification of the central area of focus. During magnification, press to adjust focal length. Digital zoom is not available in manual focus mode. Normal (none) For auto focusing The camera focuses when the Shutter button is pressed halfway down. www.kodak.com/go/z712support 11 - Kodak Z712 | Installation Guide - Page 12
Using the Drive button Using the self-timer 1 Place camera on a tripod or flat surface. 2 In any Still mode, press the Drive button. • Once for a 10-sec. delay ( stops when no storage space remains. Only the 2- and 10-second options are available in video mode. 12 www.kodak.com/go/easysharecenter - Kodak Z712 | Installation Guide - Page 13
event. Example: A person swinging a golf club. Camera takes up to 30 pictures while the Capture an button completely down and hold it to take pictures. The camera stops taking pictures when you release the .Drive Shutter in Review (see page 20). Burst is not available when shutter speeds - Kodak Z712 | Installation Guide - Page 14
bracketing to determine the best exposure (light) level for your conditions. During exposure bracketing, the camera takes 3 pictures: ■ One at + (above normal) exposure ■ One at 0 (normal) the 3 pictures. To evaluate the pictures, press the Review button. Drive 14 www.kodak.com/go/easysharecenter - Kodak Z712 | Installation Guide - Page 15
more with your camera Choose the mode that control. (See page 18.) Program, Aperture Priority, Shutter priority, and Manual mode. Viewing favorite pictures. Favorites Video with sound. (See page 3.) speed is fast. The camera pre-settings are Multi-Pattern Exposure Metering, Multi-Zone Focus. www - Kodak Z712 | Installation Guide - Page 16
Doing more with your camera SCN (Scene) modes 1 Turn the Mode dial to . 2 Press to highlight a SCN mode and view its description. NOTE: If the are in shadow or "backlit" (when light is behind the subject). Candle Light Subjects illuminated by candle light. 16 www.kodak.com/go/easysharecenter - Kodak Z712 | Installation Guide - Page 17
from your camera. NOTE: Some settings remain until you change them; others, until you change modes or turn off the camera. Some modes to highlight Setup , then press OK. Using the camera Help button To better understand each menu option, use camera Help. Highlight a menu choice, then press the - Kodak Z712 | Installation Guide - Page 18
zoom. Priority Aperture, exposure compensation, flash compensation, and ISO speed Shutter Priority Shutter priority mode is primarily used to prevent Shutter speed, exposure blur when your subject is moving. The camera .) compensation, and ISO speed Manual 18 www.kodak.com/go/easysharecenter - Kodak Z712 | Installation Guide - Page 19
change a setting. ISO-adjust the camera's sensitivity to light. Higher ISO lens opening, which determines the depth of field. ■ Smaller f-stop numbers indicate a larger lens opening; good for low-light. ■ Larger f-stop numbers indicate a smaller lens opening; keeps the main subject sharp. www.kodak - Kodak Z712 | Installation Guide - Page 20
and videos. Magnifying a picture 1 W/T Magnify 1X - 8X. 2 View other parts of the picture. 3 W Return to 1X. Deleting pictures and videos 1 Press Review. 2 View previous/next. 3 Press Delete. 4 Follow the screen prompts. If you accidentally delete a picture, you may be able to use Undo - Kodak Z712 | Installation Guide - Page 21
tech. Mode indicator Album Working with pictures/videos Protected Picture number Image storage location Scroll arrows Video length Favorite tag Email tag Review mode Album Scroll arrows www.kodak.com/go/z712support Protected Video number Image storage location Battery level Video controls 21 - Kodak Z712 | Installation Guide - Page 22
3 Solving camera problems Camera problems For step-by-step product support, visit www.kodak.com/go/z712support and select Interactive Troubleshooting & Repairs. If Try one or more of the following Camera does not turn on/off; controls do not function ■ Insert a new or charged battery. ■ If - Kodak Z712 | Installation Guide - Page 23
. For additional health-related information, contact your local Kodak customer support. ■ Dispose of batteries according to local and national regulations. Visit www.kodak.com/go/kes. ■ Do not charge non-rechargeable batteries. Visit www.kodak.com/go/batterytypes. www.kodak.com/go/z712support 23 - Kodak Z712 | Installation Guide - Page 24
your software and firmware Download the latest versions of the software included on the Kodak EasyShare software CD and the camera firmware (the software that runs on the camera). See www.kodak.com/go/z712downloads. Limited warranty Kodak warrants Kodak consumer electronic products and accessories - Kodak Z712 | Installation Guide - Page 25
equipment, cost of substitute equipment, facilities or services, or claims of your customers for such Kodak EasyShare Z712 IS zoom digital camera This equipment has been tested and found to comply with the limits for a Class B digital in accordance with the instructions, may cause harmful - Kodak Z712 | Installation Guide - Page 26
have been provided with the product or specified additional components or accessories elsewhere defined to be used with the installation of the product, municipal waste. Contact your local authorities or go to www.kodak.com/go/recycle for recycling program information. Australian C-Tick N137 VCCI Class - Kodak Z712 | Installation Guide - Page 27
China RoHS Appendix Russian GOST-R Eastman Kodak Company Rochester, NY 14650 AIO-40 Eastman Kodak Company Rochester, New York 14650 © Eastman Kodak Company, 2007 Kodak and EasyShare are trademarks of Eastman Kodak Company. 4J6067_en www.kodak.com/go/z712support 27
-
 1
1 -
 2
2 -
 3
3 -
 4
4 -
 5
5 -
 6
6 -
 7
7 -
8
-
9
-
10
-
11
-
12
-
13
-
14
-
15
-
16
-
17
-
18
-
19
-
20
-
21
-
22
-
23
-
24
-
25
-
26
-
27
 |
 |
www.kodak.com/go/z712support
1
ENGLISH
±
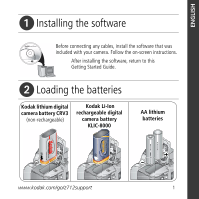
Installing the software
²
Loading the batteries
After installing the software, return to this
Getting Started Guide.
Before connecting any cables, install the software that was
included with your camera. Follow the on-screen instructions.
AA lithium
batteries
Kodak Li-Ion
rechargeable digital
camera battery
KLIC-8000
Kodak lithium digital
camera battery CRV3
(non-rechargeable)