Kodak Z712 Installation Guide - Page 14
Using exposure bracketing
 |
UPC - 041771699512
View all Kodak Z712 manuals
Add to My Manuals
Save this manual to your list of manuals |
Page 14 highlights
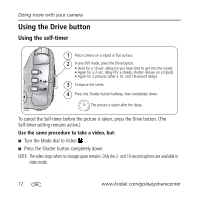
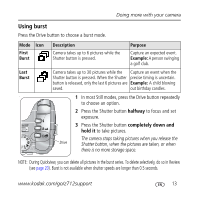
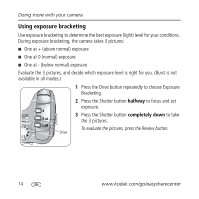
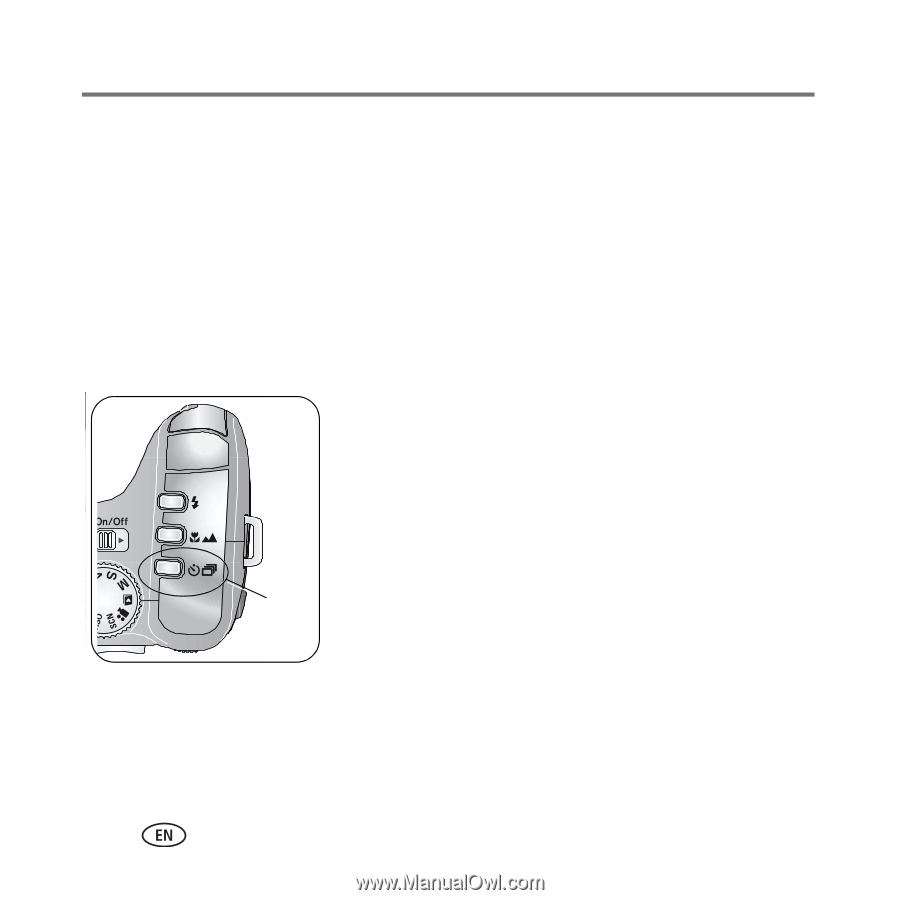
Doing more with your camera Using exposure bracketing Use exposure bracketing to determine the best exposure (light) level for your conditions. During exposure bracketing, the camera takes 3 pictures: ■ One at + (above normal) exposure ■ One at 0 (normal) exposure ■ One at - (below normal) exposure Evaluate the 3 pictures, and decide which exposure level is right for you. (Burst is not available in all modes.) 1 Press the Drive button repeatedly to choose Exposure Bracketing. 2 Press the Shutter button halfway to focus and set exposure. 3 Press the Shutter button completely down to take the 3 pictures. To evaluate the pictures, press the Review button. Drive 14 www.kodak.com/go/easysharecenter
-
 1
1 -
2
-
3
-
4
-
5
-
6
-
7
-
8
-
 9
9 -
 10
10 -
 11
11 -
 12
12 -
 13
13 -
 14
14 -
 15
15 -
 16
16 -
 17
17 -
 18
18 -
 19
19 -
20
-
21
-
22
-
23
-
24
-
25
-
26
-
27
 |
 |
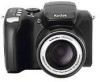
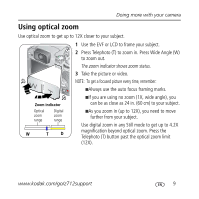
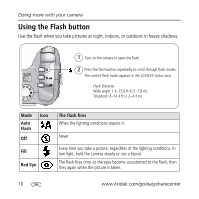
Doing more with your camera
14
www.kodak.com/go/easysharecenter
Using exposure bracketing
Use exposure bracketing to determine the best exposure (light) level for your conditions.
During exposure bracketing, the camera takes 3 pictures:
■
One at + (above normal) exposure
■
One at 0 (normal) exposure
■
One at - (below normal) exposure
Evaluate the 3 pictures, and decide which exposure level is right for you. (Burst is not
available in all modes.)
1
Press the Drive button repeatedly to choose Exposure
Bracketing.
2
Press the Shutter button
halfway
to focus and set
exposure.
3
Press the Shutter button
completely down
to take
the 3 pictures.
To evaluate the pictures, press the Review button.
Drive