Konica Minolta DR1600 DR1600MKII User manual
Konica Minolta DR1600 Manual
 |
View all Konica Minolta DR1600 manuals
Add to My Manuals
Save this manual to your list of manuals |
Konica Minolta DR1600 manual content summary:
- Konica Minolta DR1600 | DR1600MKII User manual - Page 1
- Konica Minolta DR1600 | DR1600MKII User manual - Page 2
when the equipment generates, uses, and can radiate radio frequency energy and, if not installed and used in accordance with the instruction manual, may cause harmful interference to radio communications. Operation of this equipment in a residential area is likely to cause harmful interference in - Konica Minolta DR1600 | DR1600MKII User manual - Page 3
, all operators should carefully read and follow the instructions in this manual. Please read the following section before connecting the contains important information related to user safety and preventing equipment problems. Please keep this manual in a handy place near the machine. Make sure - Konica Minolta DR1600 | DR1600MKII User manual - Page 4
If a power cord is not supplied, only use the power cord and plug that is specified in POWER CORD INSTRUCTION. Failure to use this cord could result in a fire or electrical shock. • Use the power cord supplied power cord from the power outlet, and then call your authorized service representative. - Konica Minolta DR1600 | DR1600MKII User manual - Page 5
Use of an adapter or an extension cord could cause a fire or electrical shock. Contact your authorized service representative if an extension cord is required. • Consult your authorized service representative before connecting other equipment on the same wall outlet. Overload could result in a fire - Konica Minolta DR1600 | DR1600MKII User manual - Page 6
matter get inside the product, immediately turn OFF the power switch, unplug the power cord from the power outlet, and then call your authorized service representative. CAUTION • After installing this product, mount it on a secure base. If the unit moves or falls, it may cause personal injury. • Do - Konica Minolta DR1600 | DR1600MKII User manual - Page 7
troubles WARNING • Do not keep using this product, if this product becomes inordinately hot or emits smoke, or unusual odor or noise. Immediately turn OFF the power switch, unplug the power cord from the power outlet, and then call your authorized service in the User's Guide or other documents. If - Konica Minolta DR1600 | DR1600MKII User manual - Page 8
...14 RELATIONSHIP BETWEEN DOCUMENT SIZE AND MAGNIFICATION.......... 15 TAKING A STEP TEST 16 MICROFILMING 17 RECORDING DOCUMENT MARK 18 RECORDING FRAME NUMBER 20 MANUAL EXPOSURE MODE 22 CHOICE MODES 23 MAINTENANCE AND SERVICES 27 POTENTIAL PROBLEMS 29 TROUBLESHOOTING 30 SUPPLEMENT 31 - Konica Minolta DR1600 | DR1600MKII User manual - Page 9
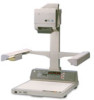
Consumption: ■ Dimensions: ■ Weight: ■ Options: ■ Accessory: : Planetary Microfilmer : Micro-Rokkor f = 28 mm : 16-mm Roll Film (Non- length of film remaining for use reaches approx. 1.5 meters. (5 ft.) : Automatic and Manual exposure control : Two 15-W fluorescent lamps : 120 V 60 Hz, 220/230 - - Konica Minolta DR1600 | DR1600MKII User manual - Page 10
INSTALLATION ■ INSTALLATION ■ Space Requirements To ensure easy operation and service the machine requires the following installation space. 2 - Konica Minolta DR1600 | DR1600MKII User manual - Page 11
■ Installation Site To prevent the machine from developing malfunction and to ensure its best possible performance, avoid installing the machine in a place: • Which is exposed to direct sunlight. • Which is immediately under a light. • Which is near a bright window. • Which is in the direct air - Konica Minolta DR1600 | DR1600MKII User manual - Page 12
. Press this Key to allow for generating a large document mark in dual-level recording or a medium document mark in tri-level recording. Press this Key to allow for generating a large document mark in tri-level recording. Incremented by one each time the Shutter Button is pressed, showing a running - Konica Minolta DR1600 | DR1600MKII User manual - Page 13
to four different Film Units. Switch 1 Switch 2 1 2 3 4 ON ON OFF OFF OFF ON ON OFF NOTE If the Memory Switch positions are changed during microfilming or with the Film Unit removed, the machine memory is unable to keep track of the correct data. Be sure, therefore, to make the switch - Konica Minolta DR1600 | DR1600MKII User manual - Page 14
ON/OFF Key: 7 Clear Key: 8 Number Keys: Press this Key to select the document-mark recording level, either 0, 1, 2, or 3. The lit indicator , , , or indicates the level currently exposure time in the Manual Exposure Mode, and the number of frames to be skipped between images (variable setting). - Konica Minolta DR1600 | DR1600MKII User manual - Page 15
9 Leader/Trailer Key (Variable Setting): 10 Leader/Trailer Key (Fixed Setting): 11 Manual Exposure Select Key: 12 Auto Exposure Control Knob: 13 Auto Exposure Select Key: 14 Film Empty Indicator: Press this Key to allow for setting the - Konica Minolta DR1600 | DR1600MKII User manual - Page 16
REMOVING AND INSTALLING THE FILM UNIT NOTE When removing and installing the Film Unit, make sure that the Power ON/OFF Switch is turned OFF. The Film Unit should be removed and installed where it is in a 1/25 reduction ratio position. ❑ Installation: 1 Hold the Film Unit with your both hands, its - Konica Minolta DR1600 | DR1600MKII User manual - Page 17
level - 0, 1, 2, or 3. Select frame number mode - OFF, 12 digits (A, B, C), 8 digits, 4 digits or OFF. Place document on Copy Board. Select exposure mode - Manual (exposure time) or Auto. Start filming. Filming completes. Advance film 50 to 100 frames. Unload film. Develop photographed documents. 9 - Konica Minolta DR1600 | DR1600MKII User manual - Page 18
LOADING AND UNLOADING FILM ■ LOADING AND UNLOADING FILM NOTE It is recommended to use a dark room when load or unload film to prevent fogging effect. 1. Loading Film 1 Place the Film Unit on its side as illustrated. Turn the Film Door Lock in the direction of arrow (counterclockwise) to open the - Konica Minolta DR1600 | DR1600MKII User manual - Page 19
If film is not threading properly, rethread it by following the instructions. 2. Unloading Film The Film Empty Indicator blinks red with beeps the length of film still available for exposure reaches a given point during microfilming. (approx 1.5 meters or 5 feet). When this occurs stop filming and - Konica Minolta DR1600 | DR1600MKII User manual - Page 20
2 Turn the Film Door Lock in the direction of arrow and open the Take-Up Door. 3 With your fingertips, hold the film down in the Take-Up Spool to prevent it from unraveling. While so doing, cut off the film. 4 Remove the Take-Up Spool from the Take-Up Spindle and place it into a light-proof - Konica Minolta DR1600 | DR1600MKII User manual - Page 21
❑ Unloading Full Roll: 1 Press [STOP] Key to stop the beeps sounding. Immediately stop filming and, using the Spacing Key, advance film until it is completely wound around the Take-Up Spool. Turn Power ON/OFF Switch off, then, remove the Film Unit from the Film Unit Mounting Board. NOTE Additional - Konica Minolta DR1600 | DR1600MKII User manual - Page 22
SPACING ■ SPACING ■ Single Frame: Depress the Spacing Key. NOTE Holding this key down will advance the film continuously. ■ Prefixed Number of frames: ❑ by using key, can be selected any desired number of frames between 1 and 9999 to be advanced. (See page 7) ❑ by using key, prefixed number ( - Konica Minolta DR1600 | DR1600MKII User manual - Page 23
(12-13/32") Legal 216 mm x 356 mm (8-1/2") (14") 310.5 mm x 403.2 mm (12-9/32") (15-7/8") NOTES • When filming a document of irregular size, manually select the reduction ratio and frame size. • The minimum size of document acceptable for auto-exposure filming is 95 mm x 170 mm or 3-3/4" x 6-11 - Konica Minolta DR1600 | DR1600MKII User manual - Page 24
result is not obtained in the Auto Exposure Mode, use the Manual Exposure Mode. Image Dark Exposure Remedy Auto Slide the Auto Exposure Control 000 ms Auto Slide the Auto Exposure Control Knob to the left. Darker Lighter Manual Set a faster exposure time. 50 ms 2,000 ms * The step test can - Konica Minolta DR1600 | DR1600MKII User manual - Page 25
MICROFILMING ■ Microfilming on DR1600MKII Place the document face up on the Copy Board so that its front left edge is held tight up against the " " mark on the Board, then press the Shutter Button. NOTE Up to 20-mm(25/32")-thick document microfilmed in focus. 17 - Konica Minolta DR1600 | DR1600MKII User manual - Page 26
DOCUMENT MARK A document mark can be generated on each image or frame of a roll of microfilm for indexing purposes. It is recorded on the A-ch side (bottom side) of a roll by the following procedure. 1 Press the Document Mark Level Select Key as many times as it is - Konica Minolta DR1600 | DR1600MKII User manual - Page 27
Batch Key (Indicator will light-up)., then press the Shutter Button. When you place an item document, directly press the Shutter Button. Tri-Level Recording 3 When you place a block document on the Copy Board, press the Block Key (Indicator will light-up)., then press the Shutter Button. When you - Konica Minolta DR1600 | DR1600MKII User manual - Page 28
FRAME NUMBER In addition to the document marks, a frame number can also be recorded on the B-ch side at top left of each image or frame of a roll of microfilm for indexing purposes. A frame number may consist of 4 digits, 8 digits (4 digits x 2 fields), or 12 digits (4 digits x 3 fields). ■ The - Konica Minolta DR1600 | DR1600MKII User manual - Page 29
the number corresponding to the medium document mark (the second 4-digit field), press the Batch key, then press the Shutter Button. -To record the number corresponding to the small document mark (the third 4-digit field), directly press the Shutter Button. ■ Frame Number Changing Procedure To - Konica Minolta DR1600 | DR1600MKII User manual - Page 30
MODE If the Auto Exposure Mode fails to produce optimum exposure condition, the Manual Exposure Mode can be used for better microfilming results. When in the Manual Exposure Mode, the machine allows you to vary the exposure time in the range between 50 ms and 2,000 ms. ■ Procedure: 1 Press - Konica Minolta DR1600 | DR1600MKII User manual - Page 31
CHOICE MODES ■ CHOICE MODES The microfilmer offers ten Choice Modes, CH2 to CH8, allowing you to define the various priority modes which are automatically selected when the machine is turned ON. 1. - Konica Minolta DR1600 | DR1600MKII User manual - Page 32
2. Details of Each Choice Mode Mode Number Description Document mark recording level No document mark Single-level recording Dual-level recording Tri-level recording Single-level document mark size Dual-level document mark size (combination) 24 - Konica Minolta DR1600 | DR1600MKII User manual - Page 33
Mode Number Description Frame number display (no. of digits) 12-digit A-mode 12-digit B-mode 8-digit (12-digit display) When BLOCK Key is pressed: BLOCK - Incremented by one BATCH - Reset to 0000 ITEM - Reset to 0001 When BATCH Key is pressed: BLOCK - Not incremented BATCH - Incremented by one - Konica Minolta DR1600 | DR1600MKII User manual - Page 34
to be skipped, as effected by the Leader/Trailer Key (Fixed Setting) Film advance pitch (Pulldown) Document mark recording position. The position of the 2.3 mm width mark in single-level recording can only be varied. NOTE When you setting the document blip mark position between 1.21 mm to 4.21 mm - Konica Minolta DR1600 | DR1600MKII User manual - Page 35
MAINTENANCE AND SERVICES ■ MAINTENANCE AND SERVICES 1. Replacing the Illumination Lamp When the ends of a fluorescent lamp turn black, it indicates that the lamp needs replacement. To ensure even illumination over the - Konica Minolta DR1600 | DR1600MKII User manual - Page 36
2. Cleaning Dust and dirt impair performance of any optical equipment. Keep the microfilmer clean at all times. ❍ Film Unit Wipe clean of dirt the interior of Take-Up and Supply Rooms and the Lens. After a roll of film - Konica Minolta DR1600 | DR1600MKII User manual - Page 37
POTENTIAL PROBLEMS When any error message occurs in the Microfilmer, an error message appears on the display, the Shutter Button turns red, and microfilm advancing stop. In this case, check the error code (numbers following the letter "E") and call your authorized Service Representative. Error Code - Konica Minolta DR1600 | DR1600MKII User manual - Page 38
TROUBLESHOOTING ■ TROUBLESHOOTING Symptom Possible Cause Remedy ❍ Power is not supplied to microfilmer right for darker image. • Set a faster exposure time in Manual Mode. ❍ Both edges of film are black. • Film was troubles not covered in the above chart, call your service representative. 30 - Konica Minolta DR1600 | DR1600MKII User manual - Page 39
SUPPLEMENT ■ Maintenance the Document Pressure Glass. As a document is being fed, the Document Pressure Glass and the Document Transport Belt became electrostatically changed. This causes a rise in the coefficient of friction. As a result, a document might be transported skewed or might misfeed. If - Konica Minolta DR1600 | DR1600MKII User manual - Page 40
For Key Operators Use When you need to call for service, the Key Operator should be prepared to provide the following information: 1. Your Company Name, Address, Telephone No., purpose. Model Name Serial Number Installation Date Authorized Dealer's Name Tel. No. for Supply for Service DR1600MKII - Konica Minolta DR1600 | DR1600MKII User manual - Page 41
-
 1
1 -
 2
2 -
 3
3 -
 4
4 -
 5
5 -
 6
6 -
 7
7 -
8
-
9
-
10
-
11
-
12
-
13
-
14
-
15
-
16
-
17
-
18
-
19
-
20
-
21
-
22
-
23
-
24
-
25
-
26
-
27
-
28
-
29
-
30
-
31
-
32
-
33
-
34
-
35
-
36
-
37
-
38
-
39
-
40
-
41
 |
 |
