Konica Minolta bizhub 4750 bizhub 4750/4050 Scan Functions User Guide - Page 89
Preparation for TWAIN/WIA scanning - print drivers
 |
View all Konica Minolta bizhub 4750 manuals
Add to My Manuals
Save this manual to your list of manuals |
Page 89 highlights
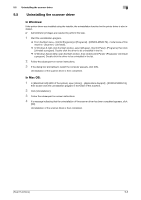
9.2 Preparation for TWAIN/WIA scanning 9 9.2 Preparation for TWAIN/WIA scanning 9.2.1 Machine side: Operations required to use this function (for administrators) Checking a LAN cable for connection Check that a LAN cable connected to the network is connected to the LAN port of this machine. Checking the network settings Print out the Configuration Page, then check that an IP address is assigned to this machine. To print out the Configuration Page, select [Utility] - [User Settings] - [Printer Settings] - [Print Reports] - [Configuration Page]. dReference If no IP address is assigned to this machine, you will need to configure the network. For details, refer to [Quick Start Guide]. 9.2.2 Computer side: Operations required to use this function Operating environment of computer In Windows: Item Supported operating systems CPU Memory Specifications Windows XP/Vista/7/8/Server 2003/Server 2008 (32 bit) Windows XP/Vista/7/8/Server 2003/Server 2008/Server 2008 R2/Server 2012 (64 bit) * For the latest information such as the service pack, refer to Readme. Any processor of the same or higher specifications as recommended for your operating system Memory capacity as recommended for your operating system In Mac OS: Item Supported operating systems CPU Memory Specifications Mac OS X (10.3.9, 10.4.x, 10.5.x, 10.6.x, 10.7.x, 10.8.x) PowerPC, Intel Processor Memory capacity as recommended for your operating system Installing the scanner driver (Windows) Install the scanner driver from the CD-ROM supplied with this machine to a computer. 0 Administrator privileges are required to perform this task. 0 Use the Drivers & Utilities CD-ROM. 1 Insert the CD-ROM for the scanner driver into the CD-ROM drive of the computer. % Make sure that the installer starts, then proceed to Step 2. % If the installer does not start, open the scanner driver folder on the CD-ROM, double-click [Auto- Run.exe], then proceed to Step 3. % If the [User Account Control] window appears, click [Continue] or [Yes]. 2 Click [Scanner]. The scanner driver installer starts. [Scan Functions] 9-3
-
 1
1 -
2
-
3
-
4
-
5
-
6
-
7
-
8
-
9
-
10
-
11
-
12
-
13
-
14
-
15
-
16
-
17
-
18
-
19
-
20
-
21
-
22
-
23
-
24
-
25
-
26
-
27
-
28
-
29
-
30
-
31
-
32
-
33
-
34
-
35
-
36
-
37
-
38
-
39
-
40
-
41
-
42
-
43
-
44
-
45
-
46
-
47
-
48
-
49
-
50
-
51
-
52
-
53
-
54
-
55
-
56
-
57
-
58
-
59
-
60
-
61
-
62
-
63
-
64
-
65
-
66
-
67
-
68
-
69
-
70
-
71
-
72
-
73
-
74
-
75
-
76
-
77
-
78
-
79
-
80
-
81
-
82
-
83
-
 84
84 -
 85
85 -
 86
86 -
 87
87 -
 88
88 -
 89
89 -
 90
90 -
 91
91 -
 92
92 -
 93
93 -
 94
94 -
95
-
96
-
97
-
98
-
99
-
100
 |
 |
