Kyocera C270N Installation Guide
Kyocera C270N - EcoPro EP Color Laser Printer Manual
 |
UPC - 632983011935
View all Kyocera C270N manuals
Add to My Manuals
Save this manual to your list of manuals |
Kyocera C270N manual content summary:
- Kyocera C270N | Installation Guide - Page 1
EP C170N/EP C220N/EP C270N Installation Guide Unpacking Unpack the printer and components. Remove the filler. Important! Kyocera Mita assumes no liability for any damage caused by an improper installation of the printer. Check Parts and Components When carrying the printer, always hold the - Kyocera C270N | Installation Guide - Page 2
the color registration, call for service. © 2007 by KYOCERA MITA Corporation All rights reserved. 2-28, 1-Chome, Tamatsukuri, Chuo-ku Osaka 540-8585, Japan For more information about the printer, refer to the Operation Guide (CD-ROM) supplied with the printer. Printed in Japan 302HJ56050 Rev
-
 1
1 -
 2
2
 |
 |
Installation Guide
Important!
Kyocera Mita assumes no liability for any damage caused by an improper
installation of the printer.
Continued on the
Reverse page
Basic installation is now complete. Before using the printer, set the color registration. Refer to
“Setting the Color Registration” procedure on the reverse page.
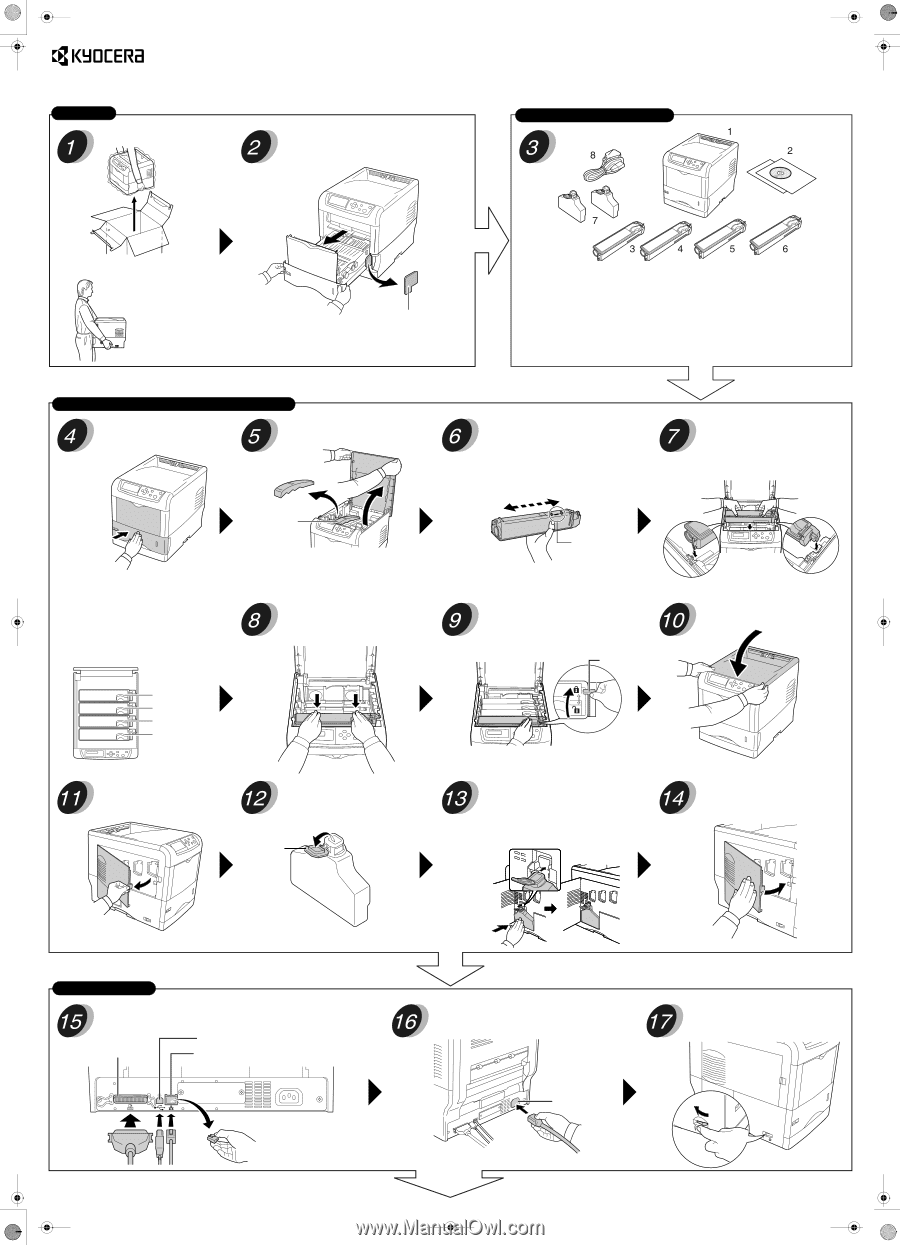
Unpack the printer and components.
Remove the filler.
When carrying the printer,
always hold the right and
left sides as shown.
1.
Printer
2.
Documentation and software
•
Installation Guide (this sheet)
•
Other Printed Matters
• CD-ROM
3.
Magenta Toner Container
4.
Cyan Toner Container
5.
Yellow Toner Container
6.
Black Toner Container
7.
Waste Toner Boxes (one is
spare)
8.
Power cord
Close the paper transfer unit tightly.
Open the top cover and remove the
packing item.
This example shows installing the black toner
container.
Hold the toner container with the markings
(caution notes, etc.) facing downward and
shake it 5 or 6 times as shown.
Do not push the center of the container or touch the toner
supply opening during this procedure.
Place the new toner container in the
printer with the markings facing
upward.
Note
Ensure the toner container is in the correct
location for that color.
Magenta (M)
Cyan (C)
Yellow (Y)
Black (K)
Push down on the container until it
clicks firmly into place.
Apply light pressure to the container and
push the blue lock lever back towards the
locked symbol as far as it will go.
Lock Lever
Follow the procedure above to install the other color toner
containers.
Close the top cover.
Open the left cover.
Open the cap of the waste toner box.
Position the bottom of the waste toner box
in the receptacle and push the box down
until it snaps firmly into place.
Close the left cover.
Connect the printer to your computer. (The connecting cable is sold
separately.)
Connect the provided power cord to the connector.
Turn on ( | ) the power switch located on
the left side of the printer.
Power Cord
Connector
EP C170N/EP C220N/EP C270N
Unpacking
Check Parts and Components
Install the Toner Containers and Waste Toner Box
Make Connections
Parallel Interface
(EP C270N only)
USB Interface
Network Interface (Ethernet)
Rear
Packing Item
Toner Supply
Opening
Filler
Cap
Remove the cap, when using
the network interface.