Kyocera C270N Installation Guide - Page 2
>>Print Regist Chart
 |
UPC - 632983011935
View all Kyocera C270N manuals
Add to My Manuals
Save this manual to your list of manuals |
Page 2 highlights
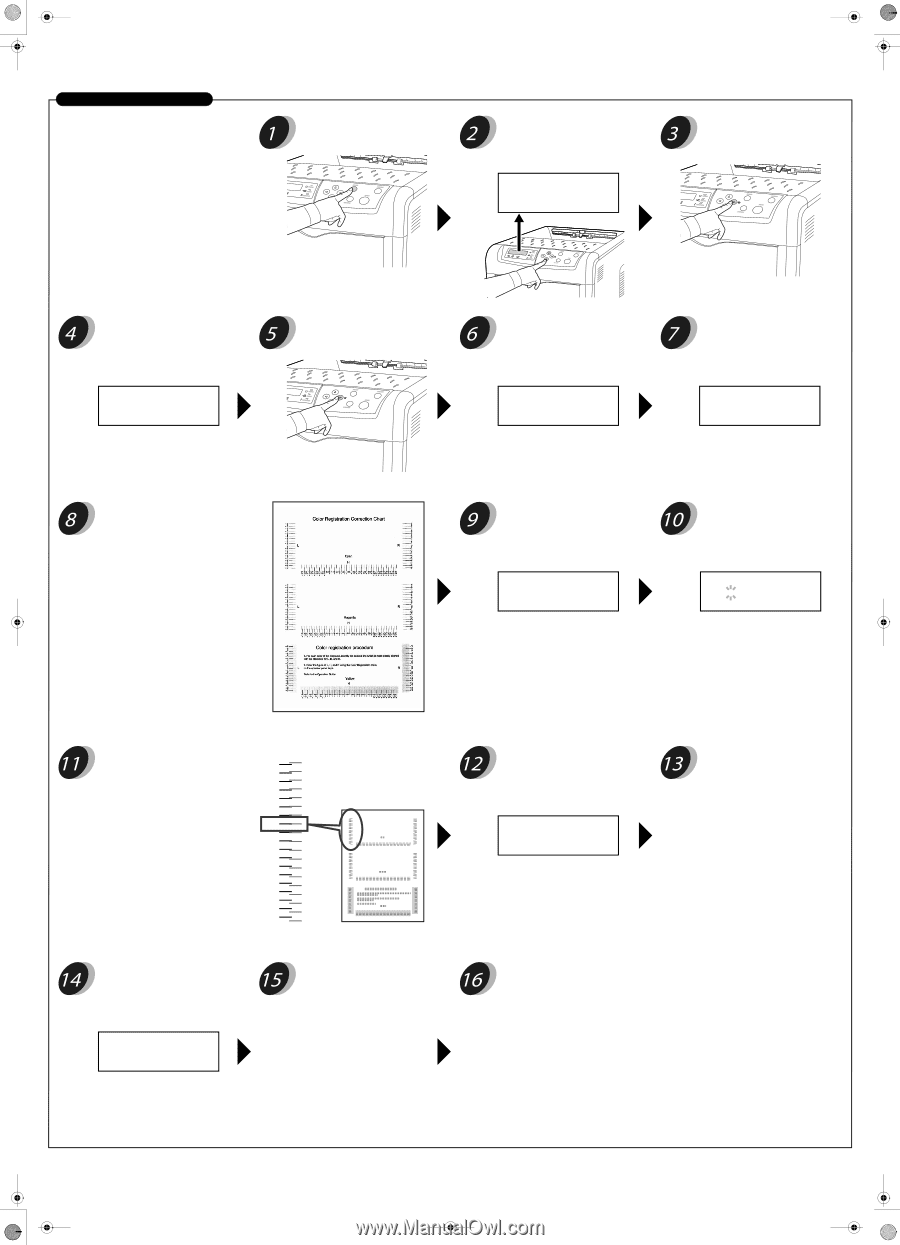
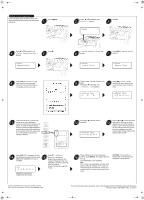
Setting the Color Registration Before using the printer for the first time, load paper and perform the following color registration procedure. Press [MENU]. Press U or V repeatedly until >Color Registration > appears. >Color > Registration Press Z. Press [OK]. Processing will appear and a color registration correction chart will be printed out. The display returns to Ready. Press U or V repeatedly until Others > appears. Others > Press Z. >>Print Regist Chart will appear >>Print Regist Chart Press [OK]. A question mark (?) appears. >>Print Regist Chart ? Perform steps 1 through 5 above once again. Press U or V repeatedly until >>Adjust Cyan appears. >>Adjust Cyan L= H= R= Press [OK]. 0 or 00 will be displayed for each value and the cursor will flash under the left (L) value. >>Adjust Cyan L= 0 H= 00 R= 0 Look at the left chart (L) in the cyan portion of the color registration -9 correction chart that you printed out in -8 step 8. Find the two lines that most -7 seem to overlap as a single straight line and note the number value listed there. -6 -5 -4 In the example below the value would -3 be -2. (Be careful of plus [+] and minus[-] numbers.) -2 -1 0 L +1 +2 +3 +4 +5 +6 +7 +8 +9 Color Regirasttion CorrectionrtCha Press [OK]. OK? will appear. If all of the displayed values are correct, press [OK]. Color registration for cyan is complete. OK? L=-2 H= 00 R= 0 Repeat the procedure for magenta and then yellow. Press V. >>Adjust Magenta will appear. Repeat the procedure to find values for Magenta in the color registration correction chart and enter the settings. Repeat the procedure again for Yellow. Press U or V until that value is displayed. >>Adjust Cyan L=-2 H= 00 R= 0 Use the Y and Z to move the cursor right and left. Perform the same operation as you did for the left (L) value in order to find the horizontal (H) and right (R) values for cyan in the color registration correction chart, and select those values on the operator panel as well. When settings for all 3 colors have been entered, press [MENU]. The display returns to Ready. Color registration is now complete. Note Print out the color registration correction chart again to check the settings. If "0" is does not correspond to the two lines that overlap as a single straight line, repeat the procedure from step 9. CAUTION: If color prints are skewed after correcting the color registration, call for service. © 2007 by KYOCERA MITA Corporation All rights reserved. 2-28, 1-Chome, Tamatsukuri, Chuo-ku Osaka 540-8585, Japan For more information about the printer, refer to the Operation Guide (CD-ROM) supplied with the printer. Printed in Japan 302HJ56050 Rev. 1.0 2007.7
-
 1
1 -
 2
2
 |
 |