Kyocera C8100DN Operation Guide - Page 47
Print Quality Problems, Corrective Action
 |
View all Kyocera C8100DN manuals
Add to My Manuals
Save this manual to your list of manuals |
Page 47 highlights
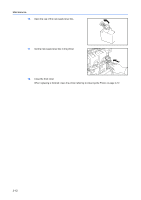
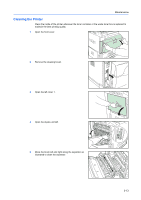
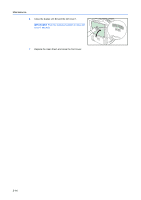
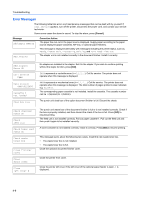
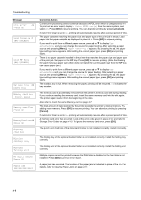
Troubleshooting Print Quality Problems The tables and diagrams in the following sections define print quality problems and the corrective action you can take to solve the problems. Some solutions may require cleaning or replacing parts of the printer. If the suggested corrective action will not solve the problem, call for service. Printed Results Skewed-color printout Corrective Action Perform color registration. Perform color registration using the printer operation panel. Completely blank printout Check the feed unit. Pull out paper cassette 1 and check if the feed unit is correctly installed. Dropouts, horizontal streaks, stray dots Refresh drum. Refer to the following procedures on the operation panel and try cleaning the drum surface using the printer's built-in cleaning system. 1 Press [Menu], and then press S or T to display Others >. 2 Press X, and then press S or T to display >Service >. 3 Press X, and then press S or T to display >>Drum. And then press [OK] twice. 4 The message display shows Please wait, and then the drum starts turning and stops after approx. 100 seconds. The printer reverts to Ready. Clean the separator. Open the printer left cover 1 and clean the separator with a cleaning brush. Refer to Cleaning the Printer on page 3-13. White vertical streaks Clean the laser scanner unit. Perform the following procedures on the operation panel and try cleaning the laser scanner unit using the printer's built-in cleaning system. 1 Press [Menu], and then press S or T to display Others >. 2 Press X, and then press S or T to display >Service >. 3 Press X, and then press S or T to display >>LSU. And then press [OK] twice. 4 The message display shows Please wait, and cleaning will be conducted for about 10 seconds. The printer reverts to Ready when cleaning is finished. 4-3
-
 1
1 -
2
-
3
-
4
-
5
-
6
-
7
-
8
-
9
-
10
-
11
-
12
-
13
-
14
-
15
-
16
-
17
-
18
-
19
-
20
-
21
-
22
-
23
-
24
-
25
-
26
-
27
-
28
-
29
-
30
-
31
-
32
-
33
-
34
-
35
-
36
-
37
-
38
-
39
-
40
-
41
-
 42
42 -
 43
43 -
 44
44 -
 45
45 -
 46
46 -
 47
47 -
 48
48 -
 49
49 -
 50
50 -
 51
51 -
 52
52 -
53
-
54
-
55
-
56
-
57
-
58
-
59
-
60
-
61
-
62
-
63
-
64
-
65
-
66
-
67
-
68
-
69
-
70
-
71
-
72
 |
 |
