Kyocera KM-2560 IB-40 Setup Guide - Page 1
Kyocera KM-2560 Manual
 |
View all Kyocera KM-2560 manuals
Add to My Manuals
Save this manual to your list of manuals |
Page 1 highlights
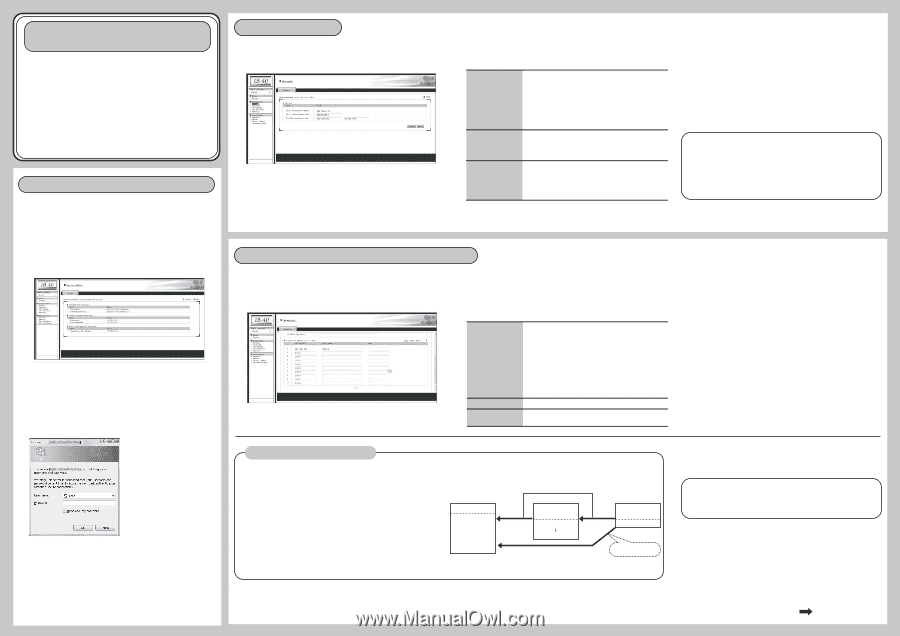
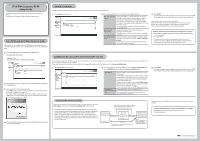
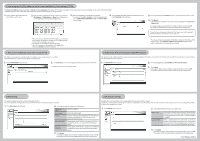
IPv6-IPv4 Converter IB-40 Setup Guide This Setup Guide describes how to setup the IPv6-IPv4 Converter, IB-40 (this product). Please refer to the "Installation Guidance" before starting the setup. Access the Web page and configure the general settings This product can be configured from its Web page by using a Web browser. The following explains how to access the Web page and view each configuration page. 1. Access the Web page of this product using a Web browser. (Example) http://ib40:60000/ (Example) http://[fe80::2c0:eeff:fe00:1122]:60000/ 2. Click the item you wish to configure from the configuration items displayed in the Web page. 3. A password entry screen will be displayed. Enter root for the user name and the password set for this product to the password. Click OK when completed. (As factory default, no password is set for this product. In this case, enter root for the user name and then leave the password blank and click OK.) 4. Once user authentication has succeeded, the configuration page you have selected will be displayed. 1.General Configuration Configure the general settings of this product. To use this product, these settings must be configured. 1. Click General on the left pane. 2. In the page displayed, enter the value for each configuration item. MFP main unit IPv4 address Enter the IPv4 address set for the MFP main unit (not the IPv4 address of this product). If your machine is 50 ppm (cpm) or lower speed model, enter the fixed IP address. If your machine is 60 ppm (cpm) or higher speed model, IPv4 address will be automatically assigned by DHCP. Leave this field as "0.0.0.0". * If you fail to connect using 0.0.0.0, enter the IP address assigned by DHCP. MFP main unit subnet mask Configure the subnet mask for the MFP main unit running on an IPv4 network. * This value must be entered even if the IP address is automatically assigned. IPv4 Address range to use Set the Start Address and End Address of the IPv4 address range you reserved for this product in Before using this product.... * Please make sure that the IPv4 address of the MFP main unit is not included in this range. 3. Click Submit. A message will appear and ask whether to reboot this product or not. Click OK. This product will automatically reboot itself and finish the configuration. The general configuration has been completed. Now, the MFP main unit can be accessed from the IPv6 network via this product. By using the IPv6 address of this product, IPv6 devices can communicate with the MFP main unit via the IPv6 network. Protocols enabled by completing the general configuration (example). TCP: telnet(#23), http(#80), LPR(#515), IPP(#631), RAW mode print(#9100), FTP-Server(#21) UDP: SNMP(#161) * This product transparently forwards protocols other than IPv6. Communication to the MFP main unit using IPv4 or other protocols (e.g. Netware and AppleTalk) can be carried out as usual. 2.Configuration for accessing IPv6 devices from the MFP main unit When communicating from the MFP main unit to an IPv6 network such as when sending/receiving an email or transferring a file, the IPv4 address sent out from the MFP main unit needs to be converted to an IPv6 address. This product converts IPv4 addresses to IPv6 addresses by mapping IPv4 addresses to IPv6 addresses in the Conversion Address List. 1. Click Advanced on the left pane. 2. On the page displayed, enter the addresses into the Conversion Address List. Up to 128 addresses can be set to the Conversion Address List. IPv4 Address IPv6 Address Note Set the IPv4 address of the destination device to be set on the MFP main unit. The IPv4 address configured here is not the IPv4 address actually used by the device that the MFP main unit communicates with. It is the address used for the MFP main unit and this product to communicate with each other. The value must be an address within the IPv4 Address range to use which you set during the general configuration. However, do not use the first address in the range. * Do not enter the IPv4 address of the MFP main unit in this field. Set the IPv6 address of the destination device. Enter a comment describing the destination device if desirable (Up to 15 characters). 3. Click Submit. A message will appear and ask whether to reboot this product or not. Click OK. This product will automatically reboot itself and finish the configuration. Change the MFP main unit settings Convert the IP address of the destination device set on the MFP main unit to the IPv4 address registered in the Conversion Address List on this product. * This product looks at the IP address in the network data sent from the MFP main unit, and converts only the network data destined for IPv4 addresses (registered in the Conversion Address List) to IPv6 network data and then sends it. If the IP address in the network data sent by the MFP main unit is not registered in the Conversion Address List, the network data is sent without being converted to IPv6 format. Please do not forget to change the IP address of the destination device set on the MFP main unit. Network data destined for the IPv4 address registered in the Conversion Address List is converted to IPv6 format and then sent. Destination device [ IPv6 Address - A ] To IPv6 Address - A Conversion Address List [ IPv4 Address - B ] Destination address of the MFP main unit To IPv4 Address -B [ IPv4 Address - B ] [ IPv6 Address - A ] [ IPv4 Address - A ] To IPv4 Address - A Network data not registered in the Conversion Address List is sent as it is. When the destination address is not changed... Communication from the MFP main unit to the IPv6 network has now been enabled. Protocols enabled by making use of the Conversion Address List. (Example) TCP: SMTP(#25), POP(#162), SMB(#445), FTP-Server(#21) UDP: SNMP-Trap(#162) Go on to the backside
-
 1
1 -
 2
2
 |
 |