Kyocera KM-2560 IB-40 Setup Guide - Page 2
register, addresses, Conversion, Address, creating, block, communication, settings, Settings
 |
View all Kyocera KM-2560 manuals
Add to My Manuals
Save this manual to your list of manuals |
Page 2 highlights
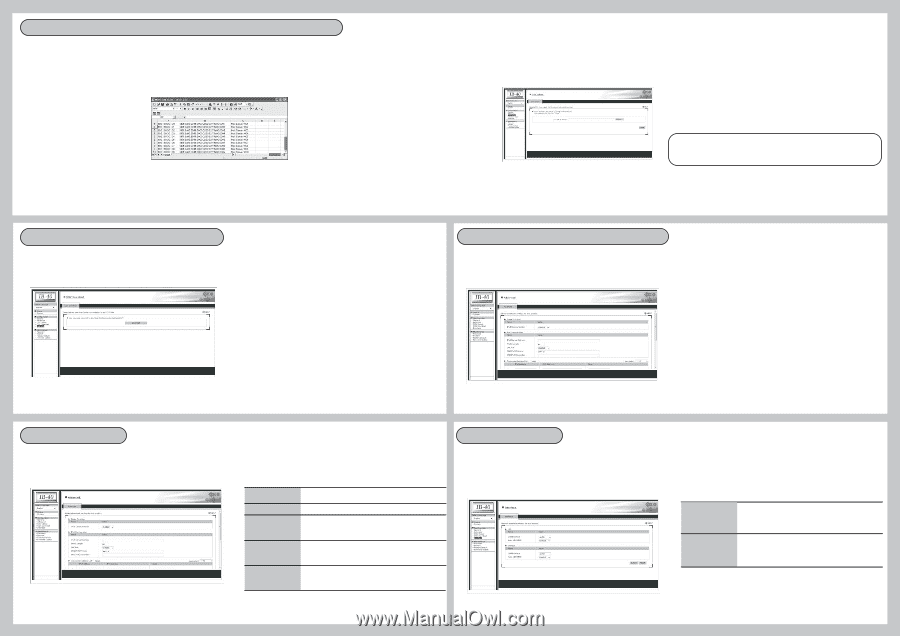
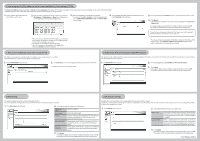
3.How to register IPv4/IPv6 addresses to the Conversion Address List by creating a CSV file The Conversion Address List can be edited as a CSV file and then uploaded to this product. This function is convenient when using the same Conversion Address List for two or more of this product. The following explains how to register IPv4/IPv6 addresses to the Conversion Address List using a CSV file. 1. Start a software application that can edit CSV files, such as Excel. 2. Enter the address information into the CSV file in the order of [IPv4 Address] -> [IPv6 Address] -> [Note]. Up to 128 addresses can be registered to the Conversion Address List. 3. When finished editing, save the file in CSV format. * If using Excel, click File -> Save As.... On the dialog displayed, select "CSV(Comma delimited) (*.csv) " for Save as type and click Save. 4. Access the Web page of this product via a Web browser and click CSV Upload on the left pane. * Please enter correct values for the IPv4/IPv6 addresses. If characters that cannot be recognized as an address are included, they will not be used for the address conversion. * Do not enter the IPv4 address of the target device. * Up to 15 characters can be entered into the [Note] field. However, a comma (,) cannot be entered. 5.On the page displayed, click Browse and select the CSV file that you have saved. 6. Click Upload. * The information contained in the CSV file will be uploaded to the Conversion Address List. A message will appear and ask whether to reboot this product or not. Click OK. This product will automatically reboot itself and finish the configuration. To use the same Conversion Address List for two or more of this product, repeat the process described in 4-6 for each one. * If you have mistakenly uploaded a CSV file that includes the IPv4 address of the MFP main unit, click Advanced - Address Conversion List and delete the address information of the target device manually. 4. How to save the Address Conversion List to a CSV file The Address Conversion List currently stored in this product can be saved to your PC as a CSV file. The following describes how to save the Address Conversion List: 1. Click CSV Download on the left pane. 2. Click Download. In the screen displayed, specify a file name and save the file. The Address Conversion List has been saved. 5.How to block IPv4 communication by the MFP main unit This product can be configured not to send any network packets including an IPv4 address. Please utilize this function when establishing a network environment where only IPv6 addresses are sent/received. 1. Click Advanced on the left pane. 2. On the page displayed, select DISABLE for IPv4 Communication. 3. Click Submit. A message will appear and ask whether to reboot this product or not. Click OK. This product will automatically reboot itself and finish the configuration. 6.IPv6 Settings 7.Network port settings This product enables you to fine tune the configuration for IPv6. Select the appropriate configuration for the network environment in which the product is installed. 1. Click Advanced on the left pane. 2. In the page displayed, change each configuration. IPv6 Manual Address Prefix Length DHCPv6 DNS (IPv6) Primary DNS (IPv6) Secondary Set the IPv6 address. Set IPv6 the prefix length. Enable or disable the DHCPv6 protocol. To use DHCPv6 to configure IPv6 addresses, a DHCPv6 server must be running in the sub-network. Set the address of the DNSv6 primary server. If DHCPv6 is enabled, the DNSv6 server acquired by DHCPv6 takes priority. Set the address of the DNSv6 secondary server. If DHCPv6 is enabled, the DNSv6 server acquired by DHCPv6 takes priority. 3. Click Submit. A message will appear and ask whether to reboot this product or not. Click OK. This product will automatically reboot itself and finish the configuration. Detailed communication settings can be configured for the network port of this product. Usually these communication settings do not need to be changed, but when this product does not link up (when the Link LED does not turn on even though this product is powered on), modify these settings. 1. Click Interface on the left pane. 2. In the page displayed, change each configuration. LAN Interface Auto MDI/MIDX Set the physical transfer speed of the LAN. Select the value that matches the communication type of the device connected to each network port. In most cases, it is recommended to use AUTO. Either a straight cable or cross cable can be used with this product. However, depending on the device connected to each network port, this auto-detect function may not work properly. In such a case, select DISABLE for this setting. 3. Click Submit. A message will appear and ask whether to reboot this product or not. Click OK. This product will automatically reboot itself and finish the configuration. First Edition 2008.9
-
 1
1 -
 2
2
 |
 |