Kyocera KM-2560 IB-40/IB-40 (Type H) Installation Instructions - Page 2
Bei Einbau in 6030/8030]
 |
View all Kyocera KM-2560 manuals
Add to My Manuals
Save this manual to your list of manuals |
Page 2 highlights
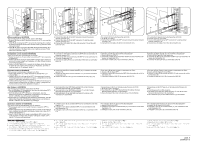
6030/8030 A OPT1 7 HDD 8 7 C [When installing in 6030/8030] 1. Remove the four screws (7) and then remove the OPT1 cover and the HDD cover. 2. Insert IB-40 (A) along the OPT1 rail so that the marking (8) is oriented as shown in the figure and secure it with two screws (7) that have been removed in step 1. 3. Insert IB-40 (Type-H) (C) along the HDD rail so that the marking (8) is oriented as shown in the figure and secure it with two screws (7) that have been removed in step 1. [Installation sur les modèles 6030/8030]
-
 1
1 -
 2
2
 |
 |
2008. 9
303MF56710
11
14
C
12
D
OPT1
HDD
15
9
13
12
15
B
OPT1
HDD
A
11
9
13
14
12
10
B
D
15
OPT1
HDD
7
7
C
A
8
6030/8030
[When installing in 6030/8030]
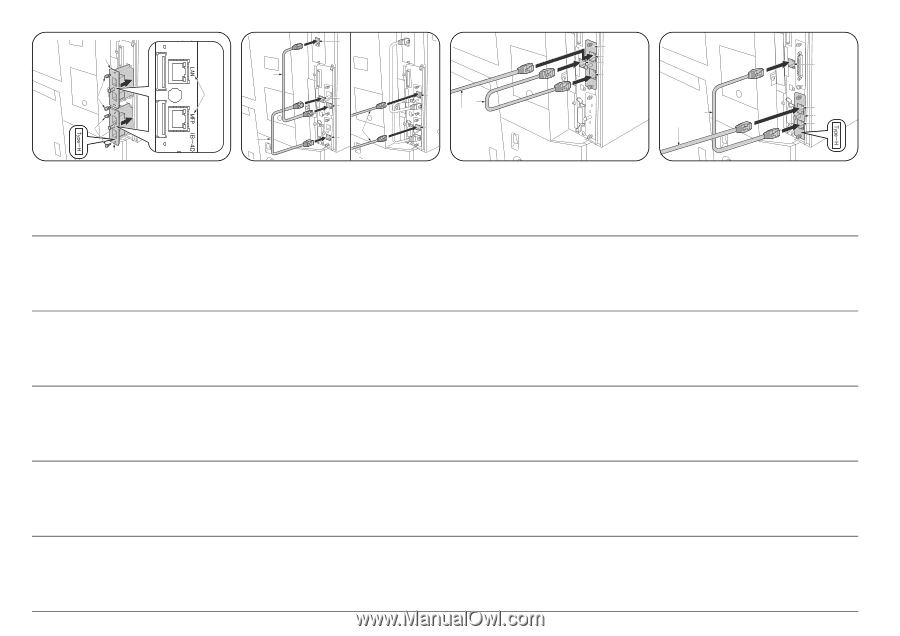
<For providing both the printer and the scanner with IPv6>
1.
Remove the four screws (7) and then remove the OPT1 cover and the
HDD cover.
2.
Insert IB-40 (A) along the OPT1 rail so that the marking (8) is oriented
as shown in the figure and secure it with two screws (7) that have been
removed in step 1.
3.
Insert IB-40 (Type-H) (C) along the HDD rail so that the marking (8) is
oriented as shown in the figure and secure it with two screws (7) that
have been removed in step 1.
4.
Connect the cable (B) to the MFP connector (9) and the scanner
network connector (10).
5.
Connect the cable (D) to the MFP connector (11) and the printer
network connector (12).
6.
Connect the LAN cable (15) to the LAN connector (13) and the LAN
connector (14).
<For using IB-40 to provide the printer with IPv6>
1.
Fit IB-40 (A) to OPT1.
2.
Connect the cable (B) to the MFP connector (9) and the printer network
connector (12).
3.
Connect the LAN cable (15) to the LAN connector (13).
<For using IB-40 (Type-H) to provide the printer with IPv6>
1.
Fit IB-40 (Type-H) (C) to HDD.
2.
Connect the cable (D) to the MFP connector (11) and the printer
network connector (12).
3.
Connect the LAN cable (15) to the LAN connector (14).
[Installation sur les modèles 6030/8030]
<Pour fournir le IPv6 à l'imprimante et au scanner>
1.
Retirer les quatre vis (7) puis retirer le couvercle OPT1 et le couvercle
du disque dur.
2.
Insérer le IB-40 (A) le long du rail de l'OPT1 de façon que le repère (8)
soit orienté comme indiqué sur l'illustration, et le fixer à l'aide des deux
vis (7) retirées à l'étape 1.
3.
Insérer le IB-40 (Type-H) (C) le long du rail du disque dur de façon que
le repère (8) soit orienté comme indiqué sur l'illustration, et le fixer à
l'aide des deux vis (7) retirées à l'étape 1.
4.
Connecter le câble (B) au connecteur du MFP (9) et au connecteur de
réseau du scanner (10).
5.
Connecter le câble (D) au connecteur du MFP (11) et au connecteur de
réseau de l'imprimante (12).
6.
Connecter le câble LAN (15) au connecteur LAN (13) et au connecteur
LAN (14).
<Utilisation du IB-40 pour fournir l'IPv6 à l'imprimante>
1.
Fixer le IB-40 (A) à l'OPT1.
2.
Connecter le câble (B) au connecteur du MFP (9) et au connecteur de
réseau de l'imprimante (12).
3.
Connecter le câble LAN (15) au connecteur LAN (13).
<Utilisation du IB-40 (Type-H) pour fournir l'IPv6 à l'imprimante>
1.
Fixer le IB-40 (Type-H) (C) au disque dur.
2.
Connecter le câble (D) au connecteur du MFP (11) et au connecteur de
réseau de l'imprimante (12).
3.
Connecter le câble LAN (15) au connecteur LAN (14).
[Cuando instale en 6030/8030]
<Para proveer a la impresora y al escaner con iPv6>
1.
Quite cuatro tornillos (7) y luego desmonte la cubierta OPT1 y la
cubierta HDD.
2.
Inserte el IB-40 (A) a lo largo del riel OPT1, de manera que la marca
(8) esté orientada como se ilustra en la figura, y asegúrela con los dos
tornillos (7) que fueron quitados en el paso 1.
3.
Inserte el IB-40 (Type-H) (C) a lo largo del riel HDD, de manera que la
marca (8) esté orientada como se ilustra en la figura, y asegúrela con
los dos tornillo (7) que fueron quitados en el paso 1.
4.
Conecte el cable (B) al conector del MFP (9) y al conector de red del
escaner (10).
5.
Conecte el cable (D) al conector del MFP (11) y al conector de red de
la impresora (12).
6.
Conecte el cable de LAN (15) a los conectores de LAN (13) y (14).
<Para usar el IB-40 para proveer a la impresora con iPv6>
1.
Inserte el IB-40 (A) en OPT1.
2.
Conecte el cable (B) al conector del MFP (9) y al conector de red de la
impresora (12).
3.
Conecte el cable de LAN (15) al conector de LAN (13).
<Para usar el IB-40 (Type-H) para proveer a la impresora con iPv6>
1.
Inserte el IB-40 (Type-H) (C) en HDD.
2.
Conecte el cable (D) al conector del MFP (11) y al conector de red de
la impresora (12).
3.
Conecte el cable de LAN (15) al conector de LAN (14).
[Bei Einbau in 6030/8030]
<Zur Versorgung von Drucker und Scanner mit IPv6>
1.
Die vier Schrauben (7) herausdrehen, und dann die Abdeckung OPT1
und die HDD-Abdeckung entfernen.
2.
IB-40 (A) entlang der OPT1-Schiene so einschieben, dass die
Markierung (8) gemäß der Abbildung ausgerichtet ist, und mit den in
Schritt 1 entfernten zwei Schrauben (7) befestigen.
3.
IB-40 (Type-H) (C) entlang der HDD-Schiene so einschieben, dass die
Markierung (8) gemäß der Abbildung ausgerichtet ist, und mit den in
Schritt 1 entfernten zwei Schrauben (7) befestigen.
4.
Das Kabel (B) an den MFP-Steckverbinder (9) und den Scanner-
Netzwerk-Steckverbinder (10) anschließen.
5.
Das Kabel (D) an den MFP-Steckverbinder (11) und den Drucker-
Netzwerk-Steckverbinder (12) anschließen.
6.
Das LAN-Kabel (15) an den LAN-Anschluss (13) und den LAN-
Anschluss (14) anschließen.
<Verwendung von IB-40 zur Versorgung des Druckers mit IPv6>
1.
IB-40 (A) in OPT1 einsetzen.
2.
Das Kabel (B) an den MFP-Steckverbinder (9) und den Drucker-
Netzwerk-Steckverbinder (12) anschließen.
3.
Das LAN-Kabel (15) an den LAN-Anschluss (13) anschließen.
<Verwendung von IB-40 (Type-H) zur Versorgung des Druckers mit
IPv6>
1.
IB-40 (Type-H) (C) in HDD einsetzen.
2.
Das Kabel (D) an den MFP-Steckverbinder (11) und den Drucker-
Netzwerk-Steckverbinder (12) anschließen.
3.
Das LAN-Kabel (15) an den LAN-Anschluss (14) anschließen.
[Quando si installa nel 6030/8030]
<Per fornire l’IPv6 sia alla stampante che allo scanner>
1.
Rimuovere le quattro viti (7), quindi rimuovere il coperchio OPT1 e
quello HDD.
2.
Inserire l’IB-40 (A) lungo la scanalatura OPT1 in modo che le scritte (8)
siano orientate come mostrato nella figura e fissare con le due viti (7)
rimosse nell’operazione 1.
3.
Inserire l’IB-40 (Type-H) (C) lungo la scanalatura HDD in modo che le
scritte (8) siano orientate come mostrato nella figura e fissare con le
due viti (7) rimosse nell’operazione 1.
4.
Collegare il cavo (B) al connettore MFP (9) e al connettore di rete dello
scanner (10).
5.
Collegare il cavo (D) al connettore MFP (11) e al connettore di rete
della stampante (12).
6.
Collegare il cavo LAN (15) al connettore LAN (13) e al connettore LAN
(14).
<Per utilizzare l’IB-40 per fornire l’IPv6 alla stampante>
1.
Inserire l’IB-40 (A) in OPT1.
2.
Collegare il cavo (B) al connettore MFP (9) e al connettore di rete della
stampante (12).
3.
Collegare il cavo LAN (15) al connettore LAN (13).
<Per utilizzare l’IB-40 (Type-H) per fornire l’IPv6 alla stampante>
1.
Inserire l’IB-40 (Type-H) (C) in HDD.
2.
Collegare il cavo (D) al connettore MFP (11) e al connettore di rete
della stampante (12).
3.
Collegare il cavo LAN (15) al connettore LAN (14).
4.
ケーブル (B) を MFP コネクタ (9) とスキャナネットワークコネクタ
(10) に接続する。
5.
ケーブル (D) を MFP コネクタ (11) とプリンタネットワークコネクタ
(12) に接続する。
6.
LAN コネクタ (13) と LAN コネクタ (14) に LAN ケーブル (15) を接続す
る。
< IB-40(Type-H)でプリンタを IPv6 対応する場合>
1.
IB-40
(Type-H)(C) を HDD に取り付ける。
2.
ケーブル (D) を MFP コネクタ (11) とプリンタネットワークコネクタ
(12) に接続する。
3.
LAN コネクタ (14) に LAN ケーブル (15) を接続する。
< IB-40 でプリンタを IPv6 対応する場合>
1.
IB-40(A) を OPT1 に取り付ける。
2.
ケーブル (B) を MFP コネクタ (9) とプリンタネットワークコネクタ
(12) に接続する。
3.
LAN コネクタ (13) に LAN ケーブル (15) を接続する。
[6030/8030 に設置する場合 ]
<プリンタ・スキャナ両方を IPv6 対応する場合>
1.
ビス (7)4 本を外し、
OPT1 のカバーと HDD のカバーを取り外す。
2.
IB-40(A) を刻印 (8) が図に示す方向になるように、OPT1 のレールに
沿って挿入し、手順 1 で外したビス (7)2 本で固定する。
3.
IB-40(Type-H)(C)を刻印(8)が図に示す方向になるように、HDDの
レールに沿って挿入し、手順 1 で外したビス(7)2 本で固定する。