Kyocera KM-3530 Scan System B Operators Guide (Setup) Edition - Page 8
The touch panel in the Scanner Operation mode - scan email
 |
View all Kyocera KM-3530 manuals
Add to My Manuals
Save this manual to your list of manuals |
Page 8 highlights
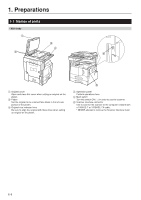
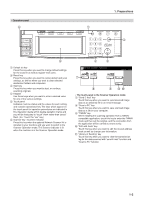
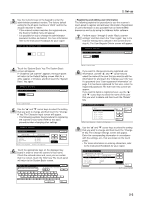
• Operation panel Printer Priority 1. Preparations 1 Default ( ) key Press this key when you want to change default settings for the scanner as well as register new users. 2 Reset key Press this key when you want to cancel default and scan settings, as well as when you want to clear selected destination folders and computers. 3 Start key Press this key when you want to start, or continue, scanning originals. 4 Keypad Use these keys when you want to enter a desired value for one of the various settings. 5 Touch panel Indicates machine status and the values for each setting, and contains operational key. The keys which appear on the touch panel for operation procedures are indicated in this Operation Guide within double quotation marks and you will be instructed to "touch" them rather than "press" them. (Ex.: Touch the "xxx" key.) 6 Scanner key / Scanner indicator Press this key when the optional Network Scanner Kit is installed in your machine and you want to switch to the Scanner Operation mode. The Scanner indicator is lit when the machine is in the Scanner Operation mode. • The touch panel in the Scanner Operation mode 7 "Send E-mail" key Touch this key when you want to send scanned image data as an attached file in an email message. 8 "Scan to PC" key Touch this key when you want to save scanned image data as a file on your computer. 9 "TWAIN" key When initiating the scanning operation from a TWAINcompatible application, touch this key to enter the TWAIN mode and then set the original, and the connection from the application will be carried out more surely. 0 "Edit add. book" key Touch this key when you want to edit the shared address book as well as change user information. ! "History of Sending" key Touch this key when you want to view the transmission log for the data scanned with "send E-mail" funciton and "Scan to PC" function. 1-2
-
 1
1 -
2
-
 3
3 -
 4
4 -
 5
5 -
 6
6 -
 7
7 -
 8
8 -
 9
9 -
 10
10 -
 11
11 -
 12
12 -
 13
13 -
14
-
15
-
16
-
17
-
18
-
19
-
20
-
21
-
22
-
23
-
24
 |
 |
