Kyocera KM-6030 Scanner File Utility Quick Guide - Page 2
Configuring the Scanner - change scan folder location
 |
View all Kyocera KM-6030 manuals
Add to My Manuals
Save this manual to your list of manuals |
Page 2 highlights
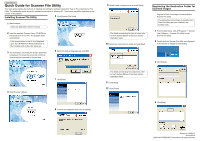
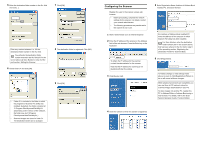
5 Enter the destination folder number in the No. field and click [...]. 7 Click [OK]. Enter any number between 1 to 100 the destination folder number in the No. field. You will enter the destination folder number entered in the No. field (001 in the screen above) at Save Number in step 5 of the next section, Setting the Scanner. 6 Select folder 01 and click [OK]. 8 The destination folder is registered. Click [OK]. 9 Click [OK]. • Folder 01 is included in the folder in which the programs of Scanner File Utility was installed. By default, the folder is located at: C:\Program Files\Kyocera\FileUtility\01. (Depending on the version of the software, the folder may be C:\Program Files\Kyocera Mita\FileUtility\01.) • Scanned images are stored in folder 01. The destination folder can be changed. Configuring the Scanner Register the user in the scanner using a web browser. • Before proceeding, complete the network settings for the scanner. For details, contact your network administrator. • The following procedures are possible while the scanner is not in use. 1 Start a web browser such as Internet Explorer. 2 Enter the IP address of the scanner in the Address field of the web browser. Press the Enter key on the keyboard. To obtain the IP address for the scanner, contact the administrator for the scanner. Note that the IP address for scanning is not identical with that for printing. 3 Click [Sender List]. 5 Enter Registration Name, Address of Address Book installed PC, and Save Number. For Address of Address Book installed PC, enter the address of the computer in which Scanner File Utility has been installed. For Save Number, enter the destination folder number (001 in the screen above) that has been entered in the No. field in step 5 of the preceding section, Registering the Destination Folder for Scanned Data. 6 Click [Registration]. To finalize changes or new settings made above, be sure to click [Registration]. Failure to do so will cancel all those changes. When all above procedures are completed, you can use Scan to PC feature to store the scanned images automatically in your PC. To store images into another PC, register the PC in Address Editor or Address Book using a web browser. For details, refer to the Scan System Operation Guide, Function Edition. 4 Click the number to which the sender is registered.
-
 1
1 -
 2
2
 |
 |
