Kyocera TASKalfa 620 TASKalfa 620/820 Print Driver Users Guide Rev 8.1 - Page 37
Print Size and Size, Creating a Custom Size, Printing with Custom Size s
 |
View all Kyocera TASKalfa 620 manuals
Add to My Manuals
Save this manual to your list of manuals |
Page 37 highlights
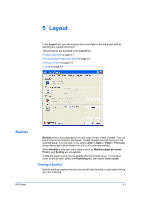
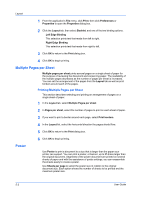
Basic Transparencies must be printed using the MP tray, and labels and envelopes require the MP tray. Ensure the paper is properly loaded by following the instructions outlined in the printing system's Operation Guide. Note: Source and Media type are separate items in the dialog box, but can be combined using the Combine source and media type lists setting in Compatibility Settings. If they are combined, Media type is not available on the Basic tab. To change this setting, open Device settings > Compatibility Settings and clear the Combine source and media type lists selection. Print Size and Page Size Print Size controls the output page size of the document. To use this setting, ensure that the Page Size setting matches the page size setting in your application. If the Print Size is different from the page size in your application, then each page will be enlarged or reduced to match the Print Size. The percentage value shown in brackets indicates the size of the Print Size setting relative to the Page Size setting. If the Page Size does not match the page size setting in the application (the size of the original), then, in most cases, the Print Size is ignored and the document prints out based on its original size. Creating a Custom Page Size To use custom page sizes, they must be created and added to the Print size list. The driver supports a maximum of twenty custom sizes. 1 In the Basic tab, click Page Sizes. 2 Click New. 3 A default custom name appears in the Name box. Enter a name for your custom page size. 4 Type or select values for the height and width. The values automatically adjust if they exceed the allowable limits. 5 When done, click Apply. The custom page size appears in the Print size list, which is used for enlarging and reducing the sizes of prints. To delete a custom page size from the Page Sizes dialog box, select the name of the custom page size and click Delete. Printing with Custom Size Pages You can print on custom-sized pages (or other media such as transparencies) by performing these steps: 1 In your application, select Print from the File menu. 2 From the Print dialog box, open Print Properties. 3 In the Basic tab, select the name of your custom page size in the Print Size list. KX Driver 4-3
-
 1
1 -
2
-
3
-
4
-
5
-
6
-
7
-
8
-
9
-
10
-
11
-
12
-
13
-
14
-
15
-
16
-
17
-
18
-
19
-
20
-
21
-
22
-
23
-
24
-
25
-
26
-
27
-
28
-
29
-
30
-
31
-
 32
32 -
 33
33 -
 34
34 -
 35
35 -
 36
36 -
 37
37 -
 38
38 -
 39
39 -
 40
40 -
 41
41 -
 42
42 -
43
-
44
-
45
-
46
-
47
-
48
-
49
-
50
-
51
-
52
-
53
-
54
-
55
-
56
-
57
-
58
-
59
-
60
-
61
-
62
-
63
-
64
-
65
-
66
-
67
-
68
-
69
-
70
-
71
-
72
-
73
-
74
-
75
-
76
-
77
-
78
-
79
-
80
-
81
-
82
-
83
-
84
-
85
-
86
-
87
-
88
-
89
-
90
-
91
-
92
-
93
-
94
-
95
 |
 |