LG DLG7188RM Owners Manual
LG DLG7188RM Manual
 |
View all LG DLG7188RM manuals
Add to My Manuals
Save this manual to your list of manuals |
LG DLG7188RM manual content summary:
- LG DLG7188RM | Owners Manual - Page 1
DLE7177WNl/DLG7188WiVi DLE7177NiVI/DLG7188NM DLE7177RIVI/DLG7188RM Thank you for buying a LG Dryer. Please read your manual carefully, as it provides instructions on safe Installation, Use and Maintenance. Record the Model and Serial Numbers, and retain the manual for future reference. For more - LG DLG7188RM | Owners Manual - Page 2
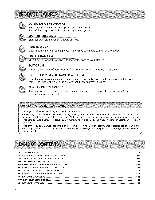
INSTALLATION ...PART5. ELECTRICAL REQUIREMENTS FOR ELECTRIC DRYER ...PART6. ELECTRICAL REQUIREMENTS FOR GAS DRYERS ...PART7. GAS REQUIREMENTS AND INSTRUCTIONS ...PART8. EXHAUST REQUIREMENTS AND MAINTENANCE ...PART9. OPERATING YOUR DRYER ...PART10. TROUBLESHOOTING GUIDE ...LG DRYER LIMITED WARRANTY - LG DLG7188RM | Owners Manual - Page 3
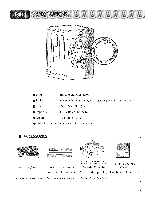
Ib) : 126 Ibs (57.2 kg) Specifications are subject to change by manufacturer. ACCESSORIES 2 Dryer rack (1 each) Stacking kit (1 each) Purchased Separately .,,s:D. esign qf pedestal_ are sul_ject to cha_tge without manqfaturer_ notice. Pedestal (1 each) Purchased Separately Remote Laundry - LG DLG7188RM | Owners Manual - Page 4
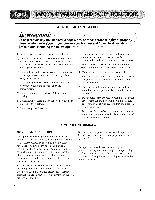
SEEKING WARRANTY ASSISTANCE The Warranty for your Dryer is located at the end of this manual. Warranty Service is available by contacting your nearest LG Service Center. If this product is installed and operated per this manual, LG will repair or replace any parts defective in material or - LG DLG7188RM | Owners Manual - Page 5
is removed li'om service or discarded, remove the door to the drying compartment. 5) Do not reach into the appliance if the drum is moving. 6) Do not install or store this appliance where it will be exposed to the weather. 7) Do not tamper with controls. 8) Do not repair or replace any part of - LG DLG7188RM | Owners Manual - Page 6
be air dried. • Failure to follow these instructions can result in fire, death or serious injury. • A qualified service person or company must perform installation and service of this appliance. WARNINGS • Keep flammable materials and vapors, such as gasoline, away from dryer. • Place dryer at - LG DLG7188RM | Owners Manual - Page 7
you review this entire manual before proceeding with any installation or use. More detailed instructions concerning electrical connections, gas connections, and exhaust requirements are provided in other parts of this manual. Choose a location with a solid floor for your dryer. Place the dryer at - LG DLG7188RM | Owners Manual - Page 8
information concerning the placement of and clearances for your dryer. Please review this entire manual before proceeding with any installation. The door on your dryer can be installed to open either to the left or the right. Follow these instructions to reverse the direction in which your door - LG DLG7188RM | Owners Manual - Page 9
AWARE THAT FAILURE TO EXHAUST THE DRYER CORRECTLY WILL VOID THE DRYER'S WARRANTY. • ALTERNATE EXHAUST DIRECTIONS ]. Remove screw and exhaust duct. 2- |. Detach and remove the knockout that matches the desired venting direction (Right side not available on Gas Dryers) 0), @), _3)the order of work - LG DLG7188RM | Owners Manual - Page 10
entitled Electrical Requirements for Electric Dryer. It is important that you thoroughly review that section and the remainder of this manual, beti)re taking any steps to install or use this dryer. 1. Use only a new U.L. listed No. 10 (copper wire only) three conductor power supply cord kit rated - LG DLG7188RM | Owners Manual - Page 11
pressure Confirming Heat Source in Gas Dryers Close the door to the dryer drum/drying compartment and, after completing all steps in this manual for proper installation of this dryer, start the dryer on a heat setting. After the dryer starts, the igniter will glow red and the main burner will - LG DLG7188RM | Owners Manual - Page 12
will comply with these standards, please contact a service and installation professional for assistance. The following instructions apply to any installation of the dryer in a manufactured or mobile home: 1) The gas dryer must be permanently attached to the floor. 2) The electrical connection - LG DLG7188RM | Owners Manual - Page 13
, please observe the instructions below. WARNINGS Incorrect Installation can cause serious accidents. The weight of the dryer and the height of installation makes the stacking procedure too risky for one person. This procedure should be performed by 2 or more experienced service personne. _}F_m - LG DLG7188RM | Owners Manual - Page 14
NOTE : Attach the lower side first. I Be sure to press the adhesive parts of the brackets firmly to the appliance. Install the eight (8) screws(supplied) to attach the brackets to the pedestal. for dryer for washer/ combo Remove the paper from the bracket. I,,/ Move the dryer to the desired place - LG DLG7188RM | Owners Manual - Page 15
Amperes (the circuit must be fused on both sides of the line). ELECTRICAL SERVICE FOR THE DRYER SHOULD BE OF MAXIMUM RATE VOLTAGE LISTED ON THE NAMEPLATE. DO NOT CONNECT DRYER TO 110, 115, OR 120 VOLT CIRCUIT. Heating elements are available for field installation in dryers which are to be connected - LG DLG7188RM | Owners Manual - Page 16
the instructions in this section if your home has a 3-wire receptacle (NEMA type 10-30R) and you will be using a UL listed, 120/240 volt minimum, 30 amp, dryer power supply cord. Important : Grounding through the neutral conductor is prohibited for (1) new branch-circuit installations, (2) mobile - LG DLG7188RM | Owners Manual - Page 17
do not allow the use of a 3 wire connection, or you are installing your dryer in a mobile home, you must use a 4wire connection. { 4-wire g Ring terminals 1. Connect neutral wire(white) of power cord to center terminal block screw. 2. Connect red and black wire to the left and right terminal - LG DLG7188RM | Owners Manual - Page 18
or ordinances connection of a frame-grounding neutral wire, use the instructions section. do not allow the conductor to the under this 3-wire Connect ground wire of appliance and neutral wire of power cord to center terminal block screw. . Connect red and black wire to the left and right terminal - LG DLG7188RM | Owners Manual - Page 19
. Please contact a qualified electrician to check your home's wiring and fuses to ensure that your home has adequate electrical power to operate the dryer. Electrical Requirements for Your Dryer: a) Please note that the wiring diagram is provided inside the dryer control hood. Label all wires prior - LG DLG7188RM | Owners Manual - Page 20
Gas (2,500 Btu/ft3 (93.1 MJ/m3)) service must be provided at 10 + 1.5 in. water column pressure. 2. Do not attempt to connect Dryer to Liquified Petroleum (LP Gas) Gas service without a qualified professkmal. 3. Isolate the dryer from the gas supply piping system by closing its individual manual - LG DLG7188RM | Owners Manual - Page 21
and and the wall. In special installations when it is impossible to make a connection with the above recommendations, then a UL-listed flexible metal transition duct may be used between the dryer and wall connection only. The use of this ducting will affect dry time. 4. DO NOT use sheet metal screws - LG DLG7188RM | Owners Manual - Page 22
a clogged lint filter may increase drying times. 11. Annually remove the lint filter and attach it to the vacuum duct. See item #2 above. 12. Please note that the wiring diagram is provided inside the dryer control hood. Label all wires prior to disconnection when servicing the dryer, because - LG DLG7188RM | Owners Manual - Page 23
Hazard Keep flammable materials and vapors, such as gasoline, away from dryer. Do not dry anything that has ever had anything flammable on it (even after washing). Failure to follow these instructions can result in death, explosion, or fire. Power Button . Use this button for power on or off. 23 - LG DLG7188RM | Owners Manual - Page 24
Up Use this cycle to remove wrinkles from items, such as clothes packed in a suitcase or items wrinkled from being left in the dryer too king. Use the Air Dry Modifier for items that require drying without heat such as rubber, plastic and heatsensitive fabrics. Time Button • Press MORE TIME or - LG DLG7188RM | Owners Manual - Page 25
operation. When Wrinkle Care is selected, this option light will glow. When power is on, Check Filter is displayed until start/pause is selected. For better drying performance and safety, clean lint filter every single usel Child Lock 2, Rack Dry Rack Dry is designed for use with items which are - LG DLG7188RM | Owners Manual - Page 26
manually by pressing Time Dry button which ranges from 20 to 60 minutes. 26 Manual Dry Cycles Load Type _ lemp! Default Time* (Minutes) SPEED DRY SMALL LOADS High 25 FRESHEN UP Medium 20 Remove Wrinkles High AIR DRY 10 + 20 Reset cycle to complete drying, if needed. • Check to see that - LG DLG7188RM | Owners Manual - Page 27
• Use this button for start or pause. @ Starting your dryer 1. Before use • Clean lint screen before or after each cycle. • Place laundry into dryer and shut door. See Loading. • Turn the knob to select the drying cycle you want. The preset setting for Sensor Dry Cycles or Manual Cycles will glow - LG DLG7188RM | Owners Manual - Page 28
The MORE TIME or LESS TIME feature canbe used with Manual Dry, Time Dry and Rack Dry Cycles. • Press TEMR CONTROL until filter straight up 2.Clean the filter using one of the following methods. (_ Run the fingers across the filter Vacuum the lint filter Wash the lint screen in warm, soapy water. Dry - LG DLG7188RM | Owners Manual - Page 29
box/circuit breaker box and replace the fuse or reset the circuit breaker. (IMPORTANT: electric dryers generally use two fuses or breakers.) 2.Problem:My Dryer Doesn't Heat i , Is the fuse blown, Or is the Circuit breaker tripped, • Is the gas supply or service blocked or ()IT'? _m !f the tuse is - LG DLG7188RM | Owners Manual - Page 30
5.Problem:There is Linton my Clothes • Is your lint filter lull? Please refer to the manual section on cleaning the lint filter, and please confirm that the lint filter is clean. It is important that the lint filter is clean beti)re each new load of laundry. • Did you properly sort your load of - LG DLG7188RM | Owners Manual - Page 31
for your _arment'. • PLM problem To avoid shrinkage, please carefully follow the care find use instructions for your garment, because some fabrics will naturally shrink when washed. Other fabrics can be washed but will shrink when dried in a dryer. See the Owner's Manual of RLM & PLC modem - LG DLG7188RM | Owners Manual - Page 32
APPLYTO: 1. Service trips to your home to deliver, pick up, and/or install the product, instruct, or replace house fuses or correct wiring, or correction of unauthorized repairs; and 2, Damages or operating problems that result from misuse, abuse, operation outside environmental specifications or
-
 1
1 -
 2
2 -
 3
3 -
 4
4 -
 5
5 -
 6
6 -
 7
7 -
8
-
9
-
10
-
11
-
12
-
13
-
14
-
15
-
16
-
17
-
18
-
19
-
20
-
21
-
22
-
23
-
24
-
25
-
26
-
27
-
28
-
29
-
30
-
31
-
32
 |
 |
1-800-243-0000
24 HOURS A DAY, 7 DAYS A WEEK FOR LG CUSTOMER SERVICE
_
¢
'/,,
4_" """n
Ir_
;_9_
,_:
_',_"r _
_,
,_Y_'_!i
,,rsi,_[
,'_;"i
r,
±j,
ElectricandGasDryer
DLE7177WNl/DLG7188WiVi
DLE7177NiVI/DLG7188NM
DLE7177RIVI/DLG7188RM
Thank
you
for buying a LG Dryer.
Pleaseread
your
manual carefully, as it provides instructions
on safe Installation, Use and Maintenance.
Record the Model and Serial Numbers, and retain the
manual for future reference.
For more information, visit our website at http:iius.lge.com
P/No.:
3828EL3010A