LG HBLG6000R Owners Manual - Page 13
Type A provided.
 |
View all LG HBLG6000R manuals
Add to My Manuals
Save this manual to your list of manuals |
Page 13 highlights
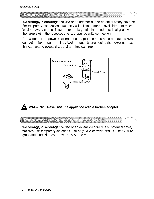
1. insert the guide panels into the guides of the air conditioner. Fasten the curtains to the unit with screws (Type A). _: Use a long screwdriver and installing the screws will be easier. 2o Cut the adhesive-backed seal strip (Type D) to the window width, Remove the backing from the seai strip and attach the seal strip to the underside o,f the bottom window, 3. Locating unit in window Open the window and mark center line on the center o,fthe inner sill, tn$i_]/ation T_e A 4 Attach L bracket 4-!. Ins.tatli the L brackets behind the inner window sill, with short side of bracket as shown. Use the 2 screws (Type A) provided. 4°2, The bracket helps to hold unit securely in pliace. Be sure to place, bracket edge flush against back of inner sill. A Inside ,CenCeLr ime O{_id,e ILBracket Owne, s Manual 13
-
 1
1 -
2
-
3
-
4
-
5
-
6
-
7
-
 8
8 -
 9
9 -
 10
10 -
 11
11 -
 12
12 -
 13
13 -
 14
14 -
 15
15 -
 16
16 -
 17
17 -
 18
18 -
19
-
20
-
21
-
22
-
23
-
24
-
25
-
26
-
27
-
28
-
29
-
30
-
31
-
32
-
33
-
34
-
35
-
36
-
37
-
38
-
39
-
40
-
41
-
42
-
43
-
44
-
45
-
46
-
47
 |
 |
