LG L1734S-BN Owner's Manual (English)
LG L1734S-BN - LG - 17" LCD Monitor Manual
 |
UPC - 719192184176
View all LG L1734S-BN manuals
Add to My Manuals
Save this manual to your list of manuals |
LG L1734S-BN manual content summary:
- LG L1734S-BN | Owner's Manual (English) - Page 1
User's Guide L1734S L1734SE Make sure to read the Important Precautions before using the product. Keep the User's Guide(CD) in an accessible place for future reference. See the label attached on the product and give the information to your dealer when you ask for service. - LG L1734S-BN | Owner's Manual (English) - Page 2
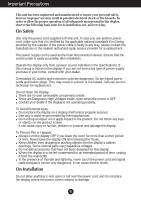
repair service provider for a replacement. The power supply cord is used as the main disconnection device. Ensure that the socket-outlet is easily accessible after installation. Operate the display only from a power source indicated in the specifications of this manual or listed on the display. If - LG L1734S-BN | Owner's Manual (English) - Page 3
a screen saver on the product. Burn-in and related problems are not covered by the warranty on this product. Do not shock or scratch the front and sides of the screen with metallic objects. Otherwise, it may cause damage to the screen. On Cleaning Unplug the display before cleaning the face of the - LG L1734S-BN | Owner's Manual (English) - Page 4
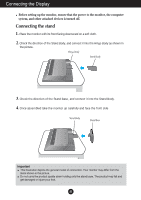
Body as shown in the picture. Hinge Body Stand Body 3. Check the direction of the Stand Base, and connect it into the Stand Body. 4. Once assembled take the monitor up carefully and face the front side Stand Body Stand Base Important This illustration depicts the general model of connection - LG L1734S-BN | Owner's Manual (English) - Page 5
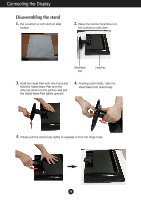
Display Disassembling the stand 1. Put a cushion or soft cloth on aflat surface. 2. Place the monitor face Down on the cushion or soft cloth. Stand Base Part Head Part 3. Hold the Head Part with one hand and hold the Stand Base Part with the other as shown in the picture and pull the Stand Base - LG L1734S-BN | Owner's Manual (English) - Page 6
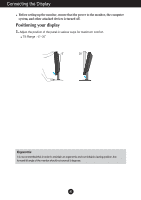
Before setting up the monitor, ensure that the power to the monitor, the computer system, and other attached devices is turned off. Positioning your display 1. Adjust the position of the panel in various ways for maximum comfort. Tilt Range : -5˚~20˚ Ergonomic It is recommended that in order to - LG L1734S-BN | Owner's Manual (English) - Page 7
'? This function provides the user with optimal display settings.When the user connects the monitor for the first time, this function automatically adjusts the display to optimal settings for individual input signals. 'AUTO Function? When you encounter problems such as blurry screen, blurred letters - LG L1734S-BN | Owner's Manual (English) - Page 8
settings, always press the AUTO button before entering the On Screen Display(OSD). This will automatically adjust your display image to the ideal settings for the current screen resolution size (display mode). The best display mode is 1280 x 1024 MENU Button Use this button to enter or exit the - LG L1734S-BN | Owner's Manual (English) - Page 9
Use this button to enter a selection in the On Screen Display. Power Button Use this button to turn the display on or off. Power Indicator This Indicator lights up blue when the display operates normally(On Mode). If the display is in Sleep Mode (Energy Saving), this indicator color changes - LG L1734S-BN | Owner's Manual (English) - Page 10
(OSD) Control Adjustment Screen Adjustment Making adjustments to the image size, position and operating parameters of the display is quick and easy with the On Screen Display Control system. A short example is given below to familiarize you with the use of the controls. The following section is - LG L1734S-BN | Owner's Manual (English) - Page 11
(OSD) Selection and Adjustment The following table indicates all the On Screen Display control, adjustment, and setting menus. Main menu Sub menu PICTURE BRIGHTNESS CONTRAST COLOR GAMMA PRESET sRGB 6500K 9300K RED GREEN BLUE POSITION HORIZONTAL VERTICAL TRACKING - LG L1734S-BN | Owner's Manual (English) - Page 12
On Screen Display(OSD) Selection and Adjustment You were introduced to the procedure of selecting and adjusting an item Tip MENU : Exit : Adjust (Decrease/Increase) SET : Enter : Select another sub-menu NOTE OSD (On Screen Display) menu languages on the monitor may differ from the manual. A11 - LG L1734S-BN | Owner's Manual (English) - Page 13
gamma value. : -50/0/50 On the monitor, high gamma values display whitish images and low gamma values display high contrast images. MENU : Exit : Decrease • sRGB: Set the screen color to fit the sRGB standard color specification. • 6500K: Slightly reddish white. • 9300K: Slightly bluish white. - LG L1734S-BN | Owner's Manual (English) - Page 14
Adjusts any vertical bars or stripes visible on the screen background. The horizontal screen size will also change. PHASE Adjusts the focus of the display. This item allows you to remove any horizontal noise and clear or sharpen text. MENU : Exit : Decrease SHARPNESS Adjust the clearness of the - LG L1734S-BN | Owner's Manual (English) - Page 15
the language in which the control names are displayed. OSD To adjust position of the OSD output of the video card is different the required specifications, the color level may deteriorate due to video signal the power indicator on the front side of the monitor to ON or OFF. If you set OFF, it - LG L1734S-BN | Owner's Manual (English) - Page 16
Troubleshooting Check the following before calling for service. No image appears G Is the power cord of the • Check and see if the power cord is connected display ? frequency range of the display. See the 'Specifications' section of this manual and configure your display again. G Do you - LG L1734S-BN | Owner's Manual (English) - Page 17
Troubleshooting Display image is incorrect G Display Position is incorrect. • Press the AUTO button to automatically adjust your display image to the ideal setting. If the results are unsatisfactory, adjust the image position using the H position and V position icon in the on screen display. • - LG L1734S-BN | Owner's Manual (English) - Page 18
the display driver from the display driver CD (or diskette) that comes with your display. Or, you can also download the driver from our web site: http://www.lge.com. G Do you see an "Unrecognized monitor, Plug&Play (VESA DDC) monitor found" message? • Make sure to check if the video card supports - LG L1734S-BN | Owner's Manual (English) - Page 19
Specifications L1734S Display Sync Input Video Input Resolution Plug&Play Power Consumption Dimensions & Weight Range Power Input Environmental Conditions Stand Base Power cord 17 inches (43 cm) Flat Panel Active matrix-TFT LCD Anti-Glare coating Visible diagonal size : 43 cm 0.264 mm pixel pitch - LG L1734S-BN | Owner's Manual (English) - Page 20
Specifications L1734SE Display Sync Input Video Input Resolution Plug&Play Power Consumption Dimensions & Weight Range Power Input Environmental Conditions Stand Base Power cord 17 inches (43 cm) Flat Panel Active matrix-TFT LCD Anti-Glare coating Visible diagonal size : 43 cm 0.264 mm pixel - LG L1734S-BN | Owner's Manual (English) - Page 21
Specifications Preset Modes (Resolution) Display Modes (Resolution) 1 VGA 640 x 350 2 VGA 720 x 400 3 VGA 640 x 480 4 VESA 640 x 480 5 VESA 800 x 600 6 VESA 800 x 600 7 MAC 832 x 624 8 VESA 1024 x - LG L1734S-BN | Owner's Manual (English) - Page 22
Installing the Wall mount plate This monitor satisfies the specifications of the Wall mount plate or the interchange device. 1. Put a cushion or soft cloth on aflat surface. 2. Place the monitor face Down on the cushion or soft cloth. Stand Base Part Head Part 3. Hold the Head Part with one - LG L1734S-BN | Owner's Manual (English) - Page 23
mount plate .6 Install the Wall mount plate. Wall mount plate(Separate purchase) This is stand-type or wall mount type and is connectable with Wall mount plate. Please refer to the installation guide for more details, which is provided when Wall mount plate is purchased. Kensington Security Slot - LG L1734S-BN | Owner's Manual (English) - Page 24
Digitally yours
-
 1
1 -
 2
2 -
 3
3 -
 4
4 -
 5
5 -
 6
6 -
 7
7 -
8
-
9
-
10
-
11
-
12
-
13
-
14
-
15
-
16
-
17
-
18
-
19
-
20
-
21
-
22
-
23
-
24
 |
 |

M
ake sure to read the
Important Precautions
before using the product.
Keep the User's Guide(CD) in an accessible place for future reference.
S
ee the label attached on the product and give the information to your
dealer when you ask for service.
L1734S
L1734SE
User’s Guide