LG L246WHX-BN Owner's Manual
LG L246WHX-BN Manual
 |
View all LG L246WHX-BN manuals
Add to My Manuals
Save this manual to your list of manuals |
LG L246WHX-BN manual content summary:
- LG L246WHX-BN | Owner's Manual - Page 1
User's Guide L246WH L246WHX Make sure to read Important Precautions before using the product. Keep the User's Guide(CD) in an accessible place for furture reference. See the label attached on the product and give the information to your dealer when you ask for service. - LG L246WHX-BN | Owner's Manual - Page 2
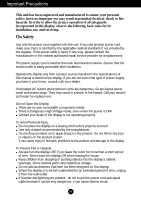
service provider for a replacement. The power supply cord is used as the main disconnection device. Ensure that the socket-outlet is easily accessible after installation. Operate the display only from a power source indicated in the specifications of this manual to humans, problems to the product - LG L246WHX-BN | Owner's Manual - Page 3
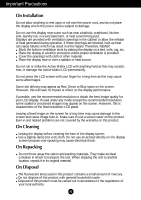
is characteristic of the fixed-resolution LCD panel. Leaving a fixed image on the screen for a long time may cause damage to the screen and cause image burn-in. Make sure to use a screen saver on the product. Burn-in and related problems are not covered by the warranty on this product. On Cleaning - LG L246WHX-BN | Owner's Manual - Page 4
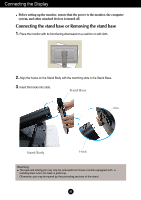
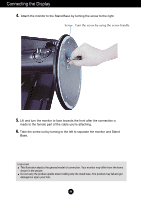
off. Connecting the stand base or Removing the stand base 1. Place the monitor with its front facing downward on a cushion or soft cloth. 2. Align Warning The tape and locking pin may only be removed from those monitors equipped with a standing base when the base is pulled up. Otherwise, you - LG L246WHX-BN | Owner's Manual - Page 5
the Stand Base by turning the screw to the right. Screw : Turn the screw by using the screw handle. 5. Lift and turn the monitor to face towards the front after the connection is made to the female part of the cable you're attaching. 6. Take the screw out by - LG L246WHX-BN | Owner's Manual - Page 6
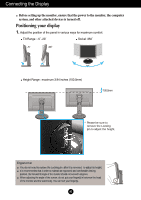
removed, to adjust its height. It is recommended that in order to maintain an ergonomic and comfortable viewing position, the forward tilt angle of the monitor should not exceed 5 degrees. When adjusting the angle of the screen, do not put your finger(s) in between the head of the - LG L246WHX-BN | Owner's Manual - Page 7
DC-OUT HDMI/DVI Y PB PR D-SUB 7 6 1 23 4 5 1 AC-IN Connector : Connect the Power Cord 2 DC-OUT Jack 3 HDMI/DVI Signal Connector by connecting earphones or a headset when using the HDMI configuration.. *AUDIO-OUT is only available with the HDMI input. (You cannot use it with D-SUB or - LG L246WHX-BN | Owner's Manual - Page 8
from the view as shown. User must use shielded signal interface cables (D-sub 15 pin cable, DVI cable) with ferrite cores to maintain the front side of the monitor. INPUT OK/AUTO A When connecting with a HDMI/DVI signal input cable. • Select HDMI : HDMI/DVI digital signal. B When connecting - LG L246WHX-BN | Owner's Manual - Page 9
. Connect the terminals to the sockets of the same color. 2. Connect the power cord. Speaker AUDIO IN DC-OUT HDMI/DVI COMPONENT Y PB PR D-SUB 1 2 AUDIO OUT PB PR PB PR Monitor RCA-Stereo cable (not included) Component Cable (not included) DVD/VIDEO/HDTV PB PR PB PR DVD/VIDEO/HDTV - LG L246WHX-BN | Owner's Manual - Page 10
. COMPONENT DC-OUT HDMI/DVI Y PB PR D-SUB OUT AUDIO 2 1 HDMI/DVI cable RCA-Stereo cable (not included) Speaker (not included) DVD/VIDEO/HDTV 2. Press the INPUT button at the front side of the monitor. INPUT OK/AUTO When connecting with a HDMI/DVI cable. • Select HDMI. A9 INPUT RGB - LG L246WHX-BN | Owner's Manual - Page 11
as keyboard, mouse, etc OUT AUDIO 2 1 MI/DVI COMPONENT Y PB PR D-SUB USB upstream Port To USB downstream port of the USB compliant PC or another hub cable 3. The monitor's USB terminal supports USB 2.0 and High Speed cables. Data Rate Power Consumption High Speed 480Mbps 2.5W (Max,each - LG L246WHX-BN | Owner's Manual - Page 12
power cord and the signal cable in the cable holder 1. OUT AUDIO OUT AUDIO 2 2 1 1 DC-OUT HDMI/DVI COMPONENT Y PB PR D-SUB DC-OUT HDMI/DVI COMPONENT Y PB PR D-SUB C DC-OUT HDMI/DVI Y Cable holder 1 3. Please put the power cord and the signal cable in the cable holder 2. While - LG L246WHX-BN | Owner's Manual - Page 13
Front Panel Controls INPUT Button Select the input signal. INPUT OK/AUTO RGB HDMI Component : 15-pin D-SUB analogue signal : HDMI/DVI digital signal DTV SET-TOP BOX,Video,DVD : DTV SET-TOP BOX,Video,DVD INPUT RGB HDMI Component MENU Button Use this button to enter or exit the On Screen - LG L246WHX-BN | Owner's Manual - Page 14
button to directly control brightness and contrast of the PC signal (RGB, HDMI/DVI). Button • (Picture In Picture) Button The sub-screen is switched on adjust your display image to the ideal settings for the current screen resolution size (display mode). The best display mode is 1920 x 1200@ - LG L246WHX-BN | Owner's Manual - Page 15
On Screen Display (OSD) Control Adjustment Screen Adjustment Making adjustments to the image size, position and operating parameters of the display is quick and easy with the On Screen Display Control system. A short example is given below to familiarize you with the use of the controls. The - LG L246WHX-BN | Owner's Manual - Page 16
On Screen Display(OSD) Selection and Adjustment OSD (On Screen Display) menu Icon Function Description PICTURE Adjusting Screen Colour. SPECIAL SCREEN Selecting the options. Screen Adjustment. Adjusting PIP Mode (Multiple Screen) Functions. PIP Note OSD(On Screen Display) The OSD function - LG L246WHX-BN | Owner's Manual - Page 17
this option to use the user-defined settings. Contrast To adjust the contrast of the screen. Brightness To adjust the brightness of the screen. Color To adjust the color to desired level. Sharpness To adjust the clearness of the screen. HDMI(Video), Component input Selecting a factory setting - LG L246WHX-BN | Owner's Manual - Page 18
. 9300K: Slightly bluish white. sRGB : Set the screen color to fit the SRGB standard color • User : Select this option to use the user-defined settings. EZ Video Contrast Brightness Red Green Blue 50 50 User 50 50 50 Contrast To adjust the contrast of the screen. Brightness To adjust the - LG L246WHX-BN | Owner's Manual - Page 19
to adjust and setup detailed functions on PC instead of the monitor OSD. Monitor can be adjusted with PC by connecting communication between PC and monitor when DDC/CI is ON, and monitor cannot be adjusted with PC because communication between PC and monitor is disconnected when DDC/CI is OFF. A18 - LG L246WHX-BN | Owner's Manual - Page 20
On Screen Display(OSD) Selection and Adjustment Screen Adjustment ARC To select the image size of the screen. Autoconfigure Clock Phase Full Original Full Original 1:1 This function is suitable for analogue signal input only. - LG L246WHX-BN | Owner's Manual - Page 21
when it is connected with DVD or SET-TOP BOX through HDMI. If you want to connect VCR, select VIDEO in this Used when it is connected with PC through HDMI. If you want to connect PC, select PC in this menu. Otherwise, the screen may be too large to support PC sub screen Note When the Interlace - LG L246WHX-BN | Owner's Manual - Page 22
To adjust the position of PIP screen. * The following table is the available option to match the main screen and PIP screen. Main PIP RGB HDMI (Video) Component PIP RGB HDMI (PC) X X Component X O X X O O X A21 - LG L246WHX-BN | Owner's Manual - Page 23
Troubleshooting Check the following before calling for service. No image appears G Is the power cord of card) is out of the diplay's horizontal or vertical frequency range. See the 'Specifications' section of this manual and configure the display again. G Do you see a "CHECK SIGNAL CABLE" message - LG L246WHX-BN | Owner's Manual - Page 24
:10 (for instance, 16:9, 5:4, 4:3), you might encounter problems such as blurred letters, blurry screen, cut-off screen display or tilted screen. The setting method can differ by computer and O/S (Operation System), and resolution mentioned above may not be supported by the video card. In this case - LG L246WHX-BN | Owner's Manual - Page 25
from the display driver CD (or diskette) that comes with your display. Or, you can also download the driver from our web site: http://www.lge.com. G Do you see an "Unrecognized monitor, Plug&Play (VESA DDC) monitor found" message? • Make sure to check if the video card supports Plug&Play function - LG L246WHX-BN | Owner's Manual - Page 26
Specifications L246WH Display Sync Input 24 inches (61.3 cm) Flat Panel Active matrix-TFT LCD Anti-glare coating Visible diagonal size Input Form 15 pin D-Sub Connector HDMI/DVI connector(Digital), Component RGB Analog (0.7 Vp-p/ 75 ohm), Digital Resolution Max Recommend Analog : VESA 1920 x - LG L246WHX-BN | Owner's Manual - Page 27
Specifications Stand Base Power cord USB Attached ( ), Detached ( O ) Wall-outlet type or PC-outlet type Standard USB 2.0, Self-Power Data Rate Max 480 Mbps Power Consumption Max 2.5W x 2 L246WH Note Information in this document is subject to change without notice. A26 - LG L246WHX-BN | Owner's Manual - Page 28
Specifications L246WHX Display Sync Input 24 inches (61.3 cm) Flat Panel Active matrix-TFT LCD Anti-glare coating Visible diagonal size Input Form 15 pin D-Sub Connector HDMI/DVI connector(Digital), Component RGB Analog (0.7 Vp-p/ 75 ohm), Digital Resolution Max Recommend Analog : VESA 1920 x - LG L246WHX-BN | Owner's Manual - Page 29
Specifications Stand Base Power cord USB Attached ( ), Detached ( O ) Wall-outlet type or PC-outlet type Standard USB 2.0, Self-Power Data Rate Max 480 Mbps Power Consumption Max 2.5W x 2 L246WHX Note Information in this document is subject to change without notice. A28 - LG L246WHX-BN | Owner's Manual - Page 30
Specifications PC INPUT Preset Modes (Resolution) Display Modes (Resolution) 1 VGA 640 x 480 2 VESA 640 x 480 3 VESA 720 x 480 4 .893 60.020 75.025 60.000 59.883 60.454 59.950 *Recommend Mode HDMI Video INPUT Display Modes (Resolution) 1 480i 2 576i 3 480p 4 576p 5 720p 6 720p 7 1080i 8 - LG L246WHX-BN | Owner's Manual - Page 31
Installing the Wall mount plate This monitor satisfies the specifications of the Wall mount plate or the interchange mount type and is connectable with Wall mount plate. Please refer to the installation guide for more details, which is provided when Wall mount plate is purchased. Kensington Security - LG L246WHX-BN | Owner's Manual - Page 32
Digitally yours
-
 1
1 -
 2
2 -
 3
3 -
 4
4 -
 5
5 -
 6
6 -
 7
7 -
8
-
9
-
10
-
11
-
12
-
13
-
14
-
15
-
16
-
17
-
18
-
19
-
20
-
21
-
22
-
23
-
24
-
25
-
26
-
27
-
28
-
29
-
30
-
31
-
32
 |
 |

M
ake sure to read
Important Precautions
before using the product.
Keep the User's Guide(CD) in an accessible place for furture reference.
S
ee the label attached on the product and give the information to your
dealer when you ask for service.
L246WH
L246WHX
User’s Guide