LG LMWC23626S Owners Manual - Page 12
Removing/Assembling the, Handles
 |
View all LG LMWC23626S manuals
Add to My Manuals
Save this manual to your list of manuals |
Page 12 highlights
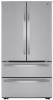
12 INSTALLATION • Too small of a distance from adjacent items may result in lowered freezing capability and increased electricity consumption charges. Allow at least 24 inches (610 mm) in front of the refrigerator to open the doors, and at least 2 inches (50.8 mm) between the back of the refrigerator and the wall. B A C D E FGH I J A B C D E F G H I J Dimension/Clearance Depth without Handle Width Height to Top of Case Height to Top of Hinge Back Clearance Depth without Door Depth with Handle Depth (Total with Freezer Drawer Open) Depth (Total with Door Open 90°) Front Clearance LMWS27626* 32 3/8˝ (822 mm) 35 3/4" (908 mm) 68 3/8" (1737 mm) 69 3/4" (1772 mm) 2" (50 mm) 28 1/2˝ (724 mm) 30 7/8˝ (886 mm) 34 3/8˝ (873 mm) 47 1/8˝ (1197 mm) 24˝ (610 mm) Removing/Assembling the Handles When moving the refrigerator through a narrow opening, removing the doors is preferred. The appearance of the handles may vary from what is shown. WARNING • When assembling or disassembling the refrigerator handles, grasp the handle firmly to avoid dropping it. • Do not swing the handle into nearby people or animals. • Make sure that the bracket hole of the handle fits properly into the stopper bolt of the door. Assemble the set screws to fix the handle into place. • Make sure that there is not a gap between the door and handle after assembling the handle. Tools Needed • 3/32 in. Allen wrench • 1/8 in. Allen wrench • 1/4 in. Allen wrench Removing the Refrigerator Handles 1 Loosen the set screws a with a 3/32 in. Allen wrench and remove the handle. 2 Loosen the mounting fasteners b that connect to the refrigerator door and handle
-
 1
1 -
2
-
3
-
4
-
5
-
6
-
 7
7 -
 8
8 -
 9
9 -
 10
10 -
 11
11 -
 12
12 -
 13
13 -
 14
14 -
 15
15 -
 16
16 -
 17
17 -
18
-
19
-
20
-
21
-
22
-
23
-
24
-
25
-
26
-
27
-
28
-
29
-
30
-
31
-
32
-
33
-
34
-
35
-
36
-
37
-
38
-
39
-
40
-
41
-
42
-
43
-
44
-
45
-
46
-
47
-
48
-
49
-
50
-
51
-
52
-
53
-
54
-
55
-
56
-
57
-
58
-
59
-
60
-
61
-
62
-
63
-
64
-
65
-
66
-
67
-
68
-
69
-
70
-
71
-
72
-
73
-
74
-
75
-
76
-
77
-
78
-
79
-
80
-
81
-
82
-
83
-
84
-
85
-
86
-
87
-
88
-
89
-
90
-
91
-
92
-
93
-
94
-
95
-
96
-
97
-
98
-
99
-
100
-
101
-
102
-
103
-
104
-
105
-
106
-
107
-
108
-
109
-
110
-
111
-
112
-
113
-
114
-
115
-
116
-
117
-
118
-
119
-
120
-
121
-
122
-
123
-
124
-
125
-
126
-
127
-
128
-
129
-
130
-
131
-
132
-
133
-
134
-
135
-
136
-
137
-
138
-
139
-
140
-
141
-
142
-
143
-
144
-
145
-
146
-
147
-
148
-
149
-
150
-
151
-
152
-
153
-
154
-
155
-
156
-
157
-
158
-
159
-
160
-
161
-
162
-
163
-
164
-
165
-
166
-
167
-
168
-
169
-
170
-
171
-
172
-
173
-
174
-
175
-
176
 |
 |
