LG LW6019ER Owners Manual - Page 10
Window Requirements, Preparation of Chassis, Clearance
 |
View all LG LW6019ER manuals
Add to My Manuals
Save this manual to your list of manuals |
Page 10 highlights
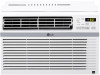
10 INSTALLATION Window Requirements ● This unit is designed for installation in standard double hung windows with actual opening widths from 22" to 36". The top and bottom window sashes must open 13" from the bottom of the upper sash to the inside sill. Wood Strip Mounted on Top of Inner Sill L Bracket ¾" Clearance Inner Sill Wood Strip for L bracket Storm Window Frame Outer Sill Indoors Outdoors 22" to 36" 13" min NOTE ● This prodcut is a WINDOW AIR CONDITIONER. As such, a standard single-hung or double-hung window is required for proper installation. No-window installations, including using sleeves, holes in walls, and other installations are not recommended. Preparation of Chassis 1 Insert the guide panels into the upper and bottom guide. Fasten the curtains to the unit with 4 type A screws on each side. Left Guide Panel Upper Guide Right Guide Panel Clearance Proper clearance enhances the cooling efficiency of the product. 1 If a storm window presents interference, fasten a 2" wide wood strip to the inner window sill across the full width of the sill. The wood strip should be thick enough to raise the height of the window sill so that the unit can be installed without interference by the storm window frame. Bottom Guide NOTE ● Use a long screwdriver and installing the screws will be easier. 2 (See drawing.) The top of the wood strip on the inside sill should be approximately ¾" 2 Cut the window sash seals to the proper length. Peel off the backing and attach the Foam-PE(Adhesive backed) to the higher than the storm window frame or wood underside of the window sash and bottom strip on the outside sill to help condensation to drain properly to the outside. of window frame. 3 If necessary, install a second wood strip (same thickness as first strip) in the center of sill flush against the back off the inner sill. This will raise the L bracket as shown in the drawing. Foam-PE (Adhesive backed)
-
 1
1 -
2
-
3
-
4
-
 5
5 -
 6
6 -
 7
7 -
 8
8 -
 9
9 -
 10
10 -
 11
11 -
 12
12 -
 13
13 -
 14
14 -
 15
15 -
16
-
17
-
18
-
19
-
20
-
21
-
22
-
23
-
24
-
25
-
26
-
27
-
28
-
29
-
30
-
31
-
32
-
33
-
34
-
35
-
36
-
37
-
38
-
39
-
40
-
41
-
42
-
43
-
44
-
45
-
46
-
47
-
48
 |
 |
