LG LWHD7000HR Owners Manual - Page 13
tns_!lation
 |
View all LG LWHD7000HR manuals
Add to My Manuals
Save this manual to your list of manuals |
Page 13 highlights
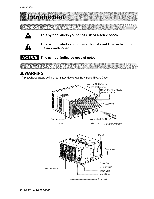
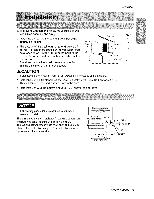
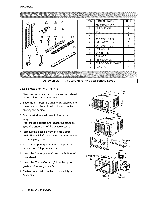
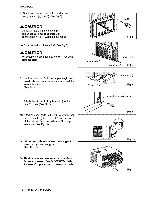
tns_!lation !,, _en the win_w, Mark a Uineon center of the wJn_3w sto,o,_(oidresired air oond_Joner Ii_atJon}. Carefully place the _binet on the window _oo,I and a_ign the center mark o,nthe bottom front with the center Hne marked in the win_w sto,ol, 2,Pullthebottomwin_w sashdown behind theup_r gui_ untiiltm_ts. Upper gui_ Do not p,ullthe wind_ sash down so tightly that the movement o! Frame Curtain is restrictS. 3. L_sely assemble the sin support using the parts in Fig, 3 4. _liect the position that will pla_ the sill support near the outer most po,i_ o,nsill (S_ Fig. 4) Be carefu!l when you instil the ,c_inet (_ame guides @ are broken so easily). 5, Attach 'the,sil_,suppo,_to the _bine{ track hole in relation to #le sele_ed _sitio, n using 2 _pe A screws in each support(See Fig 4) 6, The c_inet should be installed wi_h a very s!ight tilt(about !12") downward toward the outside (See Fig, 5), Adjust the bolt _d the nut d silli su_ort for bal_cing the cabinet. 7. Attach the, cabinet to the win_w stool by driving the screws ® (TY_ B: Length sixteen millimeters ,andbebw,)_rough the front angle into window stool 8. Puilea@ Frame ,cu_ain fuily to each window sash track, and repeat :_ep, 2, Frame Guide @ IND_R Sill support Fig, 2 OUTD@OR U Cabinet OUTDOOR Fig,4, track Owne, r _s Manual 13
-
 1
1 -
2
-
3
-
4
-
5
-
6
-
7
-
 8
8 -
 9
9 -
 10
10 -
 11
11 -
 12
12 -
 13
13 -
 14
14 -
 15
15 -
 16
16 -
 17
17 -
 18
18 -
19
-
20
-
21
 |
 |
