Lenovo 22P7196 User Guide - Page 12
Attention, Computer
 |
UPC - 000435296191
View all Lenovo 22P7196 manuals
Add to My Manuals
Save this manual to your list of manuals |
Page 12 highlights
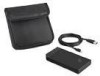
1. Attach the primary USB cable to the USB port 5 , as shown in Figure 1. 1 Power switch 2 Drive activity LED 3 Auxiliary power port 4 Power LED 5 USB port 6 Primary USB cable 7 Auxiliary power cable Figure 1. Installing the drive 2. Connect the other end of the primary USB cable 6 to an available USB port on your computer. 3. Attach the auxiliary power cable to the auxiliary power port 3 on the drive. 4. Attach the other end of the auxiliary power cable 7 to an available USB port on your computer. 5. Turn the switch 1 to the on position. Attention Only use the cables that come with this option. You might damage the drive if you use a cable not included with the option package. Do not attach an ac adapter to this device. 6. Open My Computer and double-click the icon that is associated with the IBM USB Hard Drive. Windows will automatically detect the drive. The first time you perform these steps, a welcome window will open with the option to install the Rescue and Recovery software. If you intend to use the included Rescue and Recovery software, be sure to read the general introductory information in Chapter 2, "Installing and using the Rescue 2 Portable 40 GB USB 2.0 Hard Drive with Rescue and Recovery
-
 1
1 -
2
-
3
-
4
-
5
-
6
-
 7
7 -
 8
8 -
 9
9 -
 10
10 -
 11
11 -
 12
12 -
 13
13 -
 14
14 -
 15
15 -
 16
16 -
 17
17 -
18
-
19
-
20
-
21
-
22
-
23
-
24
-
25
-
26
-
27
-
28
-
29
-
30
-
31
-
32
-
33
-
34
-
35
-
36
-
37
-
38
-
39
-
40
-
41
-
42
-
43
-
44
-
45
-
46
-
47
-
48
-
49
-
50
-
51
-
52
-
53
-
54
-
55
-
56
-
57
-
58
 |
 |
