Lenovo C100 Lenovo 3000 C100 Hardware Maintenance Manual (Windows 7) - Page 33
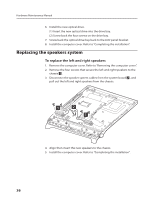
Remove the 9 screws that secure the system cover to the chassis.
 |
UPC - 884942560453
View all Lenovo C100 manuals
Add to My Manuals
Save this manual to your list of manuals |
Page 33 highlights
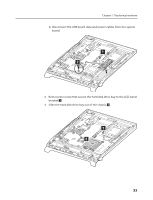
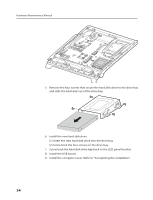
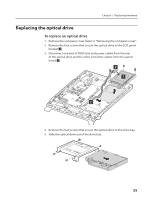
Chapter 7. Replacing hardware 4. Remove the two plastic caps covering the stand 1 . 5. Remove the four screws that secure the stand to the back of the computer 2 and remove the stand. 2 1 1 6. Remove the 9 screws that secure the system cover to the chassis. Release the left and right tabs from the connector housing, then pull each side of the cover out slightly, release the top tabs from the connector housing, then lift the cover away from the computer. 31
-
 1
1 -
2
-
3
-
4
-
5
-
6
-
7
-
8
-
9
-
10
-
11
-
12
-
13
-
14
-
15
-
16
-
17
-
18
-
19
-
20
-
21
-
22
-
23
-
24
-
25
-
26
-
27
-
 28
28 -
 29
29 -
 30
30 -
 31
31 -
 32
32 -
 33
33 -
 34
34 -
 35
35 -
 36
36 -
 37
37 -
 38
38 -
39
-
40
-
41
-
42
-
43
-
44
-
45
-
46
-
47
-
48
-
49
-
50
-
51
-
52
 |
 |

Chapter 7. Replacing hardware
31
4. Remove the two plastic caps covering the stand
1
.
5. Remove the four screws that secure the stand to the back of the
computer
2
and remove the stand.
1
1
2
6.
Remove the 9 screws that secure the system cover to the chassis.
Release the left and right tabs from the connector housing, then
pull each side of the cover out slightly, release the top tabs from the
connector housing, then lift the cover away from the computer.