Lenovo C100 Lenovo 3000 C100 Hardware Maintenance Manual (Windows 7) - Page 35
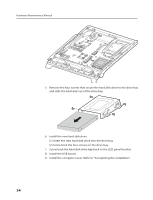
Remove the screw that secure the hard disk drive bay to the LCD panel
 |
UPC - 884942560453
View all Lenovo C100 manuals
Add to My Manuals
Save this manual to your list of manuals |
Page 35 highlights
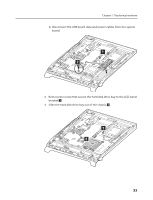
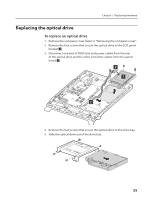
Chapter 7. Replacing hardware 2) Disconnect the USB board data and power cables from the system board. 1 2 3. Remove the screw that secure the hard disk drive bay to the LCD panel bracket 1 . 4. Slide the hard disk drive bay out of the chassis 2 . 1 2 33
-
 1
1 -
2
-
3
-
4
-
5
-
6
-
7
-
8
-
9
-
10
-
11
-
12
-
13
-
14
-
15
-
16
-
17
-
18
-
19
-
20
-
21
-
22
-
23
-
24
-
25
-
26
-
27
-
28
-
29
-
 30
30 -
 31
31 -
 32
32 -
 33
33 -
 34
34 -
 35
35 -
 36
36 -
 37
37 -
 38
38 -
 39
39 -
 40
40 -
41
-
42
-
43
-
44
-
45
-
46
-
47
-
48
-
49
-
50
-
51
-
52
 |
 |

Chapter 7. Replacing hardware
33
2)
Disconnect the USB board data and power cables from the system
board.
1
2
3.
Remove the screw that secure the hard disk drive bay to the LCD panel
bracket
1
.
4.
Slide the hard disk drive bay out of the chassis
2
.
1
2