Lenovo NetVista Hardware Maintenance Manual (HMM) for NetVista 2259 and 6049 s - Page 8
Assembling the Mainboard
 |
View all Lenovo NetVista manuals
Add to My Manuals
Save this manual to your list of manuals |
Page 8 highlights
IBM NetVista Type 6049 and 2259 Refresh 1.1 Assembling the Mainboard 1.The plastic spacers provide extreme support in areas of high mechanical stress on your mainboard. Insert the plastic spacers in the 2 mounting holes as shown in the figure through the back of your mainboard. The plastic spacers are provided with the case. 2. Position the mainboard in the plate so you can see the alignment of the mounting holes in the mainboard with the standoff holes. There are at least 4 screws that need to be secured. Version: HMM02 8 of 35
-
 1
1 -
2
-
 3
3 -
 4
4 -
 5
5 -
 6
6 -
 7
7 -
 8
8 -
 9
9 -
 10
10 -
 11
11 -
 12
12 -
 13
13 -
14
-
15
-
16
-
17
-
18
-
19
-
20
-
21
-
22
-
23
-
24
-
25
-
26
-
27
-
28
-
29
-
30
-
31
-
32
-
33
-
34
-
35
 |
 |

IBM NetVista
Type 6049 and 2259 Refresh 1.1
Version: HMM02
8 of 35
Assembling the Mainboard
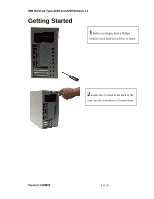
1
.The plastic spacers provide extreme
support in areas of high mechanical stress
on your mainboard. Insert the plastic
spacers in the 2 mounting holes as shown
in the figure through the back of your
mainboard. The plastic spacers are
provided with the case.
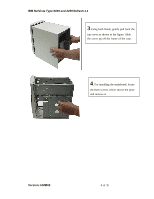
2
. Position the mainboard in the plate so
you can see the alignment of the
mounting holes in the mainboard with the
standoff holes. There are at least 4 screws
that need to be secured.