Lenovo P710 Lenovo Digital Photo Frame P710 User's Guide - Page 5
Know the DPF, 2.1 Product Presentation, IR Receiver Window, 2.2 Use the Remote Control
 |
View all Lenovo P710 manuals
Add to My Manuals
Save this manual to your list of manuals |
Page 5 highlights
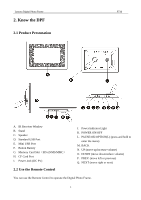
Lenovo Digital Photo Frame P710 2. Know the DPF 2.1 Product Presentation A. IR Receiver Window B. Stand C. Speaker D. Standard USB Port E. Mini USB Port F. Button Battery G. Memory Card Slot(SD/xD/MS/MMC) H. CF Card Port I. Power Jack (DC 9V) 2.2 Use the Remote Control J. Power Indicator Light K. POWER ON/OFF L. PAUSE/OK/OPTION(L) (press and hold to enter the menu) M. BACK N. UP (move up/increase volume) O. DOWN (move down/reduce volume) P. PREV. (move left or previous) Q. NEXT (move right or next) You can use the Remote Control to operate the Digital Photo Frame. 4
-
 1
1 -
 2
2 -
 3
3 -
 4
4 -
 5
5 -
 6
6 -
 7
7 -
 8
8 -
 9
9 -
 10
10 -
 11
11 -
12
-
13
-
14
-
15
-
16
-
17
-
18
-
19
-
20
-
21
-
22
-
23
-
24
-
25
-
26
-
27
-
28
-
29
-
30
-
31
-
32
-
33
-
34
-
35
-
36
 |
 |

Lenovo Digital Photo Frame
P710
2. Know the DPF
2.1 Product Presentation
A.
IR Receiver Window
J.
Power Indicator Light
K.
POWER ON/OFF
L.
PAUSE/OK/OPTION(L) (press and hold to
enter the menu)
M.
BACK
N.
UP (move up/increase volume)
O.
DOWN (move down/reduce volume)
P.
PREV. (move left or previous)
Q.
NEXT (move right or next)
B.
Stand
C.
Speaker
D.
Standard USB Port
E.
Mini USB Port
F.
Button Battery
G.
Memory Card Slot
(
SD/xD/MS/MMC
)
H.
CF Card Port
I.
Power Jack (DC 9V)
2.2 Use the Remote Control
You can use the Remote Control to operate the Digital Photo Frame.
4