Lenovo P710 Lenovo Digital Photo Frame P710 User's Guide - Page 7
Connecting to PC with USB Cable, 2.5 Interface
 |
View all Lenovo P710 manuals
Add to My Manuals
Save this manual to your list of manuals |
Page 7 highlights
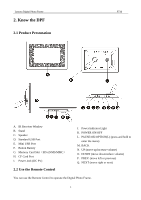
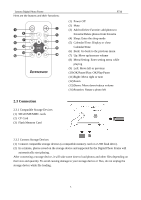
Lenovo Digital Photo Frame P710 2.4 Connecting to PC with USB Cable The Digital Photo Frame supports Windows 2000/XP/Vista operating systems. (1) Connect the adapter to the Digital Photo Frame. (2) Use the USB cable to connect the Digital Photo Frame (Mini USB port) with your computer. (3) Press POWER button to turn on the Digital Photo Frame. (4) Your computer will recognize the Digital Photo Frame as a storage device and you can copy photos onto the Digital Photo Frame or delete them from it. Note: Do not remove the USB cable or the adapter when copying or deleting. 2.5 Interface 2.5.1 Menu Function Selection Last Selection Current Selection Next Selection Current operation path 2.5.2 Key Map When operating on the Digital Photo Frame, you will see key icons on the upper side of the interface, and the icon corresponding with the functioning key will light up. To select or change selections, press UP/DOWN/LEFT/RIGHT buttons and press OK to confirm. Press BACK to go back to the previous menu. OK/PAUSE (Press and hold to go to the function menu) UP LEFT TURN ON/OFF BACK DOWN PREV. 6
-
 1
1 -
 2
2 -
 3
3 -
 4
4 -
 5
5 -
 6
6 -
 7
7 -
 8
8 -
 9
9 -
 10
10 -
 11
11 -
 12
12 -
13
-
14
-
15
-
16
-
17
-
18
-
19
-
20
-
21
-
22
-
23
-
24
-
25
-
26
-
27
-
28
-
29
-
30
-
31
-
32
-
33
-
34
-
35
-
36
 |
 |
