Lenovo PC 300PL Installing Options in your PC300PL - 6562 - Page 59
Additional Parts Required, Rotating the Drive Cage
 |
View all Lenovo PC 300PL manuals
Add to My Manuals
Save this manual to your list of manuals |
Page 59 highlights
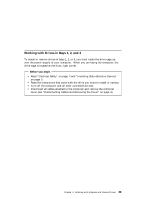
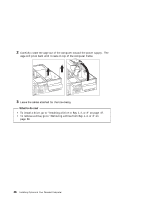
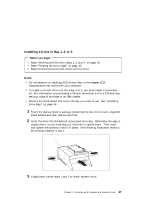
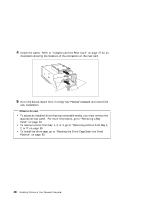
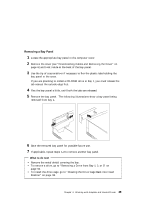
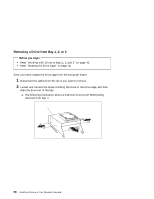
What to do next To remove a bay panel, go to "Removing a Bay Panel" on page 49. To rotate the drive cage up and rest it on the power supply, go to "Rotating the Drive Cage" on page 45. To install a drive, go to "Installing a Drive in Bay 1, 2, or 3" on page 47. To remove a drive, go to "Removing a Drive from Bay 1, 2, or 3" on page 50. Additional Parts Required If you are adding a drive to your computer, you may need to obtain a drive bay conversion kit. If you plan to add 3.5-inch drive to a 5.25-inch bay, you must mount a conversion kit in the bay to hold the drive. For information about ordering this and other parts, see "Available Options and Features" on page 2. Rotating the Drive Cage To rotate the drive cage up from the computer and over the power supply: 1 Remove the two screws that attach the drive cage to the computer frame. Chapter 4. Working with Adapters and Internal Drives 45
-
 1
1 -
2
-
3
-
4
-
5
-
6
-
7
-
8
-
9
-
10
-
11
-
12
-
13
-
14
-
15
-
16
-
17
-
18
-
19
-
20
-
21
-
22
-
23
-
24
-
25
-
26
-
27
-
28
-
29
-
30
-
31
-
32
-
33
-
34
-
35
-
36
-
37
-
38
-
39
-
40
-
41
-
42
-
43
-
44
-
45
-
46
-
47
-
48
-
49
-
50
-
51
-
52
-
53
-
 54
54 -
 55
55 -
 56
56 -
 57
57 -
 58
58 -
 59
59 -
 60
60 -
 61
61 -
 62
62 -
 63
63 -
 64
64 -
65
-
66
-
67
-
68
-
69
-
70
-
71
-
72
-
73
-
74
-
75
-
76
-
77
-
78
-
79
-
80
-
81
-
82
-
83
-
84
-
85
-
86
-
87
-
88
-
89
-
90
-
91
-
92
-
93
-
94
-
95
-
96
-
97
-
98
-
99
-
100
 |
 |
