Lenovo ThinkCentre A61 User Manual
Lenovo ThinkCentre A61 Manual
 |
View all Lenovo ThinkCentre A61 manuals
Add to My Manuals
Save this manual to your list of manuals |
Lenovo ThinkCentre A61 manual content summary:
- Lenovo ThinkCentre A61 | User Manual - Page 1
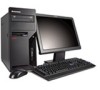
ThinkCentre User Guide Machine Types 9120, 9126, 9127, 9128, 9129, 9130, 9134, 9135, 9136, 9137, 9139, 9140, 9141, 9142, 9143, 9144, 9156, 9157, 9158, 9159, 9169, 9171, 9189, 9191 - Lenovo ThinkCentre A61 | User Manual - Page 2
- Lenovo ThinkCentre A61 | User Manual - Page 3
ThinkCentre User Guide - Lenovo ThinkCentre A61 | User Manual - Page 4
Note Before using this information and the product it supports, be sure to read the Safety and Warranty Guide that came with this product and Appendix B, "Notices," on page 51. First Edition (June 2007) © Copyright Lenovo 2005, 2007. Portions © Copyright International Business Machines Corporation - Lenovo ThinkCentre A61 | User Manual - Page 5
from a CD-ROM or diskette 23 Updating (flashing) BIOS from your operating system 24 Chapter 7. Troubleshooting and diagnostics 25 Basic troubleshooting 25 Diagnostic programs 26 PC-Doctor for Windows 27 PC-Doctor for DOS 27 PC-Doctor for Windows PE 29 Cleaning the mouse 29 Optical mouse - Lenovo ThinkCentre A61 | User Manual - Page 6
iv User Guide - Lenovo ThinkCentre A61 | User Manual - Page 7
and how to recover from a POST/BIOS update failure. v Chapter 7, "Troubleshooting and diagnostics," on page 25 provides information about basic troubleshooting and diagnostic tools for your computer. v Chapter 8, "Recovering software," on page 31 provides instructions on how to use the ThinkVantage - Lenovo ThinkCentre A61 | User Manual - Page 8
vi User Guide - Lenovo ThinkCentre A61 | User Manual - Page 9
manual, it is important that you read and understand all the related safety information for this product. Refer to the Safety and Warranty Guide Safety and Warranty Guide, you can obtain one online from the Lenovo Support Web site at: http://www.lenovo.com/support. © Lenovo 2005, 2007. Portions © - Lenovo ThinkCentre A61 | User Manual - Page 10
2 User Guide - Lenovo ThinkCentre A61 | User Manual - Page 11
should adjust independently and provide good support. The seat should have a curved . Viewing Distance Lower Back Support Seat Height Adjust the monitor overhead lights, windows, and other light right angles to windows and other light sources install the monitor near a window, use curtains or blinds - Lenovo ThinkCentre A61 | User Manual - Page 12
of reducing glare. Dust buildup compounds problems associated with glare. Remember to clean The location of electrical outlets, the length of power cords and cables that connect to the monitor, plug the computer power cord directly into an electrical outlet. v Keep power cords and cables neatly - Lenovo ThinkCentre A61 | User Manual - Page 13
Chapter 3. Setting up your computer Read and understand the Safety and Warranty Guide before you set up your computer. Reading and understanding the safety information the air vents facing upward so that the computer sits on the vertical stand. © Lenovo 2005, 2007. Portions © IBM Corp. 2005. 5 - Lenovo ThinkCentre A61 | User Manual - Page 14
computer. Look for the small connector icons on the back models are equipped with a voltage-selection switch located near the power-cord connection point on the computer. If your computer has a a different position. v If the voltage supply range in your local country or region is 100-127 V ac, set - Lenovo ThinkCentre A61 | User Manual - Page 15
on your computer, refer to the Access Help online help system for information about your fingerprint reader. See "Access Help" on page 40 for instructions on how to open the online help system. 3. Connect the mouse cable to the appropriate keyboard connector, either the standard mouse connector 1 or - Lenovo ThinkCentre A61 | User Manual - Page 16
v If you have a digital video interface (DVI) monitor, your computer must have an adapter installed that supports the DVI monitor. Connect the cable to the connector as shown. 8 User Guide 5. If you have a modem, connect the modem using the following information. PHONE PHONE PHONE LINE LINE - Lenovo ThinkCentre A61 | User Manual - Page 17
If you have audio devices, attach them using the following instructions. For more information about speakers, see steps 7 and 8. . c. Connect the speakers to the computer. d. Connect the ac adapter to the ac power source. 8. If you have unpowered speakers with no ac adapter: a. Connect the cable - Lenovo ThinkCentre A61 | User Manual - Page 18
digital audio devices and scanners. 10. Connect the power cords to properly grounded electrical outlets. 10 User Guide Note: For more information about connectors, refer to the Access Help online help system. See "Access Help" on page 40 for instructions on how to open the online help system. - Lenovo ThinkCentre A61 | User Manual - Page 19
If you experience any problems during startup, see Chapter 7, "Troubleshooting and diagnostics," on page 25. For additional help, refer to Chapter 9, "Getting information, help, and service," on page 39. You can get help and information by telephone through the Customer Support Center. Refer to the - Lenovo ThinkCentre A61 | User Manual - Page 20
after you install your operating system. Installation instructions are usually provided with the device drivers. Updating your antivirus software Your computer comes with antivirus software you can use to detect and eliminate viruses. Lenovo provides a full version of antivirus software on your - Lenovo ThinkCentre A61 | User Manual - Page 21
(size varies by model type) Memory v Support for four double data rate 2 dual inline memory modules (DDR2 DIMMs) v Flash memory for system programs (varies by Remote Administration v Automatic power-on startup v System Management (SM) BIOS and SM software v Ability to store power-on self-test (POST) - Lenovo ThinkCentre A61 | User Manual - Page 22
(some models) v 310 Watt power supply with manual voltage selection switch (some models) v Automatic 50/60 Hz input frequency switching v Advanced Configuration and Power Interface (ACPI) support Security features v User and administrator passwords for BIOS access v Support for the addition of an - Lenovo ThinkCentre A61 | User Manual - Page 23
input: Some models have a switchable power supply that supports both low and high input voltage ranges. Some models do not have a switch and support only a low or high input voltage range. For additional information refer to your Safety and Warranty Guide. Input voltage: Low range: Minimum - Lenovo ThinkCentre A61 | User Manual - Page 24
specifications for machine types 9126, 9128, 9130, 9135, 9137, 9140, 9142, 9144, power supply that supports both low and high input voltage ranges. Some models do not have a switch and support only a low or high input voltage range. For additional information refer to your Safety and Warranty Guide - Lenovo ThinkCentre A61 | User Manual - Page 25
: v Microsoft Windows XP v Microsoft Windows Vista Software provided with your Windows operating system This section describes the Windows applications included with this product. Software provided by Lenovo ThinkVantage Productivity Center The ThinkVantage Productivity Center program guides you to - Lenovo ThinkCentre A61 | User Manual - Page 26
through the Windows operating system to diagnose hardware problems and report operating-system-controlled settings that can cause hardware failures. Adobe Acrobat Reader See "Online Books folder" on page 39 for more information about accessing the online books and the Lenovo Web site. 18 User Guide - Lenovo ThinkCentre A61 | User Manual - Page 27
a good idea to use a strong password that cannot be easily compromised. Passwords should adhere to the following rules: v Have at least eight characters in length © Lenovo 2005, 2007. Portions © IBM Corp. 2005. 19 - Lenovo ThinkCentre A61 | User Manual - Page 28
and will not be displayed in the system configuration. When this feature is set to Disable, the diskette drive cannot be accessed. 20 User Guide To set Security Profile by Device, do the following: 1. Start the Setup Utility program (see "Starting the Setup Utility program" on page 19). 2. From - Lenovo ThinkCentre A61 | User Manual - Page 29
3. Select Security Profile by Device. 4. Select the desired devices and settings and press Enter. 5. Return to the Setup Utility program menu and select Exit and then Save Settings or Save and exit the Setup Utility. Note: If you do not want to save the settings, select Exit the Setup Utility - Lenovo ThinkCentre A61 | User Manual - Page 30
want to save the new settings, select Save Settings or Save and exit the Setup Utility. Otherwise, your changes will not be saved. 22 User Guide - Lenovo ThinkCentre A61 | User Manual - Page 31
. They include the power-on self-test (POST), the basic input/output system (BIOS) code, and the memory (EEPROM, also referred to as flash memory). You can easily update POST, BIOS, files on the Lenovo Web site at http://www.lenovo.com. Instructions for using the POST/BIOS updates are available - Lenovo ThinkCentre A61 | User Manual - Page 32
http://www.lenovo.com/support in the address field and press Enter. 2. Locate the Downloadable files for your machine type as follows: a. In the Enter a product number field, type in your machine type and click Go. b. Click Continue. c. Click Downloads and drivers. d. Under the BIOS category, click - Lenovo ThinkCentre A61 | User Manual - Page 33
9, "Getting information, help, and service," on page 39 for additional troubleshooting resources. Basic troubleshooting The following table provides information to help you troubleshoot your computer problem. Symptom The computer does not start when you press the power button. Action Verify that - Lenovo ThinkCentre A61 | User Manual - Page 34
the PC-Doctor for Windows or PC-Doctor for DOS diagnostic programs from http://www.lenovo.com/support/. Type your machine type into the Enter a product number field and click Go to find the downloadable files that are specific to your computer. 2. If you are unable to isolate and repair the problem - Lenovo ThinkCentre A61 | User Manual - Page 35
computer problems, access the Lenovo troubleshooting center, update system drivers, and review system information. To run PC-Doctor for Windows, open the Start menu from the Windows desktop, select All Programs, select PC-Doctor for Windows, and click PC-Doctor for Windows. Follow the instructions - Lenovo ThinkCentre A61 | User Manual - Page 36
Guide 4. When you hear beeps or see a logo screen, stop pressing the F11 key. The Rescue and Recovery workspace opens. Note: For some models, press the Esc key to enter Rescue and Recovery. 5. From the Rescue and Recovery workspace, select Create diagnostic disks. 6. Follow the instructions the PC- - Lenovo ThinkCentre A61 | User Manual - Page 37
Windows PE on your Lenovo computer. The PC-Doctor for Windows PE diagnostic program is part of the Rescue and Recovery workspace. Use PC-Doctor for Windows PE, if you are unable to start the Windows operating system or if PC-Doctor for Windows has not been successful in isolating a possible problem - Lenovo ThinkCentre A61 | User Manual - Page 38
. 1 Retainer ring 2 Ball 3 Plastic rollers 4 Ball cage To clean a mouse with a ball, follow the instructions below: 1. Turn off your computer. 2. Disconnect the mouse cable from the computer. 3. Turn the mouse upside down mouse cable to the computer. 12. Turn your computer back on. 30 User Guide - Lenovo ThinkCentre A61 | User Manual - Page 39
: 1. From the Windows desktop, open the Start menu, select All Programs, select ThinkVantage, click Create Recovery Media. 2. Follow the instructions on the screen. The following list explains how Product Recovery discs are used on different operating systems: v Windows XP: Use Product Recovery - Lenovo ThinkCentre A61 | User Manual - Page 40
guided through the process of restoring from original factory contents only. To use Product Recovery discs on Windows XP DVD drive) set correctly in your BIOS startup sequence. For more information, see system. 5. Follow the instructions on the screen. Insert some software or drivers. See "Using - Lenovo ThinkCentre A61 | User Manual - Page 41
, click Back up your hard drive select backup operation options. 3. Follow the instructions on the screen. To perform a restore operation using the Rescue and Recovery program, do the following: 1. From the Windows desktop, open the Start menu, select All Programs, click ThinkVantage, then click - Lenovo ThinkCentre A61 | User Manual - Page 42
Windows problems" on page 37. 6. Do one of the of the following: v To rescue files from your hard disk or from a backup, click Rescue files; then, follow the instructions drivers for some devices. See "Recovering or installing device drivers PC-Doctor diagnostics program, which enables you to run diagnostics from - Lenovo ThinkCentre A61 | User Manual - Page 43
Windows desktop, instructions on the screen. The following list explains how Product Recovery discs are used on different operating systems: v Windows XP USB device) set correctly in your BIOS startup sequence. For more information, see address: http://www.lenovo.com/think/support/site.wss/document. - Lenovo ThinkCentre A61 | User Manual - Page 44
devices also are available on the World Wide Web at http://www.lenovo.com/think/support/. To reinstall a device driver for a factory-installed device, do the following: 1. Start your computer and operating system. 2. Use Windows Explorer or My Computer to display the directory structure of your hard - Lenovo ThinkCentre A61 | User Manual - Page 45
Utility," on page 19. Solving recovery problems If you are unable to access the Rescue and Recovery workspace or the Windows environment, you can: v Use your rescue drive defined as a startup device in the BIOS startup sequence. For more information, see "Setting a rescue device in the - Lenovo ThinkCentre A61 | User Manual - Page 46
38 User Guide - Lenovo ThinkCentre A61 | User Manual - Page 47
Installation and Replacement Guide provides step-by-step instructions for replacing Customer Replaceable Units (CRUs) in your computer. CRUs are computer parts that can be upgraded or replaced by the customer. To view a publication, open the Start menu from the Windows desktop, select All Programs - Lenovo ThinkCentre A61 | User Manual - Page 48
and troubleshooting. To open Access Help, open the Start menu from the Windows desktop, services. v Download the latest device drivers and software updates for your computer model. v Access the online manuals. v Access the Lenovo Statement of Limited Warranty. v Access troubleshooting and support - Lenovo ThinkCentre A61 | User Manual - Page 49
to help you troubleshoot your computer problem, see "Information resources" on page 39. If you suspect a software problem, see the download device drivers and updates. To access these pages, go to http://www.lenovo.com/support/ and follow the instructions. Calling for service During the - Lenovo ThinkCentre A61 | User Manual - Page 50
, go to http://www.lenovo.com/support/, click Warranty, and follow the instructions on the screen. For technical assistance with the installation of or questions related to Service Packs for your preinstalled Microsoft Windows product, refer to the Microsoft Product Support Services Web site at http - Lenovo ThinkCentre A61 | User Manual - Page 51
manually programming your modem. Commands are accepted by the modem while it is in Command Mode. Your modem is automatically in Command Mode until you dial a number and establish a connection. Commands can be sent to your modem from a PC H_ H0 Function Manually answer incoming call supported memory - Lenovo ThinkCentre A61 | User Manual - Page 52
W2 X_ X0 X1 X2 X3 X4 Z_ Z0 Z1 44 User Guide Function Force modem off-hook (make busy) Note: H1 command is not supported for Italy Display product-identification code Factory ROM checksum test Internal memory test Firmware ID Reserved ID Low speaker volume Low speaker volume Medium speaker - Lenovo ThinkCentre A61 | User Manual - Page 53
Digital Loopback Test Perform a Remote Digital Loopback Test and Self-Test Perform Local Analog Loopback Test and Self-Test Displays Active and Stored Profiles Appendix A. Manual modem commands 45 - Lenovo ThinkCentre A61 | User Manual - Page 54
as Profile 1 Disable auto-retrain Enable auto-retrain Displays the current Select Modulation settings Displays a list of supported Select Modulation options Select modulation where: a=0, 1, 2, 3, 9, 10, 11, 12, 56, 64 \N0) Disable V.44 Enable V.44 Current values List of support values 46 User Guide - Lenovo ThinkCentre A61 | User Manual - Page 55
FDTC: +FET: +FET=N +FHNG +FK +FLID= +FLPL +FMDL? +FMFR? Data/Fax Auto Answer Service Class Receive data with HDLC framing Receive data Receive silence Transmit data with HDLC framing Transmit data Stop transmission and . Identify model. Identify manufacturer. Appendix A. Manual modem commands 47 - Lenovo ThinkCentre A61 | User Manual - Page 56
Silence detection period Sampling rate selection Silence deletion tuner DTMF tone reporting capability Enable timing mark placement Generate tone signals Voice transmit mode 48 User Guide - Lenovo ThinkCentre A61 | User Manual - Page 57
your Swisscom phone line does not have Taxsignal switched OFF, modem function may be impaired. The impairment may be resolved by a filter with the following specifications: Telekom PTT SCR-BE Taximpulssperrfilter-12kHz PTT Art. 444.112.7 Bakom 93.0291.Z.N Appendix A. - Lenovo ThinkCentre A61 | User Manual - Page 58
50 User Guide - Lenovo ThinkCentre A61 | User Manual - Page 59
operation of any other product, program, or service. Lenovo may have patents or pending patent applications covering support applications where malfunction may result in injury or death to persons. The information contained in this document does not affect or change Lenovo product specifications - Lenovo ThinkCentre A61 | User Manual - Page 60
States, other countries, or both: Lenovo Rescue and Recovery ThinkCentre ThinkVantage The following terms are trademarks of International Business Machines Corporation in the United States, other countries, or both: IBM Wake on LAN Microsoft, Windows, and Windows Vista are trademarks of Microsoft - Lenovo ThinkCentre A61 | User Manual - Page 61
32 basic trouble shooting 25 BIOS, updating ( support center 41 D deleting password 20 device drivers installing 36 recovering 36 diagnostic CD image 11, 28 creating 27 diskettes 11, 27, 28 creating 27 PC-Doctor for DOS 26, 27 PC-Doctor for Windows 26, 27 PC-Doctor for Windows PE 26, 29 © Lenovo - Lenovo ThinkCentre A61 | User Manual - Page 62
on computer 11 power-on self-test (POST) 23 product recovery disc, creating 31 productivity center, ThinkVantage 39 programs, updating system 23 purchasing additional services 42 54 User Guide R recovering device drivers 36 software 31 recovery operations, backup and 32 problems, solving 37 repair - Lenovo ThinkCentre A61 | User Manual - Page 63
23 antivirus software 12 operating system 12 system programs 23 updating (flashing) BIOS 24 user, password 20 using diagnostic programs 41 documentation 41 other services 42 passwords 19 recovery repair diskette, creating and using 35 rescue media, creating and 34 Setup Utility 19 utility program - Lenovo ThinkCentre A61 | User Manual - Page 64
56 User Guide - Lenovo ThinkCentre A61 | User Manual - Page 65
- Lenovo ThinkCentre A61 | User Manual - Page 66
Part Number: 43C4865 Printed in USA (1P) P/N: 43C4865
-
 1
1 -
 2
2 -
 3
3 -
 4
4 -
 5
5 -
 6
6 -
 7
7 -
8
-
9
-
10
-
11
-
12
-
13
-
14
-
15
-
16
-
17
-
18
-
19
-
20
-
21
-
22
-
23
-
24
-
25
-
26
-
27
-
28
-
29
-
30
-
31
-
32
-
33
-
34
-
35
-
36
-
37
-
38
-
39
-
40
-
41
-
42
-
43
-
44
-
45
-
46
-
47
-
48
-
49
-
50
-
51
-
52
-
53
-
54
-
55
-
56
-
57
-
58
-
59
-
60
-
61
-
62
-
63
-
64
-
65
-
66
 |
 |
ThinkCentre
User Guide
Machine Types
9120, 9126, 9127, 9128, 9129, 9130, 9134, 9135, 9136, 9137,
9139, 9140, 9141, 9142, 9143, 9144, 9156, 9157, 9158, 9159,
9169, 9171, 9189, 9191