Lenovo ThinkCentre Edge 92 Hardware Maintenance Manual (HMM) (July 2012) - Thi - Page 129
Installing or replacing a PCI card, To lower the drive bay assembly, press the drive bay assembly clip
 |
View all Lenovo ThinkCentre Edge 92 manuals
Add to My Manuals
Save this manual to your list of manuals |
Page 129 highlights
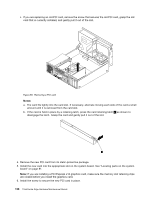
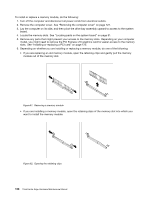
5. To lower the drive bay assembly, press the drive bay assembly clip 1 inward and pivot the drive bay assembly downward as shown. Figure 58. Lowering the drive bay assembly Installing or replacing a PCI card Attention: Do not open your computer or attempt any repair before reading and understanding "Important safety information" on page 1. This section provides instructions on how to install or replace a PCI card. Your computer has two standard PCI card slots, one PCI Express x1 card slot, and one PCI Express x16 graphics card slot. To install or replace a PCI card, do the following: 1. Turn off the computer and disconnect all power cords from electrical outlets. 2. Remove the computer cover. See "Removing the computer cover" on page 121. 3. Depending on whether you are installing or replacing a PCI card, do one of the following: • If you are installing a PCI card, remove the screw that secures the appropriate metal slot cover. Then, remove the metal slot cover. Chapter 10. Replacing FRUs (machine types: 3377, 3386, and 3388) 125
-
 1
1 -
2
-
3
-
4
-
5
-
6
-
7
-
8
-
9
-
10
-
11
-
12
-
13
-
14
-
15
-
16
-
17
-
18
-
19
-
20
-
21
-
22
-
23
-
24
-
25
-
26
-
27
-
28
-
29
-
30
-
31
-
32
-
33
-
34
-
35
-
36
-
37
-
38
-
39
-
40
-
41
-
42
-
43
-
44
-
45
-
46
-
47
-
48
-
49
-
50
-
51
-
52
-
53
-
54
-
55
-
56
-
57
-
58
-
59
-
60
-
61
-
62
-
63
-
64
-
65
-
66
-
67
-
68
-
69
-
70
-
71
-
72
-
73
-
74
-
75
-
76
-
77
-
78
-
79
-
80
-
81
-
82
-
83
-
84
-
85
-
86
-
87
-
88
-
89
-
90
-
91
-
92
-
93
-
94
-
95
-
96
-
97
-
98
-
99
-
100
-
101
-
102
-
103
-
104
-
105
-
106
-
107
-
108
-
109
-
110
-
111
-
112
-
113
-
114
-
115
-
116
-
117
-
118
-
119
-
120
-
121
-
122
-
123
-
 124
124 -
 125
125 -
 126
126 -
 127
127 -
 128
128 -
 129
129 -
 130
130 -
 131
131 -
 132
132 -
 133
133 -
 134
134 -
135
-
136
-
137
-
138
-
139
-
140
-
141
-
142
-
143
-
144
-
145
-
146
-
147
-
148
-
149
-
150
-
151
-
152
-
153
-
154
-
155
-
156
-
157
-
158
-
159
-
160
-
161
-
162
-
163
-
164
-
165
-
166
-
167
-
168
-
169
-
170
-
171
-
172
-
173
-
174
-
175
-
176
 |
 |
