Lenovo ThinkPad T500 User Manual - Page 120
CPU, lock; then remove the CPU. - cpu fan
 |
View all Lenovo ThinkPad T500 manuals
Add to My Manuals
Save this manual to your list of manuals |
Page 120 highlights
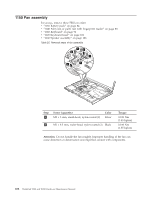
1160 CPU For access, remove these FRUs in order: v "1010 Battery pack" on page 84 v "1040 Palm rest or palm rest with fingerprint reader" on page 88 v "1060 Keyboard" on page 92 v "1120 Keyboard bezel" on page 102 v "1140 Speaker assembly" on page 106 v "1150 Fan assembly" on page 108 Attention: CPU is extremely sensitive. When you service the CPU, avoid any kind of rough handling. Table 27. Removal steps of CPU Rotate the head of the screw in the direction shown by arrow 1 to release the lock; then remove the CPU. 2 1 a b 3 When installing: Place the CPU on the CPU socket a , and then rotate the head of the screw in the direction shown by arrow b to secure the CPU. 112 ThinkPad T500 and W500 Hardware Maintenance Manual
-
 1
1 -
2
-
3
-
4
-
5
-
6
-
7
-
8
-
9
-
10
-
11
-
12
-
13
-
14
-
15
-
16
-
17
-
18
-
19
-
20
-
21
-
22
-
23
-
24
-
25
-
26
-
27
-
28
-
29
-
30
-
31
-
32
-
33
-
34
-
35
-
36
-
37
-
38
-
39
-
40
-
41
-
42
-
43
-
44
-
45
-
46
-
47
-
48
-
49
-
50
-
51
-
52
-
53
-
54
-
55
-
56
-
57
-
58
-
59
-
60
-
61
-
62
-
63
-
64
-
65
-
66
-
67
-
68
-
69
-
70
-
71
-
72
-
73
-
74
-
75
-
76
-
77
-
78
-
79
-
80
-
81
-
82
-
83
-
84
-
85
-
86
-
87
-
88
-
89
-
90
-
91
-
92
-
93
-
94
-
95
-
96
-
97
-
98
-
99
-
100
-
101
-
102
-
103
-
104
-
105
-
106
-
107
-
108
-
109
-
110
-
111
-
112
-
113
-
114
-
 115
115 -
 116
116 -
 117
117 -
 118
118 -
 119
119 -
 120
120 -
 121
121 -
 122
122 -
 123
123 -
 124
124 -
 125
125 -
126
-
127
-
128
-
129
-
130
-
131
-
132
-
133
-
134
-
135
-
136
-
137
-
138
-
139
-
140
-
141
-
142
-
143
-
144
-
145
-
146
-
147
-
148
-
149
-
150
-
151
-
152
-
153
-
154
-
155
-
156
-
157
-
158
-
159
-
160
-
161
-
162
-
163
-
164
-
165
-
166
-
167
-
168
-
169
-
170
-
171
-
172
-
173
-
174
-
175
-
176
-
177
-
178
-
179
-
180
-
181
-
182
-
183
-
184
-
185
-
186
-
187
-
188
-
189
-
190
-
191
-
192
-
193
-
194
-
195
-
196
-
197
-
198
-
199
-
200
-
201
-
202
-
203
-
204
-
205
-
206
-
207
-
208
-
209
-
210
-
211
-
212
-
213
-
214
-
215
-
216
-
217
-
218
-
219
-
220
-
221
-
222
-
223
-
224
-
225
-
226
-
227
-
228
-
229
-
230
-
231
-
232
-
233
-
234
-
235
-
236
-
237
-
238
-
239
-
240
-
241
-
242
-
243
-
244
-
245
-
246
-
247
-
248
-
249
-
250
-
251
-
252
-
253
-
254
-
255
-
256
-
257
-
258
-
259
-
260
-
261
-
262
-
263
-
264
-
265
-
266
-
267
-
268
-
269
-
270
-
271
-
272
 |
 |

1160 CPU
For access, remove these FRUs in order:
v
“1010 Battery pack” on page 84
v
“1040 Palm rest or palm rest with fingerprint reader” on page 88
v
“1060 Keyboard” on page 92
v
“1120 Keyboard bezel” on page 102
v
“1140 Speaker assembly” on page 106
v
“1150 Fan assembly” on page 108
Attention:
CPU is extremely sensitive. When you service the CPU, avoid any
kind of rough handling.
Table 27. Removal steps of CPU
Rotate the head of the screw in the direction shown by arrow
±1²
to release the
lock; then remove the CPU.
3
1
b
a
2
When installing:
Place the CPU on the CPU socket
±a²
, and then rotate the head
of the screw in the direction shown by arrow
±b²
to secure the CPU.
112
ThinkPad T500 and W500 Hardware Maintenance Manual