Lenovo ThinkPad X60s Hardware Maintenance Manual - Page 86
systems, wireless, antenna, cable, connection, ThinkPad, computers, installing
 |
View all Lenovo ThinkPad X60s manuals
Add to My Manuals
Save this manual to your list of manuals |
Page 86 highlights
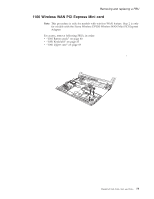
Removing and replacing a FRU For systems with 802.11n wireless LAN 3rd antenna cable connection For ThinkPad X60 and X60s computers: For ThinkPad X61 and X61s computers: 2 2 3 Step 2 Screw (quantity) M2 × 2.5 mm, wafer-head, nylon-coated (2) Color Silver Torque 0.157 Nm (1.6 kgfcm) When installing: If you are installing a 802.11a/b/g or 802.11b/g card, first insert the connector end of the white cable into a plastic cable bag and affix the cable to the mainboard with tape. Then insert the card, and attach the grey cable to the left connector, and the black cable to the right connector on the card. 80 ThinkPad® X60, X60s, X61, and X61s
-
 1
1 -
2
-
3
-
4
-
5
-
6
-
7
-
8
-
9
-
10
-
11
-
12
-
13
-
14
-
15
-
16
-
17
-
18
-
19
-
20
-
21
-
22
-
23
-
24
-
25
-
26
-
27
-
28
-
29
-
30
-
31
-
32
-
33
-
34
-
35
-
36
-
37
-
38
-
39
-
40
-
41
-
42
-
43
-
44
-
45
-
46
-
47
-
48
-
49
-
50
-
51
-
52
-
53
-
54
-
55
-
56
-
57
-
58
-
59
-
60
-
61
-
62
-
63
-
64
-
65
-
66
-
67
-
68
-
69
-
70
-
71
-
72
-
73
-
74
-
75
-
76
-
77
-
78
-
79
-
80
-
 81
81 -
 82
82 -
 83
83 -
 84
84 -
 85
85 -
 86
86 -
 87
87 -
 88
88 -
 89
89 -
 90
90 -
 91
91 -
92
-
93
-
94
-
95
-
96
-
97
-
98
-
99
-
100
-
101
-
102
-
103
-
104
-
105
-
106
-
107
-
108
-
109
-
110
-
111
-
112
-
113
-
114
-
115
-
116
-
117
-
118
-
119
-
120
-
121
-
122
-
123
-
124
-
125
-
126
-
127
-
128
-
129
-
130
-
131
-
132
-
133
-
134
-
135
-
136
-
137
-
138
-
139
-
140
-
141
-
142
-
143
-
144
-
145
-
146
-
147
-
148
-
149
-
150
-
151
-
152
-
153
-
154
-
155
-
156
-
157
-
158
-
159
-
160
-
161
-
162
-
163
-
164
-
165
-
166
-
167
-
168
-
169
-
170
-
171
-
172
-
173
-
174
-
175
-
176
-
177
-
178
-
179
-
180
-
181
-
182
-
183
-
184
-
185
-
186
-
187
-
188
-
189
-
190
-
191
-
192
-
193
-
194
-
195
-
196
-
197
-
198
-
199
-
200
-
201
-
202
-
203
-
204
-
205
-
206
-
207
-
208
-
209
-
210
-
211
-
212
-
213
-
214
-
215
-
216
-
217
-
218
-
219
-
220
-
221
-
222
-
223
-
224
-
225
-
226
-
227
-
228
-
229
-
230
-
231
-
232
-
233
-
234
-
235
-
236
-
237
-
238
-
239
-
240
-
241
-
242
 |
 |
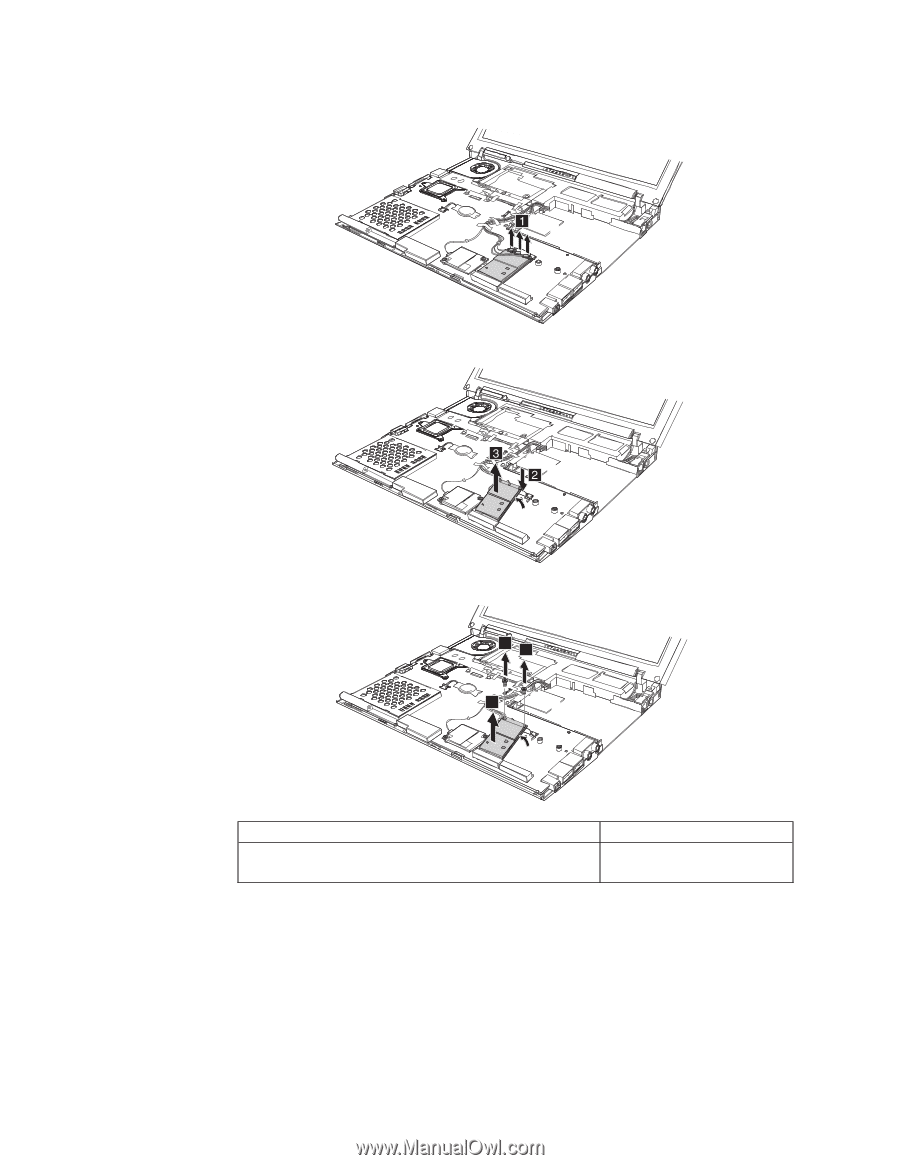
For
systems
with
802.11n
wireless
LAN
3rd
antenna
cable
connection
For
ThinkPad
X60
and
X60s
computers:
For
ThinkPad
X61
and
X61s
computers:
3
2
2
Step
Screw
(quantity)
Color
Torque
±2²
M2
×
2.5
mm,
wafer-head,
nylon-coated
(2)
Silver
0.157
Nm
(1.6
kgfcm)
When
installing:
If
you
are
installing
a
802.11a/b/g
or
802.11b/g
card,
first
insert
the
connector
end
of
the
white
cable
into
a
plastic
cable
bag
and
affix
the
cable
to
the
mainboard
with
tape.
Then
insert
the
card,
and
attach
the
grey
cable
to
the
left
connector,
and
the
black
cable
to
the
right
connector
on
the
card.
Removing
and
replacing
a
FRU
80
ThinkPad
®
X60,
X60s,
X61,
and
X61s