Lenovo ThinkServer RD330 (English) Installation and User Guide - Page 83
Installing, removing, or replacing hardware, Removing and reinstalling the rack handles, Attention
 |
View all Lenovo ThinkServer RD330 manuals
Add to My Manuals
Save this manual to your list of manuals |
Page 83 highlights
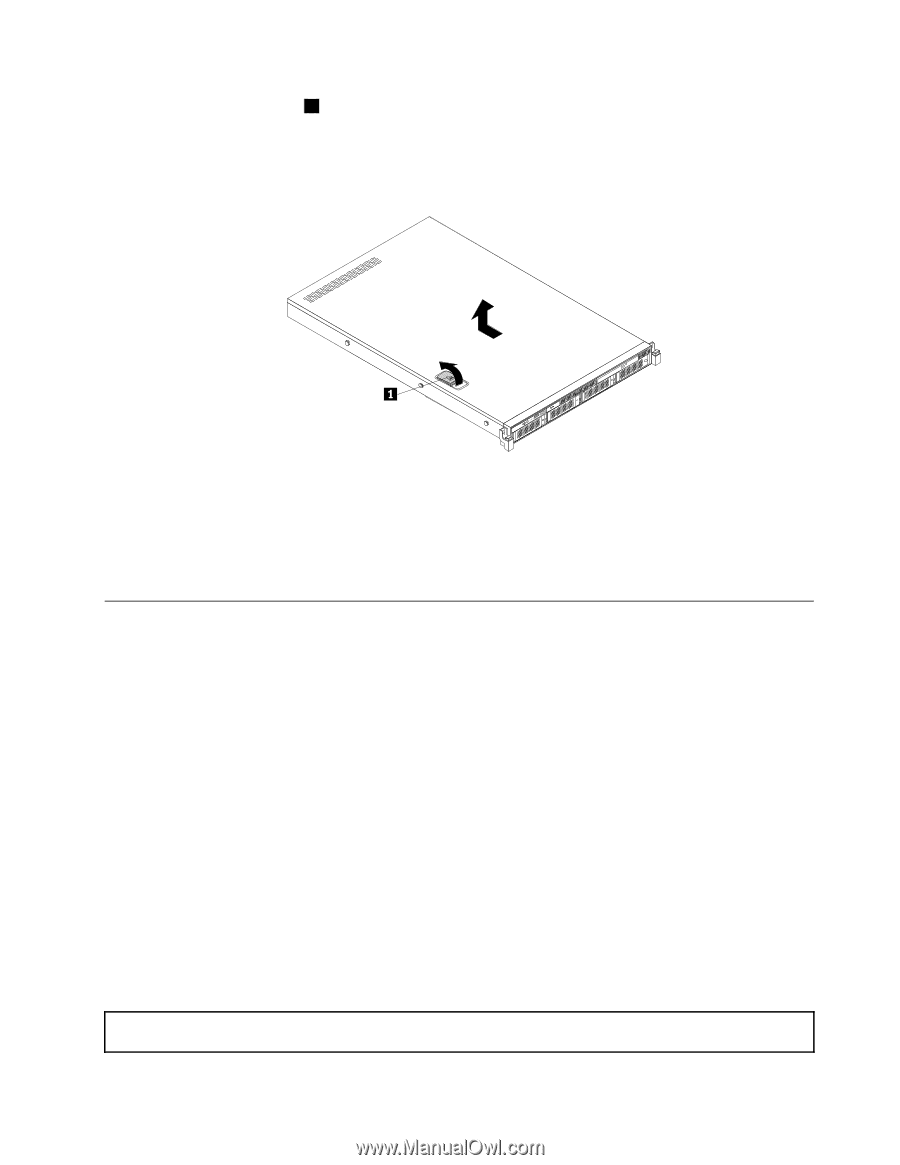
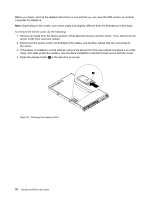
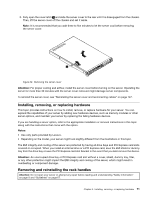
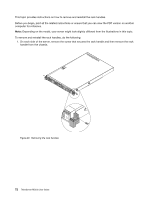
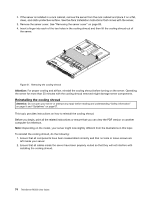
5. Fully open the cover latch 1 and slide the server cover to the rear until it is disengaged from the chassis. Then, lift the server cover off the chassis and set it aside. Note: It is recommended that you wait three to five minutes to let the server cool before removing the server cover. PSU Mem CPU ID Figure 28. Removing the server cover Attention: For proper cooling and airflow, install the server cover before turning on the server. Operating the server for more than 30 minutes with the server cover removed might damage server components. To reinstall the server cover, see "Reinstalling the server cover and reconnecting cables" on page 147. Installing, removing, or replacing hardware This topic provides instructions on how to install, remove, or replace hardware for your server. You can expand the capabilities of your server by adding new hardware devices, such as memory modules or other server options, and maintain your server by replacing the failing hardware devices. If you are handling a server option, refer to the appropriate installation or removal instructions in this topic along with the instructions that come with the option. Notes: • Use only parts provided by Lenovo. • Depending on the model, your server might look slightly different from the illustrations in this topic. The EMI integrity and cooling of the server are protected by having all drive bays and PCI Express card slots covered or occupied. When you install an internal drive or a PCI Express card, save the EMI shield or dummy tray from the drive bay or save the PCI Express card slot bracket in the event that you later remove the device. Attention: An unoccupied drive bay or PCI Express card slot without a cover, shield, dummy tray, filler, or any other protection might impact the EMI integrity and cooling of the server, which might result in overheating or component damage. Removing and reinstalling the rack handles Attention: Do not open your server or attempt any repair before reading and understanding "Safety information" on page iii and "Guidelines" on page 67. Chapter 6. Installing, removing, or replacing hardware 71
-
 1
1 -
2
-
3
-
4
-
5
-
6
-
7
-
8
-
9
-
10
-
11
-
12
-
13
-
14
-
15
-
16
-
17
-
18
-
19
-
20
-
21
-
22
-
23
-
24
-
25
-
26
-
27
-
28
-
29
-
30
-
31
-
32
-
33
-
34
-
35
-
36
-
37
-
38
-
39
-
40
-
41
-
42
-
43
-
44
-
45
-
46
-
47
-
48
-
49
-
50
-
51
-
52
-
53
-
54
-
55
-
56
-
57
-
58
-
59
-
60
-
61
-
62
-
63
-
64
-
65
-
66
-
67
-
68
-
69
-
70
-
71
-
72
-
73
-
74
-
75
-
76
-
77
-
 78
78 -
 79
79 -
 80
80 -
 81
81 -
 82
82 -
 83
83 -
 84
84 -
 85
85 -
 86
86 -
 87
87 -
 88
88 -
89
-
90
-
91
-
92
-
93
-
94
-
95
-
96
-
97
-
98
-
99
-
100
-
101
-
102
-
103
-
104
-
105
-
106
-
107
-
108
-
109
-
110
-
111
-
112
-
113
-
114
-
115
-
116
-
117
-
118
-
119
-
120
-
121
-
122
-
123
-
124
-
125
-
126
-
127
-
128
-
129
-
130
-
131
-
132
-
133
-
134
-
135
-
136
-
137
-
138
-
139
-
140
-
141
-
142
-
143
-
144
-
145
-
146
-
147
-
148
-
149
-
150
-
151
-
152
-
153
-
154
-
155
-
156
-
157
-
158
-
159
-
160
-
161
-
162
-
163
-
164
-
165
-
166
-
167
-
168
-
169
-
170
-
171
-
172
-
173
-
174
-
175
-
176
-
177
-
178
-
179
-
180
-
181
-
182
-
183
-
184
-
185
-
186
-
187
-
188
-
189
-
190
-
191
-
192
 |
 |