Lexmark 12N0008 Finisher Setup and User's Guide - Page 40
Solving other problems, Staple Jam, Check Area H, Clear Staple Job, From Finisher, Requested Env
 |
UPC - 734646560085
View all Lexmark 12N0008 manuals
Add to My Manuals
Save this manual to your list of manuals |
Page 40 highlights
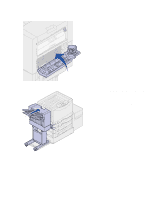
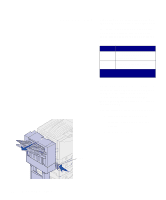
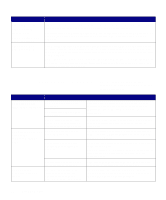
Message 210 Staple Jam Check Area H alternates with Clear Staple Job From Finisher Requested Env Not Supported Solution This message indicates a staple jam has occurred inside the finisher. Open the stapler door, remove the paper from accumulator area, and clear the staple jam. For information on removing the paper from the accumulator, see "Accumulator area" on page 51. For information on clearing the staple jam, see "Clearing staple jams" on page 56. This message indicates a request to print an envelope other than C5 or B5 was sent to the printer with the finisher attached. The message displays for 5 seconds and then is removed. The printer prints the information for the nonsupported envelope onto the print media in tray 1. Note: You receive this message if you are trying to print envelope sizes other than C5 or B5 with the finisher attached to the printer. To print envelopes other than C5 or B5, see "Printing envelopes" on page 38. Solving other problems Use the following table to find solutions to other problems with the optional finisher. Symptom Cause Paper frequently The finisher and printer are jams in the finisher. misaligned. The printer and finisher have been moved. You are trying to staple, hole punch, or offset print jobs on print media other than paper. The printer does not print to the requested output bin. The finisher cables are not connected properly. Your printer driver and the operator panel settings are different. The paper jam message will not clear. You are trying to send a print job to the wrong output bin. The cover is not closed, the finisher is not against the printer, or there is paper somewhere in the paper path. Solution Properly align the finisher with the printer. Refer to "Aligning the sides of the finisher" on page 13 and "Aligning the top of the finisher" on page 15 for instructions. Restrict use of the finisher to plain paper. You cannot hole punch transparencies, card stock, labels, or envelopes. Check the cable connections. Refer to "Attaching the cables" on page 17 for instructions on connecting the finisher to the printer. Make sure your printer driver is set to direct the output to the bin you want. Printer settings selected from a software application or driver override default settings selected from the operator panel. Card stock, transparencies, and hole punch jobs are sent to bin 1. Stapled jobs are sent to bin 2. Open and close the top cover and make sure the finisher is locked onto the docking pins. Recheck the finisher and printer for additional jams. 36 Troubleshooting
-
 1
1 -
2
-
3
-
4
-
5
-
6
-
7
-
8
-
9
-
10
-
11
-
12
-
13
-
14
-
15
-
16
-
17
-
18
-
19
-
20
-
21
-
22
-
23
-
24
-
25
-
26
-
27
-
28
-
29
-
30
-
31
-
32
-
33
-
34
-
 35
35 -
 36
36 -
 37
37 -
 38
38 -
 39
39 -
 40
40 -
 41
41 -
 42
42 -
 43
43 -
 44
44 -
 45
45 -
46
-
47
-
48
-
49
-
50
-
51
-
52
-
53
-
54
-
55
-
56
-
57
-
58
-
59
-
60
-
61
-
62
-
63
-
64
-
65
-
66
-
67
-
68
-
69
-
70
 |
 |
