Lexmark 12N0008 Finisher Setup and User's Guide - Page 60
Clearing staple jams, Staple Jam Check, Area H
 |
UPC - 734646560085
View all Lexmark 12N0008 manuals
Add to My Manuals
Save this manual to your list of manuals |
Page 60 highlights
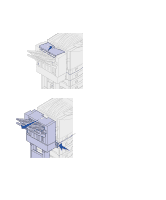
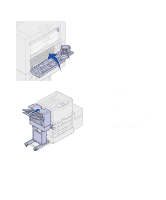
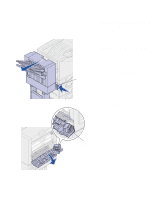
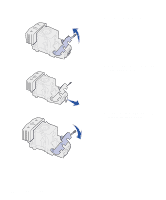
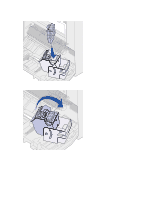
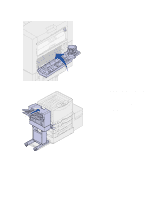
Clearing staple jams Latch If your print job is not stapled, make sure you have selected the Staple value from the Finishing Menu of your printer driver or the printer operator panel. If the correct menu value has been selected and the job does not staple, or you received a 210 Staple Jam Check Area H message, use the following steps to remove and clear the stapler: 1 Push the latch in and hold it. 2 Roll the finisher away from the printer. 3 Release the latch. 4 Open the stapler door. Stapler 56 Troubleshooting
-
 1
1 -
2
-
3
-
4
-
5
-
6
-
7
-
8
-
9
-
10
-
11
-
12
-
13
-
14
-
15
-
16
-
17
-
18
-
19
-
20
-
21
-
22
-
23
-
24
-
25
-
26
-
27
-
28
-
29
-
30
-
31
-
32
-
33
-
34
-
35
-
36
-
37
-
38
-
39
-
40
-
41
-
42
-
43
-
44
-
45
-
46
-
47
-
48
-
49
-
50
-
51
-
52
-
53
-
54
-
 55
55 -
 56
56 -
 57
57 -
 58
58 -
 59
59 -
 60
60 -
 61
61 -
 62
62 -
 63
63 -
 64
64 -
 65
65 -
66
-
67
-
68
-
69
-
70
 |
 |

56
Troubleshooting
Clearing staple jams
If your print job is not stapled, make sure
you have selected the Staple value from
the Finishing Menu of your printer driver
or the printer operator panel.
If the correct menu value has been
selected and the job does not staple, or
you received a
210 Staple Jam Check
Area H
message, use the following
steps to remove and clear the stapler:
1
Push the latch in and hold it.
2
Roll the finisher away from the
printer.
3
Release the latch.
4
Open the stapler door.
Latch
Stapler