Lexmark 4079 Service Manual - Page 51
toMAP, necessary.
 |
UPC - 734646106450
View all Lexmark 4079 manuals
Add to My Manuals
Save this manual to your list of manuals |
Page 51 highlights
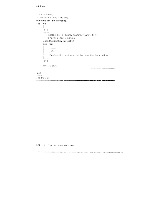
Ink Flow 003 1 Is the purge assembly motor operating normally? Yes No 004 Replace the purge unit. 005 Are the carriage waste lines full of ink at the purge assembly connector? Yes No 006 Replace the ink supply assembly (Asm. 10-1). 007 Is ink flowing through the large purge waste lines when the purge motor runs? Yes No 0081 Replace the purge unit. 009 Is ink leaking from the ink cartridge assembly or into the bottom pan? Yes No 010 Run a Long Cleaning and go to"MAP 0220: Print Quality - on page 2-46 . 011j -- Check and replace the ink cartridge assembly waste lines 4Asm 14-3) or ink cartridge, as necessary. (Step 011 continues) Diagnostic Information 2-31
-
 1
1 -
2
-
3
-
4
-
5
-
6
-
7
-
8
-
9
-
10
-
11
-
12
-
13
-
14
-
15
-
16
-
17
-
18
-
19
-
20
-
21
-
22
-
23
-
24
-
25
-
26
-
27
-
28
-
29
-
30
-
31
-
32
-
33
-
34
-
35
-
36
-
37
-
38
-
39
-
40
-
41
-
42
-
43
-
44
-
45
-
 46
46 -
 47
47 -
 48
48 -
 49
49 -
 50
50 -
 51
51 -
 52
52 -
 53
53 -
 54
54 -
 55
55 -
 56
56 -
57
-
58
-
59
-
60
-
61
-
62
-
63
-
64
-
65
-
66
-
67
-
68
-
69
-
70
-
71
-
72
-
73
-
74
-
75
-
76
-
77
-
78
-
79
-
80
-
81
-
82
-
83
-
84
-
85
-
86
-
87
-
88
-
89
-
90
-
91
-
92
-
93
-
94
-
95
-
96
-
97
-
98
-
99
-
100
-
101
-
102
-
103
-
104
-
105
-
106
-
107
-
108
-
109
-
110
-
111
-
112
-
113
-
114
-
115
-
116
-
117
-
118
-
119
-
120
-
121
-
122
-
123
-
124
-
125
-
126
-
127
-
128
-
129
-
130
-
131
-
132
-
133
-
134
-
135
-
136
-
137
-
138
-
139
-
140
-
141
-
142
-
143
-
144
-
145
-
146
-
147
-
148
-
149
-
150
-
151
-
152
-
153
-
154
-
155
-
156
-
157
-
158
-
159
-
160
-
161
-
162
-
163
-
164
-
165
-
166
-
167
-
168
-
169
-
170
-
171
-
172
-
173
-
174
-
175
-
176
-
177
-
178
-
179
-
180
-
181
-
182
-
183
-
184
-
185
-
186
-
187
-
188
-
189
-
190
-
191
-
192
-
193
-
194
-
195
-
196
-
197
-
198
-
199
-
200
-
201
-
202
-
203
-
204
-
205
-
206
-
207
-
208
-
209
-
210
-
211
-
212
-
213
-
214
-
215
-
216
-
217
-
218
-
219
-
220
-
221
-
222
-
223
-
224
-
225
-
226
-
227
-
228
-
229
-
230
-
231
-
232
 |
 |

Ink
Flow
003
1
Is
the
purge
assembly
motor
operating
normally?
Yes
No
004
Replace
the
purge
unit.
005
Are
the
carriage
waste
lines
full
of
ink
at
the
purge
assembly
connector?
Yes
No
006
Replace
the
ink
supply
assembly
(Asm.
10-1).
007
Is
ink
flowing
through
the
large
purge
waste
lines
when
the
purge
motor
runs?
Yes
No
0081
Replace
the
purge
unit.
009
Is
ink
leaking
from
the
ink
cartridge
assembly
or
into
the
bottom
pan?
Yes
No
010
Run
a
Long
Cleaning
and
go
to"MAP
0220:
Print
Quality
-
on
page
2-46
.
011j
--
Check
and
replace
the
ink
cartridge
assembly
waste
lines
4Asm
14-3)
or
ink
cartridge,
as
necessary.
(Step
011
continues)
Diagnostic
Information
2-31