Lexmark C540 Quick Reference - Page 2
Loading the 650-sheet duo drawer, Using the multipurpose feeder
 |
View all Lexmark C540 manuals
Add to My Manuals
Save this manual to your list of manuals |
Page 2 highlights
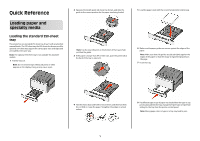
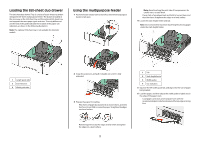
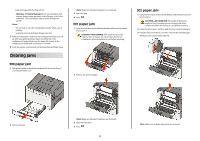
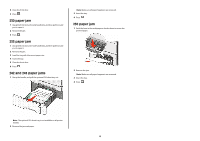
Loading the 650-sheet duo drawer The 650-sheet duo drawer (Tray 2) consists of a 550-sheet tray and an integrated 100-sheet multipurpose feeder. The drawer is loaded in the same way as the 250-sheet tray and the optional 550-sheet tray, and supports the same paper types and sizes. The only differences are the look of the guide tabs and the location of the paper size indicators, as shown in the following illustration: Note: The optional 550-sheet tray is not available for all printer models. Using the multipurpose feeder 1 Push the feeder release latch to the left to allow the multipurpose feeder to fall open. Note: Avoid touching the print side of transparencies. Be careful not to scratch them. • Flex a stack of envelopes back and forth to loosen them, and then fan them. Straighten the edges on a level surface. 4 Locate the stack height limiter and tab. Note: Do not exceed the maximum stack height by forcing paper under the stack height limiter. 1 Length guide tabs 2 Size indicators 3 Width guide tabs 2 Grasp the extension, and pull it straight out until it is fully extended. 3 Prepare the paper for loading. • Flex sheets of paper back and forth to loosen them, and then fan them. Do not fold or crease the paper. Straighten the edges on a level surface. 1 Tab 2 Stack height limiter 3 Width guides 4 Size indicators 5 Squeeze the left width guide tab, and align it for the size of paper being loaded. 6 Load the paper, and then adjust the width guide to lightly touch the edge of the paper stack. • Load paper, card stock, and transparencies with the recommended print side facedown and the top edge entering first. • Hold transparencies by the edges and fan them. Straighten the edges on a level surface. 2
-
 1
1 -
 2
2 -
 3
3 -
 4
4
 |
 |
