Lexmark E220 Setup Guide
Lexmark E220 Manual
 |
View all Lexmark E220 manuals
Add to My Manuals
Save this manual to your list of manuals |
Lexmark E220 manual content summary:
- Lexmark E220 | Setup Guide - Page 1
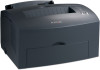
E220 Printer Setup Guide September 2003 www.lexmark.com - Lexmark E220 | Setup Guide - Page 2
described in the operating instructions, to a professional service person. • This product is designed, tested, and approved to meet strict global safety standards with the use of specific Lexmark components. The safety features of some parts may not always be obvious. Lexmark is not responsible for - Lexmark E220 | Setup Guide - Page 3
printer side cover 8 Removing the system board shield 10 Installing a memory card 10 Reinstalling the system board shield 12 Reattaching the printer side cover 13 Step 5: Load paper 14 Loading tray 1 15 Loading the optional 250-sheet tray 18 Loading the manual feed 21 Step 6: Attach cables - Lexmark E220 | Setup Guide - Page 4
Parallel cable 25 Step 7: Install drivers for local printing 26 Windows 27 Macintosh 31 UNIX/Linux 32 Step 8: Verify printer setup 34 Turning on the printer 34 Printing a setup page 34 Step 9: Distribute information to users 35 Identifying printer users 35 Locating helpful information 35 - Lexmark E220 | Setup Guide - Page 5
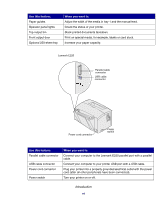
Introduction About the printer Paper support Top output bin Tray 1 Paper support Manual feed Paper guide Front output door Optional 250-sheet tray Operator panel lights Use this feature: Tray 1 Paper support Manual feed When you want to: Load up to 150 sheets of paper or 10 sheets of other - Lexmark E220 | Setup Guide - Page 6
the media in tray 1 and the manual feed. Check the status of your printer. Stack printed documents facedown. Print on special media, for example, labels or card stock. Increase your paper capacity. Lexmark E220 Parallel cable connector USB cable connector Power cord connector Power switch Use - Lexmark E220 | Setup Guide - Page 7
with the Setup Guide, provides information about choosing media, understanding the operator panel lights, clearing paper jams, and solving printing problems. The information on the publications CD is also available on Lexmark's Web site at www.lexmark.com/publications. The printer Quick Reference - Lexmark E220 | Setup Guide - Page 8
1: Unpack the printer Power cord Overlay Drivers CD Setup Guide and publications CD Quick Reference card Note: The Lexmark E220 comes with a 1,500-page starter print cartridge. Unpack the printer 1 1 Select a location for your printer. • Leave enough room to open the printer cover, output - Lexmark E220 | Setup Guide - Page 9
If any items are missing or damaged, refer to our Lexmark Web site at www.lexmark.com for the designated Lexmark support phone number for your country or region. Save the carton and packing material in case you need to repack the printer. Attaching an operator panel overlay If you have a non- - Lexmark E220 | Setup Guide - Page 10
2: Install the optional 250sheet drawer Support unit Tray You can increase paper capacity with the optional 250-sheet drawer, which attaches underneath the printer. A drawer consists of a tray and a support unit. 1 Remove the tray from the support unit. 2 Remove all packing material and tape from - Lexmark E220 | Setup Guide - Page 11
installing it. 4 Align the printer with the front of the support unit and place it on top of the support unit. Make sure the support unit is firmly in place. When you complete setting up the printer, print a menu settings page to verify the 250-sheet drawer is listed under Installed Features (see - Lexmark E220 | Setup Guide - Page 12
Installing the print cartridge Removing print cartridge packaging 1 Use the finger tab to pull down the printer cover. Cartridge handle 2 Grasp the cartridge handle and pull the print cartridge straight up. 3 Remove the protective foam packaging from the print cartridge. Install printer supplies - Lexmark E220 | Setup Guide - Page 13
4 Pull off the plastic piece attached to the ends of the print cartridge. Discard the plastic piece, foam, and paper. Note: Do not touch the photoconductor drum on the bottom of the print cartridge. 5 Shake the cartridge to distribute the toner evenly. Install printer supplies 6 - Lexmark E220 | Setup Guide - Page 14
arrows in the printer. b Holding the cartridge by the handle, tilt the cartridge down and guide it between the print cartridge grooves. c Push down on the cartridge until it is firmly in place. 7 Close the printer cover. What do I do next? Task Install memory cards Load paper Go to page - Lexmark E220 | Setup Guide - Page 15
are installing memory cards sometime after setting up the printer, turn the printer off and unplug the power cord before continuing. You can customize your printer memory capacity and connectivity by adding optional cards. Removing the printer side cover Before installing any memory options, you - Lexmark E220 | Setup Guide - Page 16
2 Firmly push in the two oval tabs as you pull open the side cover. 3 Gently pull off the cover and set it aside. Install memory cards 9 - Lexmark E220 | Setup Guide - Page 17
aside. 2 Loosen the bottom three screws, but do not remove them. 3 Slide the system board shield along the top and bottom grooves and set it aside. Installing a memory card Follow the instructions in this section to install a printer memory card. The system board has two connectors for optional - Lexmark E220 | Setup Guide - Page 18
the steps in "Removing the system board shield" on page 10. 2 Unpack the printer memory card. Avoid touching the connection points along the edge of the card. Save the packaging. Latch 3 Align the notches on the bottom of the card with the notches on the connector. 4 Guide the card between the - Lexmark E220 | Setup Guide - Page 19
Reinstalling the system board shield 1 Align the metal shield between the top and bottom grooves and slide it all the way back. 2 Tighten the bottom three screws and reattach the top screw to keep the shield in place. Install memory cards 12 - Lexmark E220 | Setup Guide - Page 20
Reattaching the printer side cover Tab 1 Align the top and bottom tabs with the corresponding slots. 2 As you close the printer side cover, push the oval tabs firmly into the slots. 3 Close the printer front cover. Tab Install memory cards 13 - Lexmark E220 | Setup Guide - Page 21
Paper support Top output bin Tray 1 Paper support Manual feed Front output door Optional 250-sheet tray Your printer has two standard paper sources: tray 1, which holds up to 150 sheets of plain paper, and a single-sheet manual feed. Use tray 1 for most print jobs. Use the manual feed to feed - Lexmark E220 | Setup Guide - Page 22
Loading tray 1 Use tray 1, which is behind the manual feed, to feed paper and special media. Tray 1 holds up to 150 sheets of paper, 10 sheets of transparencies or labels,10 envelopes, or 10 sheets of card stock. 1 Extend the rear paper support until you hear a click. 2 Flex the sheets back and - Lexmark E220 | Setup Guide - Page 23
, flap side down with the stamp area in the top left corner To reduce paper jams, do not use envelopes that: - Have excessive curl - Are stuck together - Are damaged in any way - Contain windows, holes, perforations, cutouts, or embossing - Use metal clasps, string ties, or metal folding bars - Lexmark E220 | Setup Guide - Page 24
media. 7 Slide the paper guides against the edges of the paper or envelopes. 8 Select the paper size and type from your software application. 9 Select the number of copies from your software application or printer driver if you are printing multiple copies. 10 Start your print job. Note: If you - Lexmark E220 | Setup Guide - Page 25
tray 1 Grasp the tabs on either side of the tray and pull it completely out of the printer. 2 Make sure the metal plate is pressed down before inserting the tray into the printer. After the tray is inserted, the metal plate springs back up so the paper can feed into the printer. Load paper 18 - Lexmark E220 | Setup Guide - Page 26
or legal size paper, extend the paper support on the front of the tray. 4 Flex the sheets back and forth to loosen them, fan the sheets on all four sides, and flex them again. 5 If loading letterhead paper, insert letterhead facedown with the top of the page entering the printer first. Load paper 19 - Lexmark E220 | Setup Guide - Page 27
. 6 Make sure the paper is under both corner bucklers and lying flat in the tray. Corner bucklers Note: When you load the tray, do not exceed the maximum stack height indicated by the label in the tray. Overfilling the tray may cause paper jams. 7 Slide the paper guides flush against the edges - Lexmark E220 | Setup Guide - Page 28
application. 10 Start your print job. Loading the manual feed Use the manual feed to feed media, one sheet at a time, into your printer. If you experience problems feeding envelopes or card stock in tray 1, try printing them one at a time from the manual feed. 1 Extend the front paper support on - Lexmark E220 | Setup Guide - Page 29
To reduce paper jams, do not use envelopes that: - Have excessive curl - Are stuck together - Are damaged in any way - Contain windows, holes, the paper guides flush against the edges of the paper or envelope. 6 Select the paper size and type from your software application. 7 Start your print job - Lexmark E220 | Setup Guide - Page 30
Ready/Data Toner Low Load Paper Paper Jam Error Press Continue Continue Cancel 9 When the Load Paper light and the Press Continue light come on, place another piece of media in the manual feed. 10 Press and release Continue to print another page. Load paper 23 - Lexmark E220 | Setup Guide - Page 31
to your computer operating system documentation to see if your system supports USB. To attach the printer to a computer: 1 Connect the printer to the computer using a USB or parallel cable. A USB port requires a USB cable such as Lexmark part number 12A2405 (2 m [6.5 ft]). Be sure to match the USB - Lexmark E220 | Setup Guide - Page 32
Parallel cable 4 Turn on your computer and any other peripherals. 5 Go to "Install drivers for local printing" on page 26. A parallel port requires an IEEE-1284 compliant parallel cable such as Lexmark part number 1329605 (3 m [10 ft]) or 1427498 (6 m [20 ft]). Attach cables 25 - Lexmark E220 | Setup Guide - Page 33
printing A local printer is a printer attached to your computer using a USB or parallel cable. For Windows operating systems, you can use the hardware wizard and use the drivers CD to install your printer drivers. Launch the CD and follow the instructions to install printer software. A printer - Lexmark E220 | Setup Guide - Page 34
created and appear in the Printers folder. Using Windows XP with USB or parallel cable Note: Business versions of Windows XP require that you have administrative access to install printer drivers on your computer. In addition to the following driver installation instructions, you may need to refer - Lexmark E220 | Setup Guide - Page 35
Windows 2000 with USB or parallel cable Note: You need administrative access to install printer drivers on your computer. Using Windows Me with USB or parallel cable Note: Depending on the software and printers already installed on your computer, your screens may vary from those in the instructions - Lexmark E220 | Setup Guide - Page 36
Using Windows 98 with a USB or parallel cable Note: Depending on the software and printers already installed on your computer, your screens may vary from those in the instructions. 5 Select your printer and driver from the list, and then click OK. Make sure you select the driver in the correct - Lexmark E220 | Setup Guide - Page 37
NT operating systems. Note: You need administrative access to install printer drivers on your computer. Using Windows 95 with a parallel cable Note: USB support is not available for Windows 95 operating systems. 10 Select Yes to print a test page, and then click Finish. All the necessary files - Lexmark E220 | Setup Guide - Page 38
. Note: A PPD for your printer is also available in a downloadable software package from Lexmark's Web site at www.lexmark.com. Macintosh OS 8.6 or later is required for USB printing. To print locally to a USB-attached printer you must create a desktop printer icon (Macintosh 8.6-9.x) or create - Lexmark E220 | Setup Guide - Page 39
Printer List, you can quit Print Center. UNIX/Linux Your printer supports local printing on many UNIX and Linux platforms, such as Sun Solaris and Red Hat. The Sun Solaris and Linux packages are available on the drivers CD and on the Lexmark Web site at www.lexmark.com. The User's Guide Install - Lexmark E220 | Setup Guide - Page 40
in each package gives detailed instructions for installing and using Lexmark printers in UNIX and Linux environments. All the printer driver packages support local printing using a parallel connection. The driver package for Sun Solaris supports USB connections to Sun Ray appliances and Sun - Lexmark E220 | Setup Guide - Page 41
into a properly grounded outlet. 2 Turn on the printer. All indicator lights cycle (each light blinks, from top to bottom, and then cycles again). Print a menu settings page for a list of current printer settings: 1 Press and release Continue to print the page. 2 On the menu settings page: • Verify - Lexmark E220 | Setup Guide - Page 42
Tips for successful printing • Ways to improve print quality • Information about using the printer operator panel • Instructions for replacing supplies • Solutions to common printing problems • Methods for clearing paper jams • Overview of printer menus • Explanation of printer messages Distribute - Lexmark E220 | Setup Guide - Page 43
the CD (or just specific topics) to a shared network drive or intranet site. • Each topic on the publications CD is a separate PDF. Launch the CD, click Other resources, and then click File locations. • Send Lexmark's printer documentation URL to printer users (www.lexmark.com/publications). Users - Lexmark E220 | Setup Guide - Page 44
operator panel lights Ready/Data Toner Low Load Paper Paper Jam Error Press Continue Continue Cancel The operator panel lights mean different things, depending on their sequence. They indicate that the printer is ready to print, the printer needs intervention, or the printer needs servicing. Some - Lexmark E220 | Setup Guide - Page 45
off Light is blinking Light is blinking slowly Continue Cancel Press Continue • Press Continue briefly (approximately one second) to restart the printer. • Press and release Continue twice quickly to display an error code. Press Cancel • Press and release Cancel to cancel the job currently printing - Lexmark E220 | Setup Guide - Page 46
/Data Toner Low Load Paper Paper Jam Error Press Continue Continue Cancel Ready/Data Toner Low Load Paper Paper Jam Error Press Continue Continue Cancel The printer is ready to receive and process data. The printer is busy receiving or processing data. Understanding the operator panel lights 39 - Lexmark E220 | Setup Guide - Page 47
Continue Continue Cancel Ready/Data Toner Low Load Paper Paper Jam Error Press Continue Continue Cancel The printer is waiting until additional data is received. Tray 1 or the optional 250-sheet tray is out of media or the media did not feed properly. Understanding the operator panel lights 40 - Lexmark E220 | Setup Guide - Page 48
Cancel Ready/Data Toner Low Load Paper Paper Jam Error Press Continue Continue Cancel The printer prompts you to load another sheet of media in the manual feed. The printer detects a jam. Press and release Continue twice quickly to display the secondary paper jam light sequence. Understanding the - Lexmark E220 | Setup Guide - Page 49
reinsert it. When the print fades or no longer prints satisfactorily, replace the print cartridge. Continue Cancel Note: On the Lexmark E220, the Toner Low light does not come on if the 1,500-page starter print cartridge is installed. Ready/Data Toner Low Load Paper Paper Jam Error Press Continue - Lexmark E220 | Setup Guide - Page 50
Ready/Data Toner Low Load Paper Paper Jam Error Press Continue Continue Cancel The printer has a service error. Turn the printer off and back on. If the lights are still blinking, contact your point of purchase. Understanding the operator panel lights 43 - Lexmark E220 | Setup Guide - Page 51
Troubleshooting tips Problem: What to do: Installing a print cartridge Characters appear light or blurred. • The print cartridge may be low on toner. Replace the cartridge. The printer seems to be printing, but pages • The print cartridge has an error. Replace the cartridge. are blank. The - Lexmark E220 | Setup Guide - Page 52
Problem: The paper fails to feed from tray 1. The paper fails to feed from the optional 250-sheet tray. What to do: • Make sure tray 1 is selected from the printer driver. • Remove the paper from tray 1 and fan the paper. • Make sure optional 250-sheet tray is selected from the printer driver. • - Lexmark E220 | Setup Guide - Page 53
warranty applies to the United States and Canada. For customers outside the U.S. and Canada, refer to the country-specific warranty information that came with your printer. Lexmark E220 This Statement of Limited Warranty applies to this product if it was originally purchased for your use, and not - Lexmark E220 | Setup Guide - Page 54
Lexmark or a Lexmark authorized servicer • Operation of a product beyond the limit of its duty cycle • Failure to have installed a maintenance kit as specified (if applicable) • Use of printing media outside of Lexmark specifications • Use of other than Lexmark supplies (such as toner cartridges - Lexmark E220 | Setup Guide - Page 55
This is a placeholder for the inside back cover. - Lexmark E220 | Setup Guide - Page 56
P/N 21S0260 E.C. 1SP004a Lexmark and Lexmark with diamond design are trademarks of Lexmark International, Inc., registered in the United States and/or other countries. © 2003 Lexmark International, Inc. 740 West New Circle Road Lexington, Kentucky 40550 www.lexmark.com
-
 1
1 -
 2
2 -
 3
3 -
 4
4 -
 5
5 -
 6
6 -
 7
7 -
8
-
9
-
10
-
11
-
12
-
13
-
14
-
15
-
16
-
17
-
18
-
19
-
20
-
21
-
22
-
23
-
24
-
25
-
26
-
27
-
28
-
29
-
30
-
31
-
32
-
33
-
34
-
35
-
36
-
37
-
38
-
39
-
40
-
41
-
42
-
43
-
44
-
45
-
46
-
47
-
48
-
49
-
50
-
51
-
52
-
53
-
54
-
55
-
56
 |
 |

www.lexmark.com
Setup Guide
September 2003
E220 Printer