Lexmark E360DN Troubleshooting Guide - Page 2
Solving option problems - memory
 |
UPC - 734646084475
View all Lexmark E360DN manuals
Add to My Manuals
Save this manual to your list of manuals |
Page 2 highlights
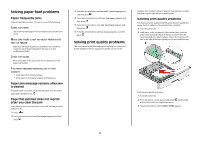
Job prints from the wrong tray or on the wrong paper CHECK THE PAPER TYPE SETTING Make sure the Paper Type setting matches the paper loaded in the tray. Incorrect characters print Make sure the printer is not in Hex Trace mode. If Ready Hex appears on the display, you must exit Hex Trace mode before you can print your job. Turn the printer off and back on to exit Hex Trace mode. Tray linking does not work LOAD THE SAME SIZE AND TYPE OF PAPER IN EACH TRAY 1 Load the same size and type of paper in each tray. 2 Move the paper guides to the correct positions for the paper size loaded in each tray. MAKE SURE THE PAPER SIZE AND PAPER TYPE SETTINGS ARE THE SAME FOR EACH TRAY 1 Print a menu settings page and compare the settings for each tray. 2 If necessary, adjust the settings from the Paper Size/Type menu. Note: None of the paper sources, trays, or feeders automatically sense the paper size. You must set the size from the Paper Size/Type menu on the printer control panel or from the Embedded Web Server. Large jobs do not collate These are possible solutions. Try one or more of the following: MAKE SURE COLLATE IS SET TO ON From Print Properties or the printer control panel Finishing menu, set Collate to On. Note: Setting Collate to Off in the software overrides the setting in the Finishing menu. REDUCE THE COMPLEXITY OF THE PRINT JOB Reduce the complexity of the print job by reducing the number and size of fonts, the number and complexity of images, and the number of pages in the job. MAKE SURE THE PRINTER HAS ENOUGH MEMORY Add printer memory. Unexpected page breaks occur Increase the Print Timeout value: 1 From the printer control panel, press . 2 Press the arrow buttons until Settings appears, and then press . 3 Press the arrow buttons until General Settings appears, and then press . 4 Press the arrow buttons until Timeouts appears, and then press . 5 Press the arrow buttons until Print Timeout appears, and then press . 6 Press the arrow buttons until the value you want appears, and then press . Solving option problems Option does not operate correctly or quits after it is installed These are possible solutions. Try one or more of the following: RESET THE PRINTER Turn the printer off, wait for about 10 seconds, and then turn the printer on. 2 CHECK TO SEE IF THE OPTION IS CONNECTED TO THE PRINTER 1 Turn the printer off. 2 Unplug the printer. 3 Check the connection between the option and the printer. MAKE SURE THE OPTION IS INSTALLED Print a menu settings page and check to see if the option is listed in the Installed Options list. If the option is not listed, reinstall it. MAKE SURE THE OPTION IS SELECTED From the program you are using, select the option. Mac OS 9 users should make sure the printer is set up in the Chooser. Drawers These are possible solutions. Try one or more of the following: MAKE SURE THE PAPER IS LOADED CORRECTLY 1 Pull the tray completely out. 2 Check for paper jams or misfeeds. 3 Make sure the guides are aligned against the edges of the paper. 4 Insert the tray. RESET THE PRINTER Turn the printer off, wait about 10 seconds, and then turn the printer on. Flash memory card Make sure the flash memory card is securely connected to the printer system board. Memory card Make sure the memory card is securely connected to the printer system board.
-
 1
1 -
 2
2 -
 3
3 -
 4
4 -
 5
5 -
 6
6 -
 7
7
 |
 |
